Python CGI编程
发布于 2015-06-21 10:37:51 | 431 次阅读 | 评论: 1 | 来源: 网络整理
CGI是什么?
-
通用网关接口或CGI,是一组定义信息如何在Web服务器和自定义脚本之间交换的标准。
-
CGI规范目前保持是由NCSA 和 NCSA 维护和定义如下。
-
通用网关接口或CGI,是外部网关方案,如HTTP服务器的信息服务器的接口标准。
-
目前的版本是CGI/1.1,而CGI/1.2目前正在定制中。
网页浏览
要了解CGI的概念,让我们看看当点击一个超链接,浏览某一个网页或URL发生什么情况。
-
浏览器触发HTTP Web服务器和网址也就是文件名的请求。
-
Web服务器将解析URL,并寻找,如果找到该文件,然后将其发送回浏览器中的文件名,否则将表示请求了错误文件的错误消息。
-
Web浏览器需要从Web服务器和显示器接收到的文件信息或错误信息的响应。
然而,也可以设置在HTTP服务器,以便每当在某个目录中的文件被请求文件不被发送回;相反,它被执行的程序,无论该程序的输出被发送回浏览器显示。此函数被称为公共网关接口CGI或与程序称为CGI脚本。这些CGI程序可以是一个Python脚本,Perl脚本,Shell脚本,C或C++程序等等。
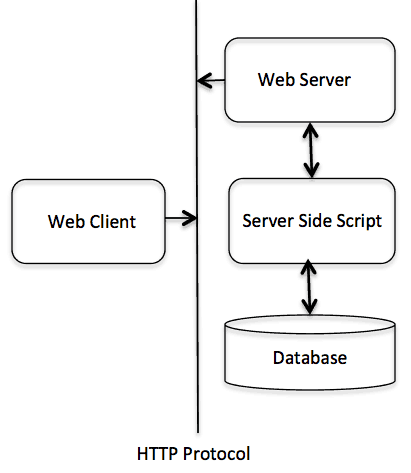
CGI架构图
Web服务器支持与配置
在进行CGI编程之前,请确保Web服务器支持CGI,它被配置为处理CGI程序。所有对由HTTP服务器执行的CGI程序保存在一个预先配置的目录。此目录被称为CGI目录,并按照惯例被命名为/var/www/cgi-bin目录。按照惯例,CGI文件具有扩展名为.cgi,但文件扩展名可以为Python语言脚本 .py。
默认情况下,Linux服务器被配置为只运行在在/var/www/cgi-bin目录中的脚本。如果想指定要运行的CGI脚本任何其他目录,在httpd.conf文件中注释以下几行:
<Directory "/var/www/cgi-bin">
   AllowOverride None
   Options ExecCGI
   Order allow,deny
   Allow from all
</Directory>

<Directory "/var/www/cgi-bin">
Options All
</Directory>
在这里,假设Web服务器能成功运行cgi程序,也可以运行Perl或Shell等任何其它的CGI程序
第一个CGI程序
下面是一个简单的链接,链接到一个名为hello.py CGI脚本。此文件被保存在/var/www/cgi-bin目录,它有以下内容。运行CGI程序之前,请确保有使用chmod 755 hello.py UNIX命令,使文件可执行文件的更改模式。
#!/usr/bin/python

print "Content-type:text/htmlrnrn"
print '<html>'
print '<head>'
print '<title>Hello Word - First CGI Program</title>'
print '</head>'
print '<body>'
print '<h2>Hello Word! This is my first CGI program</h2>'
print '</body>'
print '</html>'
如果单击hello.py,那么这将产生以下的输出:
Hello Word! This is my first CGI program |
hello.py脚本是一个简单的Python脚本,它在标准输出(即屏幕)输出显示文件。还有一个重要的额外功能,第一行要打印Content-type:text/htmlrnrn。这行内容被发送回浏览器和指定内容类型可以在浏览器画面上显示出来。
现在,必须了解CGI的基本概念,可以使用Python编写许多复杂的CGI程序。脚本可以与任何其他外部系统交互还向交换信息,如RDBMS(数据库管理系统)。
HTTP报头
第一行Content-type:text/htmlrnrn 被发送到浏览器,了解内容的HTTP标头的一部分。所有HTTP报头将在下面的表格:
HTTP Field Name: Field Content

For Example
Content-type: text/htmlrnrn
还有其他一些重要的HTTP头,会在CGI程序经常使用。
| 报头 | 描述 |
|---|---|
| Content-type: | 返回MIME字符串,定义文件的格式。例如Content-type:text/html |
| Expires: Date | 日期的信息变为无效。这应该被使用的浏览器,以决定当一个页面需要刷新。有效日期字符串应该是格式1998年1月1日12:00:00 GMT。 |
| Location: URL | 应该返回替代请求URL的URL。可以使用此字段来重定向请求到任何文件。 |
| Last-modified: Date | 资源的最后修改的日期。 |
| Content-length: N | 数据的长度,以字节为单位被返回。浏览器使用这个值来报告预计下载时间的文件。 |
| Set-Cookie: String | 通过设置该字符串传递cookie |
CGI环境变量
所有CGI程序将可使用下面的环境变量。在编写任何CGI程序,这些变量中发挥重要作用。
| Variable Name | 描述 |
|---|---|
| CONTENT_TYPE | 内容的数据类型。当客户端发送内容附加到服务器使用。例如,文件上传等。 |
| CONTENT_LENGTH | 查询信息的长度。它仅适用于POST请求。 |
| HTTP_COOKIE | 返回键和值对的形式设置Cookie。 |
| HTTP_USER_AGENT | 用户代理请求头字段包含有关用户代理发起请求信息。网络浏览器的名称。 |
| PATH_INFO | TCGI脚本的路径。 |
| QUERY_STRING | 被发送GET方法请求URL编码的信息。 |
| REMOTE_ADDR | 远程主机发出请求的IP地址。这可以是用于记录或用于认证的目的是有用的。 |
| REMOTE_HOST | 发出请求的主机的完全合格的名称。如果该信息不可用,则REMOTE_ADDR可用于获得IP地址。 |
| REQUEST_METHOD | 该方法用于制造要求。最常用的方法是GET和POST。 |
| SCRIPT_FILENAME | CGI脚本的完整路径。 |
| SCRIPT_NAME | CGI脚本的名称。 |
| SERVER_NAME | 服务器的主机名或IP地址 |
| SERVER_SOFTWARE | 软件服务器运行的名称和版本。 |
这里是小CGI程序,列出所有的CGI变量,代码内容详细如下:
#!/usr/bin/python

import os

print "Content-type: text/htmlrnrn";
print "<font size=+1>Environment</font><br>";
for param in os.environ.keys():
  print "<b>%20s</b>: %s<br>" % (param, os.environ[param])
GET / POST 方法
当需要从浏览器中传递一些信息到Web服务器中的CGI程序。最常见的是浏览器会使用两种方法二传这个信息给Web服务器。这两个方法分别是GET方法和POST方法。
使用GET方法传递信息:
GET方法将附加在页面请求所编码的用户信息。页面和编码信息是由 ?字符分开如下:
http://www.test.com/cgi-bin/hello.py?key1=value1&key2=value2
GET方法是默认的方法,从浏览器的信息传递到Web服务器和它所产生出现在浏览器的位置,如果是很长的字符串,或如果有密码或其他敏感信息传递给服务器,切勿使用GET方法。 GET方法有大小限制:仅1024个字符可以在请求字符串被发送。 GET方法将使用QUERY_STRING头信息,并会通过QUERY_STRING环境变量的CGI程序访问。
可以通过简单的串联键和值对传递以及任何URL信息,或者可以使用HTML<form>标记使用GET方法来传递信息。
简单URL示例:GET方法
下面是一个简单的URL,它会通过两个值使用GET方法传递给hello_get.py程序。
/cgi-bin/hello_get.py?first_name=ZARA&last_name=ALI
下面是hello_get.py脚本来处理输入Web浏览器显示。要使用CGI模块,这使得它非常容易访问传递信息:
#!/usr/bin/python

# Import modules for CGI handling
import cgi, cgitb

# Create instance of FieldStorage
form = cgi.FieldStorage()

# Get data from fields
first_name = form.getvalue('first_name')
last_name  = form.getvalue('last_name')

print "Content-type:text/htmlrnrn"
print "<html>"
print "<head>"
print "<title>Hello - Second CGI Program</title>"
print "</head>"
print "<body>"
print "<h2>Hello %s %s</h2>" % (first_name, last_name)
print "</body>"
print "</html>"
这将产生以下结果:
Hello ZARA ALI |
简单的表单示例:GET方法
下面是一个简单的例子,通过使用HTML表单和提交按钮两个值。我们将使用相同的CGI脚本hello_get.py来处理这个输入。
<form action="/cgi-bin/hello_get.py" method="get">
First Name: <input type="text" name="first_name">  <br />

Last Name: <input type="text" name="last_name" />
<input type="submit" value="Submit" />
</form>
下面是上述形式的实际输出,输入您名字和姓氏,然后单击提交按钮来查看结果。
使用POST方法传递信息:
将信息传递给CGI程序的一般比较可靠的方法是POST方法。这个包中完全相同的方式作为GET方法的信息,但是,代替发送它作为后一个文本字符串?在URL中,它把它作为一个单独的消息。此消息进入在标准输入表单的CGI脚本。
下面是处理GET和POST方法都使用相同的hello_get.py脚本。
#!/usr/bin/python

# Import modules for CGI handling
import cgi, cgitb

# Create instance of FieldStorage
form = cgi.FieldStorage()

# Get data from fields
first_name = form.getvalue('first_name')
last_name  = form.getvalue('last_name')

print "Content-type:text/htmlrnrn"
print "<html>"
print "<head>"
print "<title>Hello - Second CGI Program</title>"
print "</head>"
print "<body>"
print "<h2>Hello %s %s</h2>" % (first_name, last_name)
print "</body>"
print "</html>"
让我们再上面同样的例子其中通过使用HTML表单两个值和提交按钮。我们将使用相同的CGI脚本hello_get.py来处理这个输入框。
<form action="/cgi-bin/hello_get.py" method="post">
First Name: <input type="text" name="first_name"><br />
Last Name: <input type="text" name="last_name" />

<input type="submit" value="Submit" />
</form>
这里是在上述形式的实际输出。输入名字和姓氏,然后单击提交按钮来查看结果。
传递复选框数据给CGI程序
复选框用于当需要多个选项被选中。
下面是两个复选框形式例如HTML代码:
<form action="/cgi-bin/checkbox.cgi" method="POST" target="_blank">
<input type="checkbox" name="maths" value="on" /> Maths
<input type="checkbox" name="physics" value="on" /> Physics
<input type="submit" value="Select Subject" />
</form>
这段代码的结果如下表:
下面是checkbox.cgi脚本来处理Web浏览器中给出的复选框按钮。
#!/usr/bin/python

# Import modules for CGI handling
import cgi, cgitb

# Create instance of FieldStorage
form = cgi.FieldStorage()

# Get data from fields
if form.getvalue('maths'):
   math_flag = "ON"
else:
   math_flag = "OFF"

if form.getvalue('physics'):
   physics_flag = "ON"
else:
   physics_flag = "OFF"

print "Content-type:text/htmlrnrn"
print "<html>"
print "<head>"
print "<title>Checkbox - Third CGI Program</title>"
print "</head>"
print "<body>"
print "<h2> CheckBox Maths is : %s</h2>" % math_flag
print "<h2> CheckBox Physics is : %s</h2>" % physics_flag
print "</body>"
print "</html>"
传递单选按钮数据给CGI程序
单选按钮,使用只需要一个选项被选择。
下面是两个单选按钮的形式例如HTML代码:
<form action="/cgi-bin/radiobutton.py" method="post" target="_blank">
<input type="radio" name="subject" value="maths" /> Maths
<input type="radio" name="subject" value="physics" /> Physics
<input type="submit" value="Select Subject" />
</form>
这段代码的结果如下表:
下面是radiobutton.py脚本来处理Web浏览器给出的单选按钮:
#!/usr/bin/python

# Import modules for CGI handling
import cgi, cgitb

# Create instance of FieldStorage
form = cgi.FieldStorage()

# Get data from fields
if form.getvalue('subject'):
   subject = form.getvalue('subject')
else:
   subject = "Not set"

print "Content-type:text/htmlrnrn"
print "<html>"
print "<head>"
print "<title>Radio - Fourth CGI Program</title>"
print "</head>"
print "<body>"
print "<h2> Selected Subject is %s</h2>" % subject
print "</body>"
print "</html>"
Passing Text Area Data to CGI Program
TEXTAREA element is used when multiline text has to be passed to the CGI Program.
Here is example HTML code for a form with a TEXTAREA box:
|
The result of this code is the following form:
Below is textarea.cgi script to handle input given by web browser:
#!/usr/bin/python

# Import modules for CGI handling
import cgi, cgitb

# Create instance of FieldStorage
form = cgi.FieldStorage()

# Get data from fields
if form.getvalue('textcontent'):
   text_content = form.getvalue('textcontent')
else:
   text_content = "Not entered"

print "Content-type:text/htmlrnrn"
print "<html>"
print "<head>";
print "<title>Text Area - Fifth CGI Program</title>"
print "</head>"
print "<body>"
print "<h2> Entered Text Content is %s</h2>" % text_content
print "</body>"
Passing Drop Down Box Data to CGI Program
Drop Down Box is used when we have many options available but only one or two will be selected.
Here is example HTML code for a form with one drop down box:
<form action="/cgi-bin/dropdown.py" method="post" target="_blank">
<select name="dropdown">
<option value="Maths" selected>Maths</option>
<option value="Physics">Physics</option>
</select>
<input type="submit" value="Submit"/>
</form>
The result of this code is the following form:
Below is dropdown.py script to handle input given by web browser.
#!/usr/bin/python

# Import modules for CGI handling
import cgi, cgitb

# Create instance of FieldStorage
form = cgi.FieldStorage()

# Get data from fields
if form.getvalue('dropdown'):
   subject = form.getvalue('dropdown')
else:
   subject = "Not entered"

print "Content-type:text/htmlrnrn"
print "<html>"
print "<head>"
print "<title>Dropdown Box - Sixth CGI Program</title>"
print "</head>"
print "<body>"
print "<h2> Selected Subject is %s</h2>" % subject
print "</body>"
print "</html>"
Using Cookies in CGI
HTTP protocol is a stateless protocol. But for a commercial website, it is required to maintain session information among different pages. For example, one user registration ends after completing many pages. But how to maintain user's session information across all the web pages.
In many situations, using cookies is the most efficient method of remembering and tracking preferences, purchases, commissions, and other information required for better visitor experience or site statistics.
How It Works?
Your server sends some data to the visitor's browser in the form of a cookie. The browser may accept the cookie. If it does, it is stored as a plain text record on the visitor's hard drive. Now, when the visitor arrives at another page on your site, the cookie is available for retrieval. Once retrieved, your server knows/remembers what was stored.
Cookies are a plain text data record of 5 variable-length fields:
-
Expires : The date the cookie will expire. If this is blank, the cookie will expire when the visitor quits the browser.
-
Domain : The domain name of your site.
-
Path : The path to the directory or web page that sets the cookie. This may be blank if you want to retrieve the cookie from any directory or page.
-
Secure : If this field contains the word "secure", then the cookie may only be retrieved with a secure server. If this field is blank, no such restriction exists.
-
Name=Value : Cookies are set and retrieved in the form of key and value pairs.
Setting up Cookies
It is very easy to send cookies to browser. These cookies will be sent along with HTTP Header before to Content-type field. Assuming you want to set UserID and Password as cookies. So cookies setting will be done as follows:
#!/usr/bin/python

print "Set-Cookie:UserID=XYZ;rn"
print "Set-Cookie:Password=XYZ123;rn"
print "Set-Cookie:Expires=Tuesday, 31-Dec-2007 23:12:40 GMT";rn"
print "Set-Cookie:Domain=www.domain.com;rn"
print "Set-Cookie:Path=/perl;n"
print "Content-type:text/htmlrnrn"
...........Rest of the HTML Content....
From this example, you must have understood how to set cookies. We use Set-Cookie HTTP header to set cookies.
Here, it is optional to set cookies attributes like Expires, Domain and Path. It is notable that cookies are set before sending magic line "Content-type:text/htmlrnrn.
Retrieving Cookies
It is very easy to retrieve all the set cookies. Cookies are stored in CGI environment variable HTTP_COOKIE and they will have following form:
key1=value1;key2=value2;key3=value3....
下面是如何获取cookies的例子。
#!/usr/bin/python

# Import modules for CGI handling
from os import environ
import cgi, cgitb

if environ.has_key('HTTP_COOKIE'):
   for cookie in map(strip, split(environ['HTTP_COOKIE'], ';')):
      (key, value ) = split(cookie, '=');
      if key == "UserID":
         user_id = value

      if key == "Password":
         password = value

print "User ID  = %s" % user_id
print "Password = %s" % password
这将产生以下结果由上面的脚本设置cookie:
User ID = XYZ
Password = XYZ123
文件上传例子:
上传文件,HTML表单的enctype属性必须设置为multipart/form-data。文件类型的input标签将创建一个“浏览”按钮。
<html>
<body>
   <form enctype="multipart/form-data"
                     action="save_file.py" method="post">
   <p>File: <input type="file" name="filename" /></p>
   <p><input type="submit" value="Upload" /></p>
   </form>
</body>
</html>
这段代码的结果如下表:
上面的例子中编写完成后,可以在你的服务器尝试上面的代码。
下面是脚本save_file.py处理文件上传:
#!/usr/bin/python

import cgi, os
import cgitb; cgitb.enable()

form = cgi.FieldStorage()

# Get filename here.
fileitem = form['filename']

# Test if the file was uploaded
if fileitem.filename:
   # strip leading path from file name to avoid
   # directory traversal attacks
   fn = os.path.basename(fileitem.filename)
   open('/tmp/' + fn, 'wb').write(fileitem.file.read())

   message = 'The file "' + fn + '" was uploaded successfully'

else:
   message = 'No file was uploaded'

print """
Content-Type: text/htmln
<html>
<body>
   <p>%s</p>
</body>
</html>
""" % (message,)
如果运行是上Unix/Linux上的脚本,那么就必须照顾替换文件分隔符,如下所示,否则在Windows机器上面open()语句应该正常工作。
fn = os.path.basename(fileitem.filename.replace("", "/" ))
如何弹出“文件下载”对话框?
有时,期望要提供选项当用户将点击一个链接,它将一个“文件下载”对话框弹出给用户,而不是显示的实际内容。这是很容易的,并通过HTTP头来实现。这个HTTP头跟从上一节提到的报头是一样。
例如,如果想从一个给定链路进行文件名的文件下载,它的语法如下:
#!/usr/bin/python

# HTTP Header
print "Content-Type:application/octet-stream; name="FileName"rn";
print "Content-Disposition: attachment; filename="FileName"rnn";

# Actual File Content will go hear.
fo = open("foo.txt", "rb")

str = fo.read();
print str

# Close opend file
fo.close()