解决nginx+lua搭建文件上传下载服务问题
发布于 2018-03-18 20:54:14 | 277 次阅读 | 评论: 0 | 来源: 网友投递
这里有新鲜出炉的Nginx开发从入门到精通,程序狗速度看过来!
Nginx WEB服务器
Nginx 是一个高性能的 HTTP 和 反向代理 服务器,也是一个 IMAP/POP3/SMTP 代理服务器。 Nginx 是由 Igor Sysoev 为俄罗斯访问量第二的 Rambler.ru 站点开发的,第一个公开版本0.1.0发布于2004年10月4日。其将源代码以类BSD许可证的形式发布,因它的稳定性、丰富的功能集、示例配置文件和低系统资源的消耗而闻名。
这篇文章主要介绍了nginx+lua搭建文件上传下载服务,涉及到nginx安装配置方法,本文通过代码给大家介绍的非常详细,需要的朋友可以参考下
导语
项目需要做一个文件上传下载服务,利用 nginx+lua 做一个代理服务,上传入口统一,分发到不同的机器存储,下载链接和物理存储隔离,支持添加 agent 的方式扩容,这里主要讲一下思路和搭建配置过程,大神勿喷。
主要逻辑
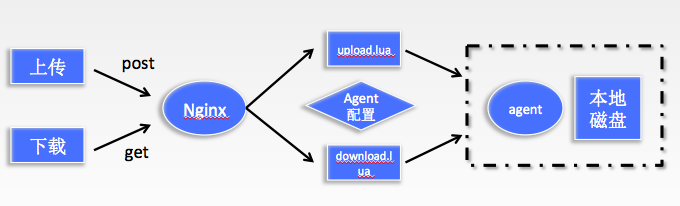
上传
前端请求 nginx 服务, nginx 调用 upload 脚本,脚本通过查找配置,找到对应的逻辑存储路径和物理存储机器的 agent 的 ip 和端口,通过 tcp 发包到对应 agent ,部署在对应机器的 agent 接受数据,并写到本地文件。
下载
http下载请求 nginx , nginx 调用 download 脚本,脚本解析链接参数,根据参数找到对应的 agent 地址,请求返回文件二进制内容,脚本接受到 agent 返回的数据,返回给请求端。
配置Nginx+lua
接下来主要讲一下 nginx 安装配置(这里包括lua的二进制流处理 lpack, md5计算, mysql 操作, json 操作)
1、安装 nginx
下载http://nginx.org/en/download.html
解压tar -xvf nginx-1.10.3.tar.gz
2、安装 luajit(轻量级 lua)
http://luajit.org/download.html
修改 makefile 里面的安装路径export PREFIX= /usr/local/luajit
然后安装make &make install
3、安装nginx_lua_module
下载https://github.com/openresty/lua-nginx-module
解压
4、 安装ngx_devel_kit (NDK提供函数和宏处理一些基本任务,减轻第三方模块开发的代码量)
下载https://github.com/simpl/ngx_devel_kit/
5、 安装编译,导入
export LUAJIT_LIB=/usr/local/luajit/lib
export LUAJIT_INC=/usr/local/luajit/include/luajit-2.0
./configure --prefix=/usr/local/nginx --with-http_stub_status_module --with-http_ssl_module --add-module=/home/oicq/jeffzhuang/ngx_devel_kit-0.3.0 --add-module=/home/oicq/jeffzhuang/lua-nginx-module-0.10.
make -j2
make install
启动/usr/local/nginx/sbin/nginx 重启命令` usr/local/nginx/sbin/nginx -s reload v
如果报错找不到luajit库ln -s /usr/local/lib/libluajit-5.1.so.2 /lib64/libluajit-5.1.so.2
测试nginx直接打开浏览器就可以了http:10.x.x.x:8080就可以看到欢迎界面了
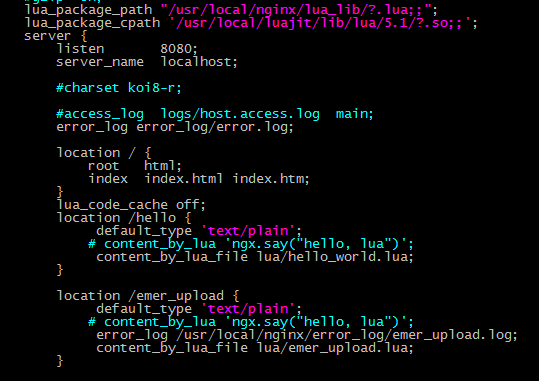
6 、配置conf/nginx.conf运行 lua 脚本
增加lua库的查找路径lua_package_path,lua_package_cpath
7、增加mysql.lua下载 https://github.com/openresty/lua-resty-mysql 拷贝到lua_package_path 目录下就可以了
8、增加 csjon http://www.kyne.com.au/~mark/software/download/lua-cjson-2.1.0.tar.gz
修改 Makefile 里面的 PREFIX=/usr/local/luajit就是luajit 的安装路径,make后将生成的 cjson.so拷贝到
lua_package_cpath目录下
9、安装lpack 可以用现成的 lpack.lua 拷贝到 lua_package_path 或者用 https://github.com/LuaDist/lpack 编译生成 lpack.so拷贝到 lua_package_cpath 64位需要增加编译命令 -fPIC
10、upload.lua下载https://github.com/openresty/lua-resty-upload
11、md5下载 https://github.com/openresty/lua-resty-string
主要代码
1、前端上传页面代码
<!DOCTYPE html>
<html>
 <head>
  <title>File upload example</title>
 </head>
 <body>
  <form action="emer_upload/order_system_storage" method="post" enctype="multipart/form-data">
  <input type="file" name="testFileName"/>
  <input type="submit" name="upload" value="Upload" />
  </form>
 </body>
</html>
2、upload上传代码,该模块在解析文件上传请求的过程中,主要采用了简单的类似有限状态机的算法来实现的,在不同的状态由相应的 handler 进行处理。
--文件下载服务写到 saveRootPath .."/" .. filename 下面
function DownLoad()
 local chunk_size = 4096
 local form,err=upload:new(chunk_size)
 if not form then
  ngx.log(ngx.ERR, "failed to new upload: ", err)
  ngx.exit(ngx.HTTP_INTERNAL_SERVER_ERROR)
 end
 form:set_timeout(100000)
 while true do
 local typ,res,err=form:read()
 if not typ then
  ErrorMsg="failed to read :"..err
  return 1
 end
 if typ =="header" then
  local key=res[1]
  local value=res[2]
  if key =="Content-Disposition" then
  local kvlist=string.split(value,';')
   for _, kv in ipairs(kvlist) do
   local seg = string.trim(kv)
   if seg:find("filename") then
   local kvfile = string.split(seg, "=")
   filename = string.sub(kvfile[2], 2, -2)
   if filename then
    --获取文件后缀名字
    fileExtension=getExtension(filename)
    local linuxTime=tostring(os.time())
    filePath=saveRootPath .."/" ..linuxTime..filename
    fileToSave,errmsg = io.open(filePath, "w+")
    --存储的文件路径
    --ngx.say("failed to open file ", filePath)
    if not fileToSave then
    --ngx.say("failed to open file ", filePath .. errmsg)
    ErrorMsg="打开文件失败"..filePath .. errmsg
    return 1
    end
   else
    ErrorMsg="请求参数找不到文件名字"
    return 1
   end
   --跳出循环
   break
   end
   end
  end
 elseif typ =="body" then
  if fileToSave then
  fileToSave:write(res)
  fileMd5:update(res)
  end
 elseif typ =="part_end" then
  if fileToSave then
  local md5_sum=fileMd5:final()
  --ngx.say("md5: ", str.to_hex(md5_sum))
  fileMD532=str.to_hex(md5_sum)
  fileToSave:close()
  fileToSave = nil
  end
 elseif typ =="eof" then
  break
 else
  ngx.log(ngx.INFO, "do other things")
 end
 end
 return 0
end
3、tcp接收二进制数据
-- 读取byte
function readInt8(tcp)
 local next, val = string.unpack(tcp:receive(1), "b")
 return tonumber(val);
end
-- 读取int16
function readInt16(tcp)
 local next, val = string.unpack(tcp:receive(2), "h");
 return tonumber(val);
end
-- 读取int32
function readInt32(tcp)
 local next, val = string.unpack(tcp:receive(4), ">i");
 return tonumber(val);
end
-- 读取字符串
function readString(tcp,len)
 return tostring(tcp:receive(len));
end
4、tcp写二进制数据,这里和 agent 的通信协议是:开始标志位+包长度+json 字符串+结束标志位,所以对应 pack 用的参数就是 bIAb ,> 就是转化为大端
jsonData["filename"]=fileMD532 .. "." .. fileExtension
jsonData["cmd"]="write"
jsonData["fileSize"]=tostring(filelen)
jsonData["path"]=System.."/"..StorageDate
local Jsonstr=cjson.encode(jsonData)
local uiLen=string.len(Jsonstr)
senddata=bpack(">b1IAb",startIndex,uiLen,Jsonstr,endIndex)
socket:send(senddata)
5、下载错误的时候,使用了 redirect 直接跳转到错误页面,方便输出错误信息,其实这里还可以做用户 token 校验
local ErrorUrl="/downloadError.html"
ErrorMsg="url 参数解析有问题 "..index
return ngx.redirect(ErrorUrl.."?msg="..ErrorMsg,``` ngx.HTTP_MOVED_TEMPORARILY)
总结
以上所述是小编给大家介绍的解决nginx+lua搭建文件上传下载服务问题,希望对大家有所帮助,如果大家有任何疑问请给我留言,小编会及时回复大家的。在此也非常感谢大家对PHPERZ网站的支持!