Angular实现表单验证功能
发布于 2018-03-16 22:27:16 | 220 次阅读 | 评论: 0 | 来源: 网友投递
AngularJS 前端JS框架
AngularJS诞生于Google是一款优秀的前端JS框架,已经被用于Google的多款产品当中。AngularJS有着诸多特性,最为核心的是:MVC、模块化、自动化双向数据绑定、语义化标签、依赖注入,等等。
这篇文章主要为大家详细介绍了Angular实现表单验证功能,具有一定的参考价值,感兴趣的小伙伴们可以参考一下
Angular表单验证分为两种验证:1.内置验证(required,minlength等);2.自定义验证(正则表达式)。
接下来我们用一个注册账号的demo来看一下这两种验证是如何实现的。
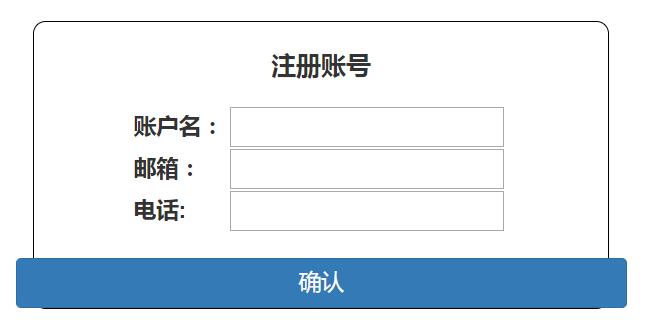
项目界面
一、内置验证
其中账户名有required验证和最短长度验证,其他两个只有required验证
1.项目目录
----------app.component.ts
----------app.component.html
----------app.component.css
----------app.module.ts
2.项目代码
app.module.ts
import { BrowserModule } from '@angular/platform-browser';
import { NgModule } from '@angular/core';
import { FormsModule,ReactiveFormsModule }  from '@angular/forms';//表单验证必须导入这两个模块

import { AppComponent } from './app.component';

@NgModule({
 declarations: [
  AppComponent
 ],
 imports: [
  BrowserModule,
  FormsModule,  //注册模块
  ReactiveFormsModule
 ],
 providers: [],
 bootstrap: [AppComponent]
})
export class AppModule { }
app.component.ts
import { Component,OnInit } from '@angular/core';
import { FormGroup, FormControl, Validators } from '@angular/forms';

@Component({
 selector: 'app-root',
 templateUrl: './app.component.html',
 styleUrls: ['./app.component.css']
})
export class AppComponent {
 title = 'app';
 Form:FormGroup;
 data={
   name:"",
   email:"",
   tel:""
 }
 ngOnInit(): void {
   this.Form = new FormGroup({
      'name': new FormControl(this.data.name, [
       Validators.required,
       Validators.minLength(4)
      ]),
      'email': new FormControl(this.data.email, Validators.required),
      'tel': new FormControl(this.data.tel, Validators.required)
     });
  }

  get name() { return this.Form.get('name'); }
  get email() { return this.Form.get('email'); }
  get tel() { return this.Form.get('tel'); }
}
简单来说,在使用验证表单的时候,大致分为四步:
(1)导入相关模块FormGroup, FormControl, Validators;
(2)声明表单验证变量From:FromGroup;
(3)定义验证规则;
(4)通过它所属的控件组(FormGroup)的get方法来访问表单控件
app.component.html
<div class="wrapper">
  <div class="row">
    <p class="title-wrapper">注册账号</p>
  </div>
  <div class="row">
    <div class="contain-wrapper" [formGroup]="Form">
      <label for="name">账户名:</label>
      <input type="text" id="name" formControlName="name"><br/>
      <div *ngIf="name.invalid && (name.dirty || name.touched)" class="alert alert-danger">
        <div *ngIf="name.errors.required">
          请输入长度账户名!
        </div>
        <div *ngIf="name.errors.minlength">
          账户名长度不小于4!
        </div>
      </div>
      <label for="email">邮箱:</label>
      <input type="text" id="email" formControlName="email"><br/>
      <div *ngIf="email.invalid && (email.dirty || email.touched)" class="alert alert-danger">
        <div *ngIf="email.errors.required">
          请输入邮箱!
        </div>
      </div>
      <label for="tel">电话:</label>
      <input type="text" id="tel" formControlName="tel">
      <div *ngIf="tel.invalid && (tel.dirty || tel.touched)" class="alert alert-danger">
        <div *ngIf="tel.errors.required">
          请输入电话!
        </div>
      </div>
    </div>
  </div>
  <div class="row">
    <button class="btn btn-primary confirm">确认</button>
  </div>
</div>
app.component.css
*{
  font-size: 18px;
}
.wrapper{
  margin: 0 auto;
  margin-top:10%;
  width:30%;
  height: 20%;
  border:1px solid black;
  border-radius: 10px;
}

.title-wrapper{
  margin: 0 auto;
  padding-top: 20px;
  padding-bottom: 20px;
  width:370px;
  text-align: center;
  font-size: 20px;
  font-weight: 800;
}
label{
  display: inline-block;
  width:72px;
}
.contain-wrapper{
  width: 300px;
  margin:0 auto;
}
.confirm{
  margin-top:20px;
  width:100%;

}
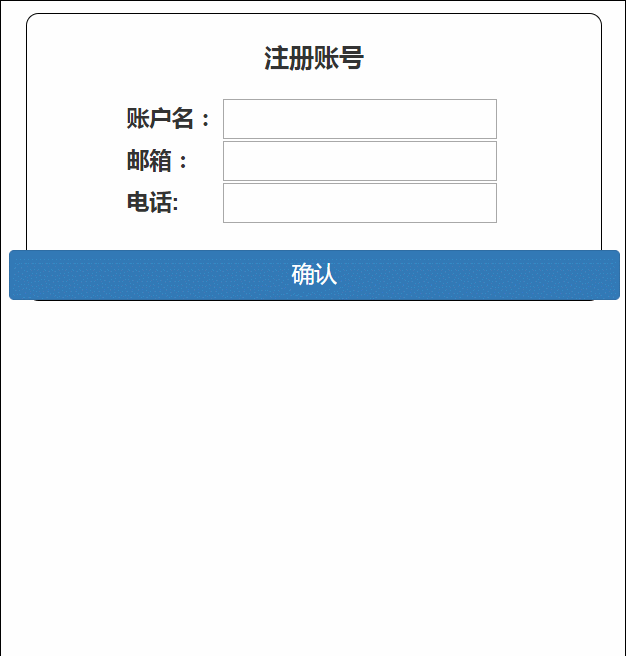
3.项目效果
二、自定义验证
自定义表单验证,需要创建自定义验证器,我们接下来更改邮箱的验证,将其改为有格式的验证,而不是单纯的存在验证,首先我们来看一下项目目录的更改
1.项目目录
----------app.component.ts
----------app.component.html
----------app.component.css
----------app.module.ts
----------emailAuthentication.ts
2.项目代码
app.module.ts
注册自定义验证器EmailValidatorDirective
import { BrowserModule } from '@angular/platform-browser';
import { NgModule } from '@angular/core';
import { FormsModule,ReactiveFormsModule }  from '@angular/forms';
import { EmailValidatorDirective } from './emailAuthentication';

import { AppComponent } from './app.component';

@NgModule({
 declarations: [
  AppComponent,
  EmailValidatorDirective
 ],
 imports: [
  BrowserModule,
  FormsModule,
  ReactiveFormsModule
 ],
 providers: [],
 bootstrap: [AppComponent]
})
export class AppModule { }
emailAuthentication.ts
import { Directive, Input, OnChanges, SimpleChanges } from '@angular/core';
import { AbstractControl, NG_VALIDATORS, Validator, ValidatorFn, Validators } from '@angular/forms';

/** A hero's name can't match the given regular expression */
export function emailValidator(nameRe: RegExp): ValidatorFn {
  return (control: AbstractControl): { [key: string]: any } => {
    const forbidden = !nameRe.test(control.value);
    return forbidden ? { 'forbiddenName': { value: control.value } } : null;
  };
}

@Directive({
  selector: '[appForbiddenName]',
  providers: [{ provide: NG_VALIDATORS, useExisting: EmailValidatorDirective, multi: true }]
})
export class EmailValidatorDirective implements Validator {
  @Input() forbiddenName: string;

  validate(control: AbstractControl): { [key: string]: any } {
    return this.forbiddenName ? emailValidator(new RegExp(this.forbiddenName, 'i'))(control)
      : null;
  }
}
app.component.ts
import { Component,OnInit } from '@angular/core';
import { FormGroup, FormControl, Validators } from '@angular/forms';
import { emailValidator } from './emailAuthentication'; //导入emailValidator自定义验证器

@Component({
 selector: 'app-root',
 templateUrl: './app.component.html',
 styleUrls: ['./app.component.css']
})
export class AppComponent {
 title = 'app';
 //email的正则表达式
 emailExp = /^([a-zA-Z0-9_-])+@([a-zA-Z0-9_-])+(.[a-zA-Z0-9_-])+/ ;
 Form:FormGroup;
 data={
   name:"",
   email:"",
   tel:""
 }
 ngOnInit(): void {
   this.Form = new FormGroup({
      'name': new FormControl(this.data.name, [
       Validators.required,
       Validators.minLength(4)
      ]),
      'email': new FormControl(this.data.email, [
        Validators.required,
        emailValidator(this.emailExp) //自定义验证器
        ]),
      'tel': new FormControl(this.data.tel, Validators.required)
     });
  }

  get name() { return this.Form.get('name'); }
  get email() { return this.Form.get('email'); }
  get tel() { return this.Form.get('tel'); }
}
app.component.html
<div class="wrapper">
  <div class="row">
    <p class="title-wrapper">注册账号</p>
  </div>
  <div class="row">
    <div class="contain-wrapper" [formGroup]="Form">
      <label for="name">账户名:</label>
      <input type="text" id="name" formControlName="name"><br/>
      <div *ngIf="name.invalid && (name.dirty || name.touched)" class="alert alert-danger">
        <div *ngIf="name.errors.required">
          请输入账户名!
        </div>
        <div *ngIf="name.errors.minlength">
          账户名长度不小于4!
        </div>
      </div>
      <label for="email">邮箱:</label>
      <input type="text" id="email" formControlName="email" required><br/>
      <div *ngIf="email.invalid && (email.dirty || email.touched)" class="alert alert-danger">
        <div *ngIf="email.errors.forbiddenName">
         请输入正确格式的邮箱!
        </div>
      </div>
      <label for="tel">电话:</label>
      <input type="text" id="tel" formControlName="tel">
      <div *ngIf="tel.invalid && (tel.dirty || tel.touched)" class="alert alert-danger">
        <div *ngIf="tel.errors.required">
          请输入电话!
        </div>
      </div>
    </div>
  </div>
  <div class="row">
    <button class="btn btn-primary confirm" [disabled]="Form.invalid" >确认</button>
  </div>
</div>
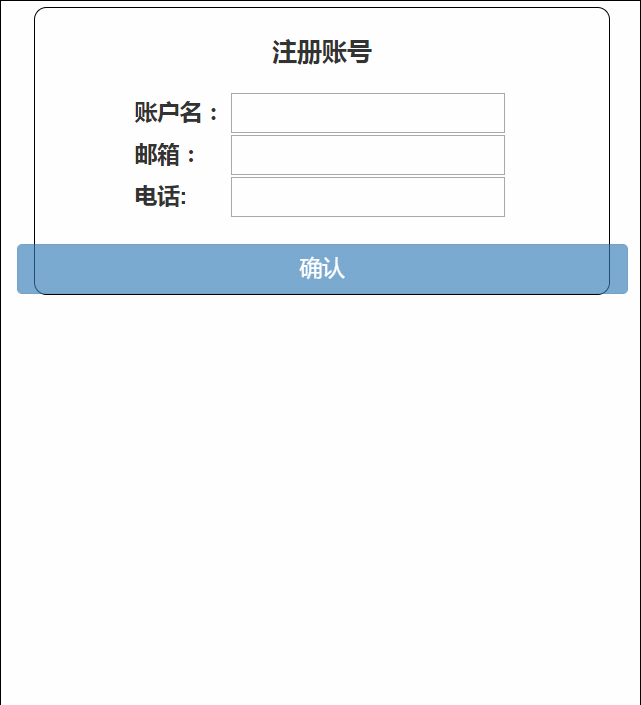
在最后确认的时候,我们设置一下按钮的disabled属性,在表单验证不通过的时候,确认按钮是点击不了的,显示不可点击状态。[disabled]="Form.invalid"。
3.项目效果
以上就是本文的全部内容,希望对大家的学习有所帮助,也希望大家多多支持phperz。