spring batch 读取多个文件数据导入数据库示例
发布于 2017-12-04 05:24:01 | 222 次阅读 | 评论: 0 | 来源: 网友投递
Spring Framework 开源j2ee框架
Spring是什么呢?首先它是一个开源的项目,而且目前非常活跃;它是一个基于IOC和AOP的构架多层j2ee系统的框架,但它不强迫你必须在每一层 中必须使用Spring,因为它模块化的很好,允许你根据自己的需要选择使用它的某一个模块;它实现了很优雅的MVC,对不同的数据访问技术提供了统一的接口,采用IOC使得可以很容易的实现bean的装配,提供了简洁的AOP并据此实现Transcation Managment,等等
本篇文章主要介绍了spring batch 读取多个文件数据导入数据库示例,小编觉得挺不错的,现在分享给大家,也给大家做个参考。一起跟随小编过来看看吧
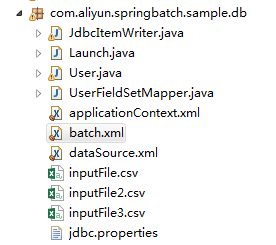
项目的目录结构
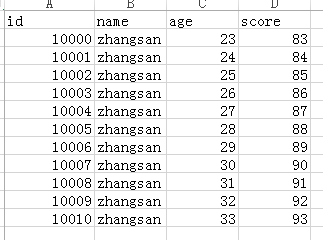
需要读取文件的的数据格式
applicatonContext.xml的配置
<?xml version="1.0" encoding="UTF-8"?>
<beans xmlns="http://www.springframework.org/schema/beans"
  xmlns:xsi="http://www.w3.org/2001/XMLSchema-instance" xmlns:p="http://www.springframework.org/schema/p"
  xmlns:tx="http://www.springframework.org/schema/tx" xmlns:aop="http://www.springframework.org/schema/aop"
  xmlns:context="http://www.springframework.org/schema/context"
  xsi:schemaLocation="http://www.springframework.org/schema/beans
  http://www.springframework.org/schema/beans/spring-beans-3.0.xsd
  http://www.springframework.org/schema/tx
  http://www.springframework.org/schema/tx/spring-tx-3.0.xsd
  http://www.springframework.org/schema/aop
  http://www.springframework.org/schema/aop/spring-aop-3.0.xsd
  http://www.springframework.org/schema/context
  http://www.springframework.org/schema/context/spring-context-3.0.xsd"
  default-autowire="byName">
  <context:component-scan base-package="com.aliyun.springbatch" />

  <bean id="jobLauncher" class="org.springframework.batch.core.launch.support.SimpleJobLauncher">
    <property name="jobRepository" ref="jobRepository"/>
  </bean>
  <bean id="jobRepository" class="org.springframework.batch.core.repository.support.MapJobRepositoryFactoryBean">
    <property name="transactionManager" ref="transactionManager"></property>
  </bean>
  <bean id="transactionManager"
    class="org.springframework.batch.support.transaction.ResourcelessTransactionManager">
  </bean>
   <bean id="jdbcTemplate" class="org.springframework.jdbc.core.JdbcTemplate">
     <property name="dataSource" ref="dataSource"></property>
   </bean>


   <!-- 引入外部数据源配置信息 -->
  <bean class="org.springframework.beans.factory.config.PropertyPlaceholderConfigurer">
    <property name="locations">
      <value>classpath:com/aliyun/springbatch/sample/db/jdbc.properties</value>
    </property>
  </bean>
   <!-- 配置数据源 -->
  <bean id="dataSource" class="org.springframework.jdbc.datasource.DriverManagerDataSource">
    <property name="driverClassName" value="${jdbc.driver}"></property>
    <property name="url" value="${jdbc.url}"></property>
    <property name="username" value="${jdbc.username}"></property>
    <property name="password" value="${jdbc.password}"></property>
  </bean>
</beans>
batch.xml的配置
<?xml version="1.0" encoding="UTF-8"?>
<bean:beans xmlns="http://www.springframework.org/schema/batch"
  xmlns:bean="http://www.springframework.org/schema/beans" xmlns:xsi="http://www.w3.org/2001/XMLSchema-instance"
  xmlns:p="http://www.springframework.org/schema/p" xmlns:tx="http://www.springframework.org/schema/tx"
  xmlns:aop="http://www.springframework.org/schema/aop" xmlns:context="http://www.springframework.org/schema/context"
  xmlns:util="http://www.springframework.org/schema/util"
  xsi:schemaLocation="http://www.springframework.org/schema/beans
http://www.springframework.org/schema/beans/spring-beans-3.0.xsd
http://www.springframework.org/schema/tx
http://www.springframework.org/schema/tx/spring-tx-3.0.xsd
http://www.springframework.org/schema/aop
http://www.springframework.org/schema/aop/spring-aop-3.0.xsd
http://www.springframework.org/schema/context
http://www.springframework.org/schema/context/spring-context-3.0.xsd
http://www.springframework.org/schema/batch
http://www.springframework.org/schema/batch/spring-batch-3.0.xsd
http://www.springframework.org/schema/util http://www.springframework.org/schema/util/spring-util.xsd">

  <!-- <bean:import resource="dataSource.xml" /> -->
  <bean:import resource="applicationContext.xml" />
  <!-- Job的配置信息 -->
  <!-- commit-interval="1" 表示每处理完1条数据提交一次事务 -->
  <job id="dbJob">
    <step id="dbReadAndWriterStep" >
      <tasklet>
        <chunk reader="userReader" writer="jdbcItemWriter"
          commit-interval="1">
        </chunk>
      </tasklet>
    </step>
  </job>

  <!-- <bean:bean id="jdbcItemReader" class="org.springframework.batch.item.database.JdbcCursorItemReader"
    scope="step"> <bean:property name="dataSource" ref="dataSource" /> <bean:property
    name="sql" value="select id,name,age,score from t_user" /> <bean:property
    name="rowMapper"> <bean:bean class="org.springframework.jdbc.core.BeanPropertyRowMapper">
    <bean:property name="mappedClass" value="com.aliyun.springbatch.sample.db.User"
    /> </bean:bean> </bean:property> </bean:bean> -->
  <!-- 读文件 多文件上传-->
  <bean:bean id="userReader" class="org.springframework.batch.item.file.MultiResourceItemReader"
    scope="step">
<!-- 单个文件读取 -->
    <!-- <property name="resource" value="file:./sample.csv" /> -->
<!-- 多个文件读取 读取文件的位置 -->
    <bean:property name="resources" value="file:#{jobParameters['inputFile']}" />
  <!-- 引入单个文件的读取对象 -->
    <bean:property name="delegate" ref="flatFileItemReader" />
  </bean:bean>
  <!-- 单个文件的读取对象 -->
  <bean:bean id="flatFileItemReader"
    class="org.springframework.batch.item.file.FlatFileItemReader">
  <!-- 跳过读取文件的第一行 因为第一行是列名-->
  <bean:property name="linesToSkip" value="1"/>
  <!-- 文件的行映射 -->
  <bean:property name="lineMapper">
   <bean:bean class="org.springframework.batch.item.file.mapping.DefaultLineMapper">
    <!-- 行的字段映射 -->
    <bean:property name="lineTokenizer">
      <!-- 映射的字段以下面names属性,以,隔开 -->
      <bean:bean
          class="org.springframework.batch.item.file.transform.DelimitedLineTokenizer">
        <bean:property name="names" value="id,name,age,score" />
      </bean:bean>
    </bean:property>
    <!-- 设置 读取的字段映射给实体对象 -->
    <bean:property name="fieldSetMapper">
      <bean:bean
      class="org.springframework.batch.item.file.mapping.BeanWrapperFieldSetMapper">
        <bean:property name="prototypeBeanName" value="user" />
      </bean:bean>
    </bean:property>
   </bean:bean>
  </bean:property>
 </bean:bean>

 <bean:bean id="user" class="com.aliyun.springbatch.sample.db.User"></bean:bean>
  <!-- db数据的写 -->
  <!-- <bean:bean id="jdbcItemWriter"
    class="org.springframework.batch.item.database.JdbcBatchItemWriter">
    <bean:property name="dataSource" ref="dataSource" />
    <bean:property name="sql"
      value="insert into T_DESTUSER (ID,USERID,USERNAME,PASSWORD,UPDATETIME,UPDATEUSER)
          values
         (:id,:userId,:userName,:password,:updateDate,:updateUser)" />
    <bean:property name="itemSqlParameterSourceProvider">
      <bean:bean
        class="org.springframework.batch.item.database.BeanPropertyItemSqlParameterSourceProvider" />
    </bean:property>
  </bean:bean> -->

  <!-- 这是自定义的实现ItemWriter接口的ItemWriter的实现类 -->
<bean:bean id="jdbcItemWriter" class="com.aliyun.springbatch.sample.db.JdbcItemWriter">
</bean:bean>
</bean:beans>
jdbc.properties mysql数据源配置文件
#Oracle
#hibernate.dialect=org.hibernate.dialect.OracleDialect
#validationQuery.sqlserver=SELECT 1 FROM DUAL
#jdbc.driver=oracle.jdbc.driver.OracleDriver
#jdbc.url=jdbc:oracle:thin:@localhost:1521:orcl
#jdbc.username=activitproject
#jdbc.password=activitproject
#Mysql
jdbc.driver=com.mysql.jdbc.Driver
jdbc.url=jdbc:mysql://127.0.0.1:3306/spring_batch_demo
jdbc.username=root
jdbc.password=root
封装数据的实体类就自己写吧
测试主方法:
 public static void main(String[] args) {
    ApplicationContext context = new ClassPathXmlApplicationContext(
        "com/aliyun/springbatch/sample/db/batch.xml");
    JobLauncher launcher = (JobLauncher) context.getBean("jobLauncher");
    Job job = (Job) context.getBean("dbJob");

    try {

      // JOB执行,设置参数添加读取文件的路径
      JobExecution result = launcher.run(
          job,
          //添加job参数时,将读取的文件目录加入到job的参数中
          new JobParametersBuilder()
              .addString("inputFile",
                  "src/main/java/com/aliyun/springbatch/sample/db/inputFile*.csv")
              .toJobParameters());
      // 运行结果输出
      System.out.println(result.toString());
    } catch (Exception e) {
      e.printStackTrace();
    }
  }
以上就是本文的全部内容,希望对大家的学习有所帮助,也希望大家多多支持PHPERZ。
推荐阅读
最新资讯