Java组件commons fileupload实现文件上传功能
发布于 2017-12-03 12:26:29 | 292 次阅读 | 评论: 0 | 来源: 网友投递
Java程序设计语言
java 是一种可以撰写跨平台应用软件的面向对象的程序设计语言,是由Sun Microsystems公司于1995年5月推出的Java程序设计语言和Java平台(即JavaEE(j2ee), JavaME(j2me), JavaSE(j2se))的总称。
这篇文章主要为大家详细介绍了Java组件commons fileupload实现文件上传功能,具有一定的参考价值,感兴趣的小伙伴们可以参考一下
Apache提供的commons-fileupload jar包实现文件上传确实很简单,最近要用Servlet/JSP做一个图片上传功能,在网上找了很多资料,大多是基于struts框架介绍的,还有些虽然也介绍common-fileupload的上传,但是那些例子比较老,有些类现在都废弃了。
通过研究学习总结,终于完成了这个上传功能,下面与大家分享一下。
案例场景
一个图书馆后台管理界面,需要提供上传图书图片的功能并且最终显示在页面中。
实现效果
进入添加书籍页面,默认显示一个图片“暂无突破”(长宽均为200px),提供一个按钮“上传图片”,如下图效果。

点击“上传图片”按钮,通过模式窗口弹出上传界面,如下图所示。
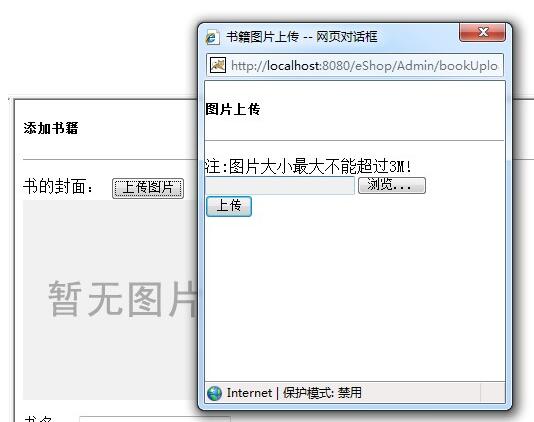
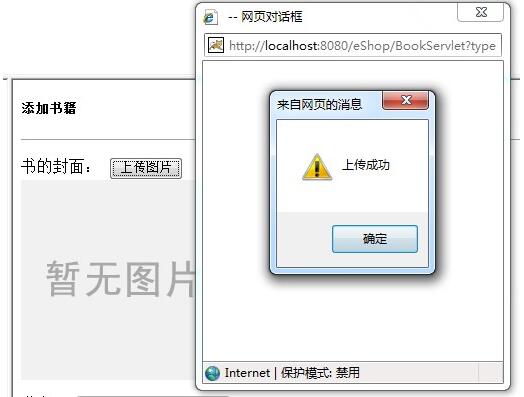
通过“浏览”按钮选择指定图片,点击“上传”按钮进行上传,如果上传成功则弹出成功提示,用户点击“确定”后关闭弹出窗并自动将新图片显示在页面上,如下图所示。

代码实现
①首先创建一个添加书籍页面:bookAdd.jsp
页面id为photo_id的hidden标签用于存储图片路径,方便提交到后台存放到数据库,id为img_id的<img>标签用于显示图片,所有图片都存放在服务器下,方便读取。然后一个关键js,点击button通过模式窗口弹出上传页面,在弹出模式窗口时定义了一个变量win,该变量用于获取模式窗口传回的图片路径值。
(注意:因为安全性问题图片不能图片不能随意存放,项目部署在服务器中,图片就只能放在该服务器下才能查看得到,如果一定要读取非当前服务器下的图片需要配置服务器的虚拟目录)
<html>
 <head>
  <title>添加书籍</title>
  <script type="text/javascript">
   //打开上传页面
   function openUpload(){
    var win = window.showModalDialog("<%=root%>/Admin/bookUpload.jsp","","dialogWidth:300px;dialogHeight:300px;scroll:no;status:no");
    if(win != null){
     document.getElementById("photo_id").value = win;
     document.getElementById("img_id").src = "<%=root%>/"+win;
    }
   }
  </script>
 </head>
 <body>
  <h5>添加书籍</h5><hr/>
   <p>
    书的封面:
    <label>
     <input type="hidden" id="photo_id" name="photo" value="images/noimg.png"><input type="button" onclick="openUpload()" value="上传图片"/><br/>
     <img id="img_id" alt="" src="<%=root%>/images/noimg.png" width="200px" height="200px">
    </label>
   </p>
  </body>
</html>
②创建上传图片页面,bookUpload.jsp
注意一定要定义<base>标签,当前模式窗口关闭时才能将数据返回到父窗体,<form>标签还要设置一个属性enctype="multipart/form-data"这样提交的文件才能被后台获取,点击“上传”button即可将文件向后台传送,剩下的重头戏就是后台上传处理了。
<html>
 <head>
  <meta http-equiv="Content-Type" content="text/html; charset=GBK">
  <meta http-equiv="pragma" content="no-cache" />
  <span style="color: #ff0000;"><base target="_self"></span>
  <title>书籍图片上传</title>
 </head>
 <body>
  <h5>图片上传</h5><hr/>
  <p style="color: red">${requestScope.errorMsg}</p>
  <form id="form1" name="form1" action="<%=root%>/BookServlet?type=bookUpload" method="post" enctype="multipart/form-data">
   <div>注:图片大小最大不能超过3M!</div>
   <div><input type="file" name="file_upload"/></div>
   <div><input type="submit" value="上传"/></div>
  </form>
 </body>
</html>
③创建一个普通的Servlet,下面只提供部分关键代码
红色代码部分是上传的关键代码,其它就是作为点缀了。完成这三步,一个简单的上传即实现了。
public class BookServlet extends HttpServlet {

 private String uploadPath = "eShop/upload/"; // 上传文件的目录
 private String tempPath = "eShop/uploadtmp/"; // 临时文件目录
 private String serverPath = null;

 private int sizeMax = 3;//图片最大上限
 private String[] fileType = new String[]{".jpg",".gif",".bmp",".png",".jpeg",".ico"};

 public void doGet(HttpServletRequest request, HttpServletResponse response)
   throws ServletException, IOException {
  serverPath = getServletContext().getRealPath("/").replace("\\", "/");
  //Servlet初始化时执行,如果上传文件目录不存在则自动创建
  if(!new File(serverPath+uploadPath).isDirectory()){
   new File(serverPath+uploadPath).mkdirs();
  }
  if(!new File(serverPath+tempPath).isDirectory()){
   new File(serverPath+tempPath).mkdirs();
  }

  <span style="color: #ff0000;">DiskFileItemFactory factory = new DiskFileItemFactory();</span>
  factory.setSizeThreshold(5*1024); //最大缓存
  factory.setRepository(new File(serverPath+tempPath));//临时文件目录

  <span style="color: #ff0000;">ServletFileUpload upload = new ServletFileUpload(factory);</span>
  upload.setSizeMax(sizeMax*1024*1024);//文件最大上限

  String filePath = null;
  try {
   <span style="color: #ff0000;">List<FileItem> items = upload.parseRequest(request);</span>//获取所有文件列表
   for (FileItem item : items) {
    //获得文件名,这个文件名包括路径
    <span style="color: #ff0000;">if(!item.isFormField()){</span>
     //文件名
     String fileName = item.getName().toLowerCase();

     if(fileName.endsWith(fileType[0])||fileName.endsWith(fileType[1])||fileName.endsWith(fileType[2])||fileName.endsWith(fileType[3])||fileName.endsWith(fileType[4])||fileName.endsWith(fileType[5])){
      String uuid = UUID.randomUUID().toString();
      filePath = serverPath+uploadPath+uuid+fileName.substring(fileName.lastIndexOf("."));
      <span style="color: #ff0000;">item.write(new File(filePath));</span>
      PrintWriter pw = response.getWriter();
      pw.write("<script>alert('上传成功');window.returnValue='"+uploadPath+uuid+fileName.substring(fileName.lastIndexOf("."))+"';window.close();</script>");
      pw.flush();
      pw.close();
     }else{
      request.setAttribute("errorMsg", "上传失败,请确认上传的文件存在并且类型是图片!");
      request.getRequestDispatcher("/Admin/bookUpload.jsp").forward(request,
        response);
     }
    }
   }
  } catch (Exception e) {
   e.printStackTrace();
   request.setAttribute("errorMsg", "上传失败,请确认上传的文件大小不能超过"+sizeMax+"M");
   request.getRequestDispatcher("/Admin/bookUpload.jsp").forward(request,
     response);
  }

 }
以上就是本文的全部内容,希望对大家的学习有所帮助,也希望大家多多支持PHPERZ。