使用Spring的AbstractRoutingDataSource实现多数据源切换示例
发布于 2017-12-02 07:54:31 | 330 次阅读 | 评论: 0 | 来源: 网友投递
Spring Framework 开源j2ee框架
Spring是什么呢?首先它是一个开源的项目,而且目前非常活跃;它是一个基于IOC和AOP的构架多层j2ee系统的框架,但它不强迫你必须在每一层 中必须使用Spring,因为它模块化的很好,允许你根据自己的需要选择使用它的某一个模块;它实现了很优雅的MVC,对不同的数据访问技术提供了统一的接口,采用IOC使得可以很容易的实现bean的装配,提供了简洁的AOP并据此实现Transcation Managment,等等
这篇文章主要介绍了使用Spring的AbstractRoutingDataSource实现多数据源切换示例,具有一定的参考价值,感兴趣的小伙伴们可以参考一下。
最近因为项目需要在做两个项目间数据同步的需求,具体是项目1的数据通过消息队列同步到项目2中,因为这个更新操作还涉及到更新多个库的数据,所以就需要多数据源切换的操作。下面就讲讲在Spring中如何进行数据源切换。这里是使用AbstractRoutingDataSource类来完成具体的操作,AbstractRoutingDataSource是Spring2.0后增加的。
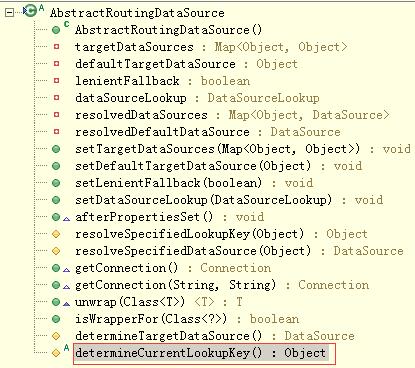
实现数据源切换的功能就是自定义一个类扩展AbstractRoutingDataSource抽象类,其实该相当于数据源DataSourcer的路由中介,可以实现在项目运行时根据相应key值切换到对应的数据源DataSource上。先看看AbstractRoutingDataSource的源码:
public abstract class AbstractRoutingDataSource extends AbstractDataSource implements InitializingBean {
  /* 只列出部分代码 */
  private Map<Object, Object> targetDataSources;

  private Object defaultTargetDataSource;

  private boolean lenientFallback = true;

  private DataSourceLookup dataSourceLookup = new JndiDataSourceLookup();

  private Map<Object, DataSource> resolvedDataSources;

  private DataSource resolvedDefaultDataSource;

  @Override
  public Connection getConnection() throws SQLException {
    return determineTargetDataSource().getConnection();
  }

  @Override
  public Connection getConnection(String username, String password) throws SQLException {
    return determineTargetDataSource().getConnection(username, password);
  }

  protected DataSource determineTargetDataSource() {
    Assert.notNull(this.resolvedDataSources, "DataSource router not initialized");
    Object lookupKey = determineCurrentLookupKey();
    DataSource dataSource = this.resolvedDataSources.get(lookupKey);
    if (dataSource == null && (this.lenientFallback || lookupKey == null)) {
      dataSource = this.resolvedDefaultDataSource;
    }
    if (dataSource == null) {
      throw new IllegalStateException("Cannot determine target DataSource for lookup key [" + lookupKey + "]");
    }
    return dataSource;
  }

  protected abstract Object determineCurrentLookupKey();
}
从源码可以看出AbstractRoutingDataSource继承了AbstractDataSource并实现了InitializingBean,AbstractRoutingDataSource的getConnection()方法调用了determineTargetDataSource()的该方法,这里重点看determineTargetDataSource()方法代码,方法里使用到了determineCurrentLookupKey()方法,它是AbstractRoutingDataSource类的抽象方法,也是实现数据源切换要扩展的方法,该方法的返回值就是项目中所要用的DataSource的key值,拿到该key后就可以在resolvedDataSource中取出对应的DataSource,如果key找不到对应的DataSource就使用默认的数据源。
自定义类扩展AbstractRoutingDataSource类时就是要重写determineCurrentLookupKey()方法来实现数据源切换功能。下面是自定义的扩展AbstractRoutingDataSource类的实现:
/**
 * 获得数据源
 */
public class MultipleDataSource extends AbstractRoutingDataSource{

  @Override
  protected Object determineCurrentLookupKey() {
     return DynamicDataSourceHolder.getRouteKey();
  }
}
DynamicDataSourceHolder类如下,实现对数据源的操作功能:
/**
 * 数据源操作类
 */
public class DynamicDataSourceHolder {
  private static ThreadLocal<String> routeKey = new ThreadLocal<String>();

  /**
   * 获取当前线程的数据源路由的key
   */
  public static String getRouteKey()
  {
    String key = routeKey.get();
    return key;
  }

  /**
   * 绑定当前线程数据源路由的key
   * 使用完成后必须调用removeRouteKey()方法删除
   */
  public static void setRouteKey(String key)
  {
    routeKey.set(key);
  }

  /**
   * 删除与当前线程绑定的数据源路由的key
   */
  public static void removeRouteKey()
  {
    routeKey.remove();
  }
}
下面在xml文件中配置多个数据源:
<!-- 数据源 -->
<bean id="dataSource1" class="org.apache.commons.dbcp.BasicDataSource">
   <property name="driverClassName" value="net.sourceforge.jtds.jdbc.Driver">
   </property>
   <property name="url" value="jdbc:jtds:sqlserver://127.0.0.1;databaseName=test">
   </property>
   <property name="username" value="***"></property>
   <property name="password" value="***"></property>
 </bean>
 <bean id="dataSource2" class="org.apache.commons.dbcp.BasicDataSource">
   <property name="driverClassName" value="net.sourceforge.jtds.jdbc.Driver">
   </property>
   <property name="url" value="jdbc:jtds:sqlserver://127.0.0.2:1433;databaseName=test">
   </property>
   <property name="username" value="***"></property>
   <property name="password" value="***"></property>
</bean>

<!-- 配置多数据源映射 -->
<bean id="multipleDataSource" class="MultipleDataSource" >
   <property name="targetDataSources">
     <map key-type="java.lang.String">
       <entry value-ref="dataSource1" key="dataSource1"></entry>
       <entry value-ref="dataSource2" key="dataSource2"></entry>
     </map>
   </property>
   <!-- 默认数据源 -->
   <property name="defaultTargetDataSource" ref="dataSource1" >
   </property>
</bean>
到这里基本的配置就完成了,下面只要在需要切换数据源的地方调用方法就行了,一般是在dao层操作数据库前进行切换的,只需在数据库操作前加上如下代码即可:
DynamicDataSourceHolder.setRouteKey("dataSource2");上面介绍的是在dao层当需要切换数据源时手动加上切换数据源的代码,也可以使用AOP的方式,把配置的数据源类型都设置成注解标签,在dao层中需要切换数据源操作的方法或类上写上注解标签,这样实现起来可操作性也更强。
@DataSourceKey("dataSource1")
public interface TestEntityMapper extends MSSQLMapper<TestEntity> {
  public void insertTest(TestEntity testEntity);
}
DataSourceKey注解代码如下:
@Target({ElementType.TYPE,ElementType.METHOD})
@Retention(RetentionPolicy.RUNTIME)
@Documented
public @interface DataSourceKey {
  String value() default "";
}
注解配置完后就要写一个实现数据源切换的类,如下:
public class MultipleDataSourceExchange {

  /**
   * 拦截目标方法,获取由@DataSource指定的数据源标识,设置到线程存储中以便切换数据源
   */
  public void beforeDaoMethod(JoinPoint point) throws Exception {
    Class<?> target = point.getTarget().getClass();
    MethodSignature signature = (MethodSignature) point.getSignature();
    // 默认使用目标类型的注解,如果没有则使用其实现接口的注解类
    for (Class<?> cls : target.getInterfaces()) {
      resetDataSource(cls, signature.getMethod());
    }
    resetDataSource(target, signature.getMethod());
  }


  /**
   * 提取目标对象方法注解和类注解中的数据源标识
   */
  private void resetDataSource(Class<?> cls, Method method) {
    try {
      Class<?>[] types = method.getParameterTypes();
      // 默认使用类注解
      if (cls.isAnnotationPresent(DataSourceKey.class)) {
        DataSourceKey source = cls.getAnnotation(DataSourceKey.class);
        DynamicDataSourceHolder.setRouteKey(source.value());
      }
      // 方法注解可以覆盖类注解
      Method m = cls.getMethod(method.getName(), types);
      if (m != null && m.isAnnotationPresent(DataSourceKey.class)) {
        DataSourceKey source = m.getAnnotation(DataSourceKey.class);
        DynamicDataSourceHolder.setRouteKey(source.value());
      }
    } catch (Exception e) {
      System.out.println(cls + ":" + e.getMessage());
    }
  }
}
代码写完后就要在xml配置文件上添加配置了(只列出部分配置):
<bean id="multipleDataSourceExchange" class="MultipleDataSourceExchange "/>

<bean id="txManager" class="org.springframework.jdbc.datasource.DataSourceTransactionManager">
  <property name="dataSource" ref="multipleDataSource" />
</bean>

<tx:advice id="txAdvice" transaction-manager="txManager">
  <tx:attributes>
    <tx:method name="insert*" propagation="NESTED" rollback-for="Exception"/>
    <tx:method name="add*" propagation="NESTED" rollback-for="Exception"/>
    ...
  </tx:attributes>
</tx:advice>

<aop:config>
  <aop:pointcut id="service" expression="execution(* com.datasource..*.service.*.*(..))"/>
  <!-- 注意切换数据源操作要比持久层代码先执行 -->
  <aop:advisor advice-ref="multipleDataSourceExchange" pointcut-ref="service" order="1"/>
  <aop:advisor advice-ref="txAdvice" pointcut-ref="service" order="2"/>
</aop:config>
到此就完成使用AOP的方式实现多数据源的动态切换了。