学习SpringMVC——如何获取请求参数详解
发布于 2017-12-01 11:25:01 | 148 次阅读 | 评论: 0 | 来源: 网友投递
Spring Framework 开源j2ee框架
Spring是什么呢?首先它是一个开源的项目,而且目前非常活跃;它是一个基于IOC和AOP的构架多层j2ee系统的框架,但它不强迫你必须在每一层 中必须使用Spring,因为它模块化的很好,允许你根据自己的需要选择使用它的某一个模块;它实现了很优雅的MVC,对不同的数据访问技术提供了统一的接口,采用IOC使得可以很容易的实现bean的装配,提供了简洁的AOP并据此实现Transcation Managment,等等
本篇文章主要介绍了SpringMVC——如何获取请求参数详解,详细的介绍了每种参数注解的用法。具有一定的参考价值,感兴趣的小伙伴们可以参考一下。
@RequestParam,你一定见过;@PathVariable,你肯定也知道;@QueryParam,你怎么会不晓得?!还有你熟悉的他(@CookieValue)!她(@ModelAndView)!它(@ModelAttribute)!没错,仅注解这块,spring mvc就为你打开了五彩斑斓的世界。来来来,不要兴(mi)奋(hu),坐下来,我们好好聊聊这么些个注解兄弟们~~~(wait, 都没有听过? 好,来,你坐前排,就你!)
一、spring mvc如何匹配请求路径——“请求路径哪家强,RequestMapping名远扬”
@RequestMapping是用来映射请求的,比如get请求,post请求,或者REST风格与非REST风格的。 该注解可以用在类上或者方法上,如果用于类上,表示该类中所有方法的父路径。
举例(这里用到的测试类如SpringMVCTest以及一些页面在第一篇《学习SpringMVC——从HelloWorld开始》中已经介绍):
SpringMVCTest.java中加入测试方法:
@RequestMapping("/testRequestMapping")

public String testRequestMapping(){

  System.out.println("testRequestMapping");

  return SUCCESS;

}
注意这里在方法级别上添加了注解@RequestMapping(“/testRequestMapping”), 表示可以通过“/testRequestMapping”相对路径来定位到这个方法,同时我们在SpringMVCTest类上也放了一个类级别的RequestMapping的注解:
@RequestMapping("/springmvc")

@Controller

public class SpringMVCTest {
注意这里还添加了一个@Controller的注解,该注解在SpringMVC 中,负责处理由DispatcherServlet 分发的请求,它把用户请求的数据经过业务处理层处理之后封装成一个Model ,然后再把该Model 返回给对应的View 进行展示。至此有了一个“springmvc/testRequestMapping”这样的路径,我们就能够定位到testRequestMapping这个方法上,然后执行方法内的方法体。
再补充一点,RequestMapping可以实现模糊匹配路径,比如:
?:匹配一个字符
*:匹配任意字符
**:匹配多层路径
/springmvc/**/lastTest 就可以匹配/springmvc/firstTest/secondTest/lastTest这样的路径
二、spring mvc如何获取请求的参数——“八仙过海,各显神通”
1. @PathVariable
该注解用来映射请求URL中绑定的占位符。通过@PathVariable可以将URL中占位符的参数绑定到controller处理方法的入参中,没听懂?看例子:
@RequestMapping("/testPathVariable/{id}")

public String testPathVariable(@PathVariable(value="id") Integer id){

  System.out.println("testPathVariable:" + id);

  return SUCCESS;

}
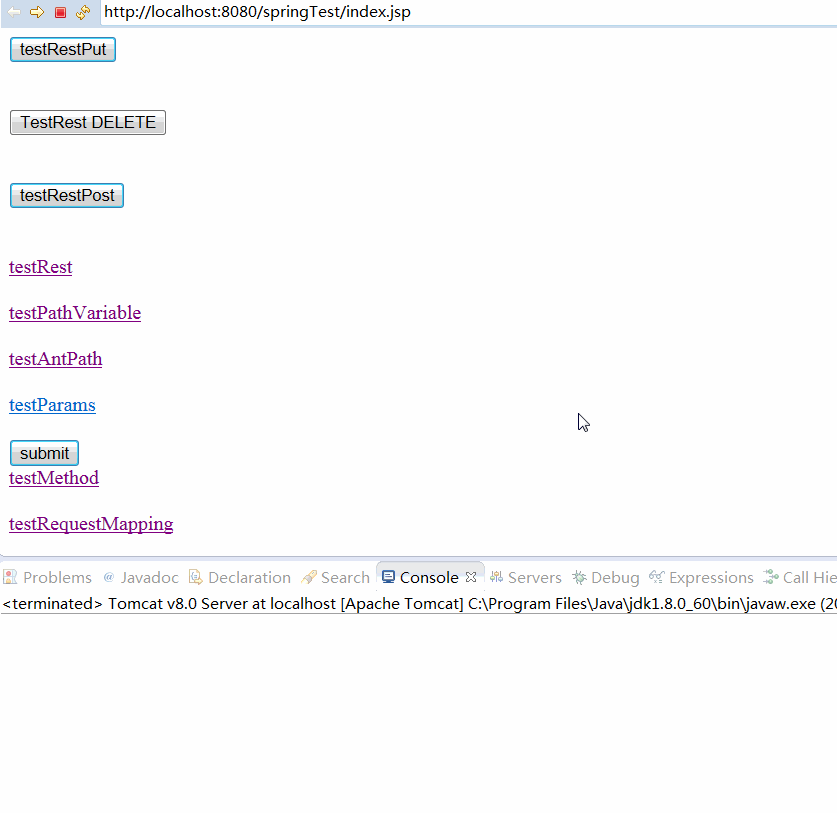
在index.jsp中我们添加一条连接,用来触发一个请求:
<a href="springmvc/testPathVariable/1">testPathVariable</a><br/><br/> 我们可以看到这里有一个超链接,点击后会进入到springmvc/testPathVariable/1对应的controller处理的方法中,那我们现在就是想获取到这个请求参数中的“1”,所以在testPathVariable方法上加入“/testPathVariable/id”,关于 id”,关于{id}的具体对应在该方法的参数中,通过@PathVariable(value="id")来声明要接收的请求参数,并通过Integer id来绑定和接收。通过该种方式,我们就可以得到前台页面请求的参数“1”。
2. @RequestParam
该注解也是用来获取请求参数的。那么该注解和@PathVariable有何不同呢? 还是看例子:
在SpringMVCTest中添加方法
@RequestMapping(value="/testRequestParam")

public String testRequestParam(@RequestParam(value="username") String username, @RequestParam(value="age", required=false, defaultValue="0") int age){

  System.out.println("testRequestParam" + " username:" + username + " age:" +age);

  return SUCCESS;

}
在index.jsp添加超链接标签
<a href="springmvc/testRequestParam?username=jackie&age=12">testRequestParam</a><br/><br/> 点击页面上的超链接,就会匹配controller中testRequestParam方法上的RequestMapping的路径。注意在该方法中,我们通过@RequestParam这个注解声明了两个变量,用来获取请求中query所带的参数值,一个是username后的值,另一个是age后面的值。
看到这里,你大概已经明白了@PathVariable和@RequestParam之间的一些区别了吧,对于像“springmvc/testPathVariable/1”这样的请求,我们通过@PathVariable来绑定请求的参数;而对于类似“springmvc/testRequestParam?username=jackie&age=12”这样的请求参数是以键值对出现的,我们通过@RequestParam来获取到如username或age后的具体请求值。
与RequestParam有异曲同工用法的还有QueryParam,因其不是spring mvc框架内的注解,这里不再详述。
对于不同的请求类型和请求方式,spring mvc都有一套针对的解决方案,下面我们来看看当下比较流行的REST风格的请求是啥样的——利用REST风格实现增删改查。
在SpringMVCTest类中自下而上的实现了查(get)增(post)删(delete)和改(put)的接口
@RequestMapping(value="/testRest/{id}", method=RequestMethod.PUT)

public String testRestPut(@PathVariable(value="id") Integer id){

  System.out.println("test put:" + id);

  return SUCCESS;

}


@RequestMapping(value="/testRest/{id}", method=RequestMethod.DELETE)

public String testRestDelete(@PathVariable(value="id") Integer id){

  System.out.println("test delete:" + id);

  return SUCCESS;

}


@RequestMapping(value="/testRest", method=RequestMethod.POST)

public String testRest(){

  System.out.println("test post");

  return SUCCESS;

}


@RequestMapping(value="/testRest/{id}", method=RequestMethod.GET)

public String testRest(@PathVariable(value="id") Integer id){

  System.out.println("test get:" + id);

  return SUCCESS;

}
那么前台界面如何实现呢,相对应的顺序为
<form action="springmvc/testRest/1" method="post">

  <input type="hidden" name="_method" value= "PUT"/>

  <input type="submit" value="testRestPut"/>

</form><br/><br/>


<form action="springmvc/testRest/1" method="post">

  <input type="hidden" name="_method" value="DELETE"/>

  <input type="submit" value="TestRest DELETE"/>

</form><br><br>


<form action="springmvc/testRest" method="post">

  <input type="submit" value="testRestPost">

</form><br/><br/>


<a href="springmvc/testRest/1">testRest</a><br/><br/>
除此之外,我们还需要在配置文件web.xml中添加支持将post转化为delete和put请求的声明
<!-- 配置HiddenHttpMethodFilter:可以把POST请求转为DELETE或POST请求 -->

<filter>

  <filter-name>HiddenHttpMethodFilter</filter-name>

  <filter-class>org.springframework.web.filter.HiddenHttpMethodFilter</filter-class>

</filter>


<filter-mapping>

  <filter-name>HiddenHttpMethodFilter</filter-name>

  <url-pattern>/*</url-pattern>

</filter-mapping>
如你所见,这里的改和删都是通过post的方式发送出去的,因为这里不支持put和delete来直接实现删改,而是通过借助post方式,并悄悄的带上一块令牌hidden类型的input标签来告诉后台我在前台发送的实际上是删和改的请求。
那么这个过程时如何实现的呢,为什么加上
<input type="hidden" name="_method" value="DELETE"/> 这块令牌,人家后台就要买你的账呢。那我们就来看看后来是如何买账的吧。
归根到底还是得益于添加在web.xml中的HiddenHttpMethodFilter这个类,在该类中有一个方法doFilterInternal, 通过调试我们可以发现其中端倪,启动tomcat(不能是tomcat8),点击delete操作对应的input标签,进入调试界面,我们可以看到:
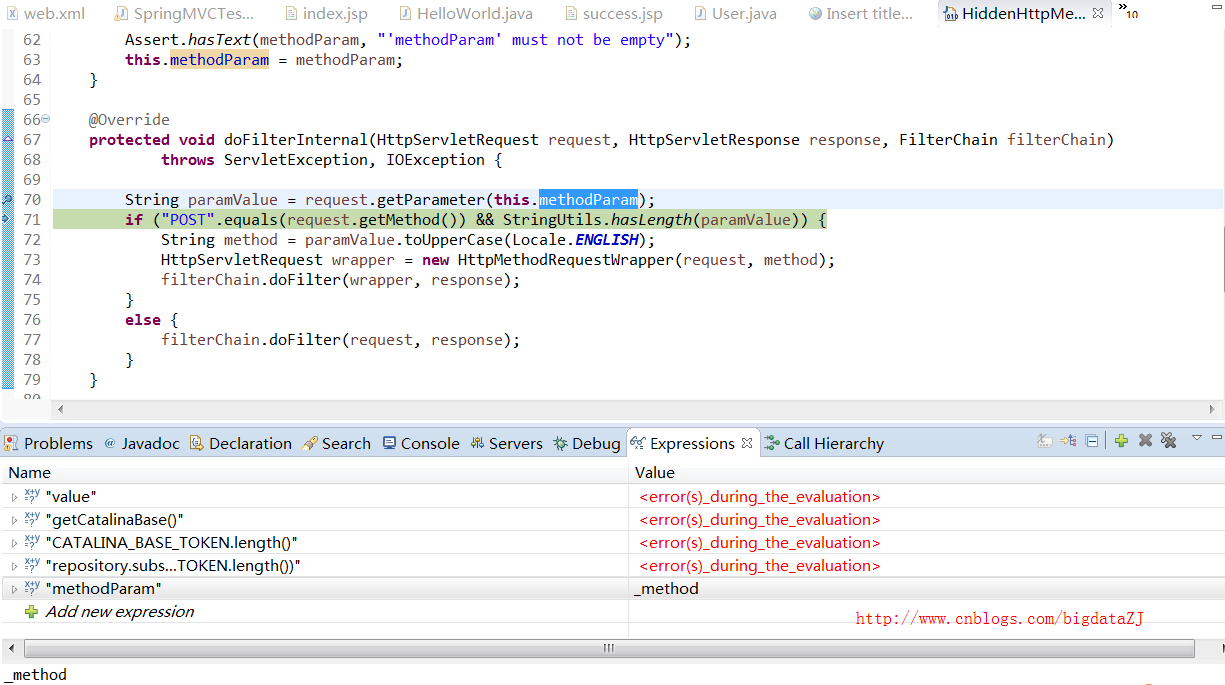
- 通过request.getParameter(this.methodParam)在request域中得到this.methodParam(_method)的值,对应于删除delete的操作,在页面上,delete中声明了一个hidden的input,其中name就是“_method”,value就是DELETE,所以这里得到的paramValue的值为“DELETE”
- 继续执行,可以看到通过request.getMethod的取值是否与“POST”相等,显然,这里是相等,因为我们在前台页面中对于delete的操作请求中method声明为post方式
- 再往后就是将获取到的请求方法封装HttpServletRequest中,完成后续的处理。这里我们应该明白了为什么前台要加上那样一个hidden的input了。
小坑:这里注意启动不能是tomcat8,而只能是比8小的版本,如7或6等,下图展示了用tomcat的报错信息和用7的成功响应:
总结下,如何发送put和delete的请求:
1.在web.xml中配置HiddenHttpMethodFilter
2.发送post请求
3.请求中是个隐藏域,name为”_mothod”,value为put或delete
最后再来说下@CookieValue这个注解。
3. @CookieValue
该注解也是差不多的套路,也是一种映射,映射的是一个Cookie值。
在我们发送一个请求时,我们可以看到请求中携带了一些cookie值
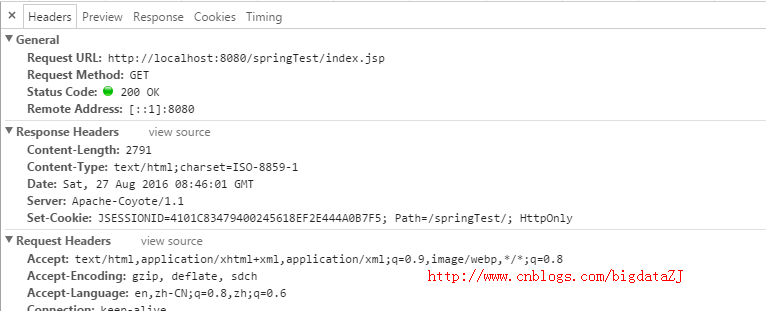
比如这里的JSESSIONID或者Path等。现在我们就写个方法用于获取Cookie值。
在SpringMVCTest中添加
@RequestMapping(value="/testCookieValue")

public String testCookieValue(@CookieValue("JSESSIONID") String cookieValue){

  System.out.println("testCookieValue: " + cookieValue);

  return SUCCESS;

}
index.jsp界面上添加链接
<a href="springmvc/testCookieValue">testCookieValue</a><br/><br/> 这样我们就可以得到类似“testCookieValue: 1410F05C9ADD84E8659C2AC79E8CC666”这样的结果。
至此,我们介绍了
1.@RequestMapping的用法
2.获取请求参数的@PathVariable、@RequestParam的用法
3.介绍如何实现REST风格的请求,并分析了post如何转化为delete和put请求
4.介绍了@CookieValue的用法
以上就是本文的全部内容,希望对大家的学习有所帮助,也希望大家多多支持PHPERZ。