spring mail借助qq邮箱服务器发送邮件
发布于 2017-11-30 21:24:24 | 143 次阅读 | 评论: 0 | 来源: 网友投递
Spring Framework 开源j2ee框架
Spring是什么呢?首先它是一个开源的项目,而且目前非常活跃;它是一个基于IOC和AOP的构架多层j2ee系统的框架,但它不强迫你必须在每一层 中必须使用Spring,因为它模块化的很好,允许你根据自己的需要选择使用它的某一个模块;它实现了很优雅的MVC,对不同的数据访问技术提供了统一的接口,采用IOC使得可以很容易的实现bean的装配,提供了简洁的AOP并据此实现Transcation Managment,等等
这篇文章主要介绍了spring mail借助qq邮箱服务器发送邮件的相关资料,具有一定的参考价值,感兴趣的小伙伴们可以参考一下
spring mail封装了javaMail的邮件服务,让邮件服务使用起来更简单,下面以qq邮箱服务器为例,用spring mail服务来发送邮件
配置qq邮箱,“设置”——“账户”,打开smtp服务,生成授权码
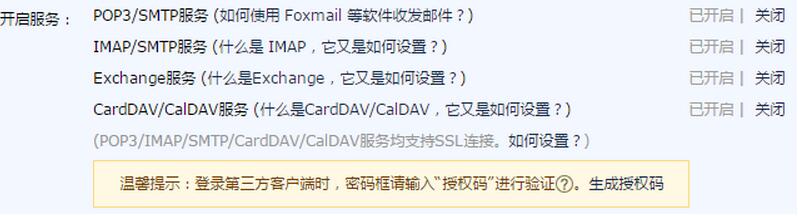
生成授权码需要验证手机,接下来用qq邮箱账号和授权码就可以发送邮件了,不需要qq密码
spring mail服务在spring-context-support中,配置依赖,然后就可以借助qq邮箱提供的发件服务器发送邮件了
<dependency>
 <groupId>javax.mail</groupId>
 <artifactId>mail</artifactId>
 <version>1.4.7</version>
</dependency>
<dependency>
 <groupId>org.springframework</groupId>
 <artifactId>spring-context-support</artifactId>
 <version>3.2.17.RELEASE</version>
</dependency>
普通文本邮件
首先测试的是普通文本邮件
package com.xmyself.mail;

import org.springframework.mail.SimpleMailMessage;
import org.springframework.mail.javamail.JavaMailSenderImpl;

public class Main {
 public static void main(String[] args) {
  JavaMailSenderImpl mailSender = new JavaMailSenderImpl();
  mailSender.setHost("smtp.qq.com");
  mailSender.setPort(587);
  mailSender.setUsername("573215750@qq.com");
  mailSender.setPassword("dsruklozelxcbdba");//授权码

  SimpleMailMessage mail = new SimpleMailMessage();
  mail.setTo("573215750@qq.com");
  mail.setFrom("573215750@qq.com");
  mail.setSubject("test mail");
  mail.setText("test mail content");

  mailSender.send(mail);
  System.out.println("success");
 }
}
运行,即可发送一封email,注意:授权码而不是密码,端口并不是25而是587
接下来,保持mailSender不变,修改mail类型,发送内容丰富的邮件
简单html邮件
让邮件内容以html格式展现,只需要修改如下
MimeMessage mail = mailSender.createMimeMessage();
MimeMessageHelper helper = new MimeMessageHelper(mail, true);//true用来打开multipart模式,添加图片或附件

helper.setTo("573215750@qq.com");
helper.setFrom("573215750@qq.com");
helper.setSubject("test mail");
helper.setText("<html><head></head><body>"
  + "<h1>hello!!spring html Mail</h1>"
  + "</body></html>"
  , true);
依然使用mailSender发送这个mail
mailSender.send(mail);
带图片的html邮件
在邮件的html内容中插入图片显示,修改text内容即可
helper.setText("<html><head></head><body>"
  + "<h1>hello!!spring html Mail</h1>"
  + "<img src=\"cid:image\" />"
  + "</body></html>"
  , true);
FileSystemResource image = new FileSystemResource(new File("d:/test.jpg"));
helper.addInline("image", image);
带附件的html邮件
为邮件添加附件,text内容不变,只需要修改如下
helper.setText("<html><head></head><body>"
  + "<h1>hello!!spring html Mail</h1>"
  + "</body></html>"
  , true);
FileSystemResource image = new FileSystemResource(new File("d:/test.jpg"));
helper.addAttachment("test.jpg", image);
freemarker模板邮件
html内容通常非常丰富,直接写在setText()方法中实在太乱了,所以,应该将html作为一个文件单独管理,然后用工具将其内容转换为字符串,作为setText()的参数,下面以freemarker模板引擎为例
在工程src/main/resources目录下新建templates目录,里面放一个test.ftl文件,内容如下
<html>
 <head></head>
 <body>
  <p>test freemarker template, welcome ${username}</p>
  <img src="cid:image" />
 </body>
</html>
然后,用freemarker和spring提供的工具将内容转换为字符串,这当然需要依赖新的jar
<dependency>
 <groupId>org.freemarker</groupId>
 <artifactId>freemarker</artifactId>
 <version>2.3.23</version>
</dependency>
新建FreemarkerParser.java
package com.xmyself.mail;

import java.util.Map;
import org.springframework.ui.freemarker.FreeMarkerTemplateUtils;
import freemarker.template.Configuration;
import freemarker.template.Template;

public class FreemarkerParser {
 public String toHtmlString(String name, Map<String, String> data) {
  @SuppressWarnings("deprecation")
  Configuration config = new Configuration();
  config.setClassForTemplateLoading(this.getClass(), "/templates/");
  try {
   Template template = config.getTemplate(name);
   return FreeMarkerTemplateUtils.processTemplateIntoString(template, data);
  } catch (Exception e) {
   e.printStackTrace();
  }
  return "fail";
 }
}
用map中的值替换掉模板中的${}内容,将模板文件转换为String字符串
注意:过程中模板路径的配置与读取是个麻烦事,暂时以这种方式处理
发送邮件的代码只需要非常小的变化
Map<String, String> data = new HashMap<String, String>();
data.put("username", "chengyi");
String text = new FreemarkerParser().toHtmlString("test.ftl", data);

helper.setText(text, true);
FileSystemResource image = new FileSystemResource(new File("d:/test.jpg"));
helper.addInline("image", image);
以上就是本文的全部内容,希望对大家的学习有所帮助,也希望大家多多支持PHPERZ。