JavaWeb Spring开发入门深入学习
发布于 2017-11-27 23:56:22 | 145 次阅读 | 评论: 0 | 来源: 网友投递
Spring Framework 开源j2ee框架
Spring是什么呢?首先它是一个开源的项目,而且目前非常活跃;它是一个基于IOC和AOP的构架多层j2ee系统的框架,但它不强迫你必须在每一层 中必须使用Spring,因为它模块化的很好,允许你根据自己的需要选择使用它的某一个模块;它实现了很优雅的MVC,对不同的数据访问技术提供了统一的接口,采用IOC使得可以很容易的实现bean的装配,提供了简洁的AOP并据此实现Transcation Managment,等等
这篇文章主要为大家详细介绍了JavaWeb Spring开发入门学习教程,具有一定的参考价值,感兴趣的小伙伴们可以参考一下
1 Spring基本特征
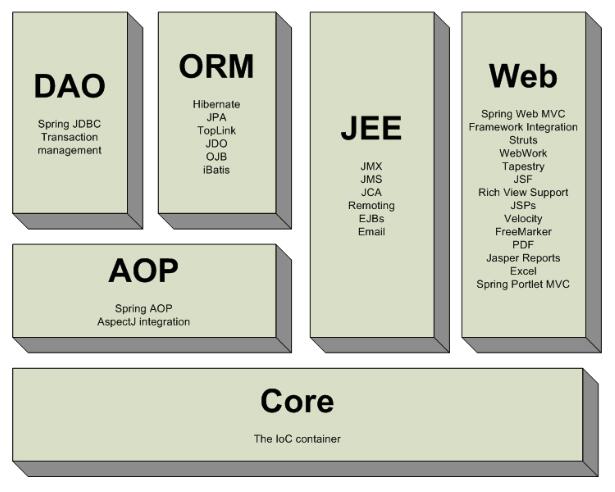
Spring是一个非常活跃的开源框架;它是一个基于Core来构架多层JavaEE系统的框架,它的主要目地是简化企业开发.
Spring以一种非侵入式的方式来管理你的代码,Spring提倡”最少侵入”,这也就意味着你可以适当的时候安装或卸载Spring,Spring让java亮了。 (开放–闭合原理),这里是闭原则。
2 开发spring所需要的工具
(这里先将spring2.5 ,后面3.0)
2.1 Spring的jar包
到http://www.springsource.org/download下载spring,然后进行解压缩,在解压目录中找到下面jar文件,拷贝到类路径下
—spring的核心类库 在spring文档的dist下 dist\spring.jar
—引入的第三方类库 都spring文档的lib下,lib\jakarta-commons\commons-logging.jar
—如果使用了切面编程(AOP),还需要下列jar文件 lib/aspectj/aspectjweaver.jar和aspectjrt.jarlib/cglib/cglib-nodep-2.1_3.jar
—如果使用了JSR-250中的注解,如@Resource/@PostConstruct/@PreDestroy,还需要下列jar文件lib\j2ee\common-annotations.jar
注:JSR(Java 规范请求)是指向JCP(Java Community Process)提出新增一个标准化技术规范的正式请求。任何人都可以提交JSR(Java 规范请求),以向Java平台增添新的API和服务。JSR已成为Java界的一个重要标准
2.2 Spring配置文件
默认情况下是applicationContext.xml文件。可以建立很多xml文件,工程中一般都是这样配置的。(src目录下建)
3 Spring基本功能详解
3.1 SpringIOC
Spring的控制反转:把对象的创建、初始化、销毁等工作交给spring容器来做。由spring容器控制对象的生命周期。
步骤:
•A. 启动spring容器
1、 在类路径下寻找配置文件来实例化容器
ApplicationContext ctx = new ClassPathXmlApplicationContext(new String[]{"applicationContext.xml"});可以在整个类路径中寻找xml文件
* 通过这种方式加载。需要将spring的配置文件放到当前项目的classpath路径下
* classpath路径指的是当前项目的src目录,该目录是java源文件的存放位置。
2、 在文件系统路径下寻找配置文件来实例化容器
Spring的配置文件可以指定多个,可以通过String数组传入。
注:经常用第一种方法启动容器
•B. 从spring容器中提取对象
spring 容器结构:

3.2 别名
<beans>
 <alias name="person" alias="p"/>//alias这里是别名,可以通过p,得到person这个bean.
 <bean name="person" class="cn.itcast.aliasspring.Person"/>
</beans>
通过这样的配置,可以达到在一个地方命名,在多个地方使用不同的名字的效果。
3.3 Spring容器内部对象
1 创建对象的方式
1.1 无参构造函数
<bean id="helloWorld" class="com.itheima10.spring.createobject.HelloWorld"></bean>
1.2 静态工厂方法
<bean id="helloWorld2" class="com.itheima10.spring.createobject.method.HelloWorldFactory"
factory-method="getInstance"></bean>
1.3 实例工厂方法
<bean id="helloWorldFactory" class="com.itheima10.spring.createobject.method.HelloWorldFactory2"></bean>
<bean id="helloWorld3" factory-bean="helloWorldFactory" factory-method="getInstance"></bean>
记住概念即可,用的最多的是第一种方法,但是和别的工具集成时,用的是实例工厂模式。
实例:
配置applicationContext.xml
<?xml version="1.0" encoding="UTF-8"?>
<beans xmlns="http://www.springframework.org/schema/beans"
 xmlns:xsi="http://www.w3.org/2001/XMLSchema-instance"
 xsi:schemaLocation="http://www.springframework.org/schema/beans
  http://www.springframework.org/schema/beans/spring-beans-2.5.xsd">
 <!--
 把一个类放入到spring容器中,该类就称为一个bean
 -->
 <!--
 bean描述了一个类
  id 唯一的标示
  class 类的全名
 -->

 <bean id="helloWorld" class="com.itheima10.spring.createobject.HelloWorld"></bean>

 <!-----------------------别名-------------------------------------->
 <!--
 name的属性和bean的id匹配
 alias 别名
 -->
 <alias name="helloWorld" alias="狗蛋"/>
 <alias name="helloWorld" alias="习近平"/>
<!-----------------------静态工厂方法-------------------------------------->
<!--
 把helloWorldFactory放入到spring容器中
 factory-method 工厂方法
 -->
 <bean id="helloWorld2"
 factory-method="getInstance"
 class="com.itheima10.spring.createobject.method.HelloWorldFactory"></bean>
<!-----------------------实例工厂方法-------------------------------------->
 <!--
 把helloWorldFactory2放入到spring容器中
 factory-bean 指明了工厂bean
 factory-method 指明了该工厂bean中的方法
 -->
 <bean id="helloWorldFactory" class="com.itheima10.spring.createobject.method.HelloWorldFactory2"></bean>
 <bean id="helloWorld3"
 factory-bean="helloWorldFactory"
 factory-method="getInstance"></bean>
</beans>
建立实体类HelloWorld
package com.itheima10.spring.createobject;

public class HelloWorld {
 public void hello(){
 System.out.println("hello");
 }
}
建立静态工厂HelloWorldFactory
package com.itheima10.spring.createobject.method;

public class HelloWorldFactory {
 public static HelloWorld getInstance(){
 System.out.println("static method");
 return new HelloWorld();
 }
}
建立实体工厂HelloWorldFactory2
package com.itheima10.spring.createobject.method;

public class HelloWorldFactory2 {
 /**
 * 必须先创建工厂对象,才能调用该方法
 * @return
 */
 public HelloWorld getInstance(){
 return new HelloWorld();
 }
}
编写测试方法CreateObjectMethodTest
package com.itheima10.spring.createobject.method;

import org.junit.Test;
import org.springframework.context.ApplicationContext;
import org.springframework.context.support.ClassPathXmlApplicationContext;


/**
 * 第二种和第三种产生方式能看明白就OK了
 * @author zd
 *
 */
public class CreateObjectMethodTest {
 /**
 * 在默认情况下,spring容器调用的是一个类的默认的构造函数创建对象
 */
 @Test
 public void testCreateObject_Default(){
 ApplicationContext context =
  new ClassPathXmlApplicationContext("applicationContext.xml");
 HelloWorld helloWorld = (HelloWorld)context.getBean("helloWorld");
 helloWorld.hello();
 }

 /**
 * 利用静态工厂创建对象
 * <bean id="helloWorld2"
 factory-method="getInstance"
 class="com.itheima10.spring.createobject.method.HelloWorldFactory"></bean>
  spring容器做的事情:
  利用HelloWorldFactory类调用了getInstance方法
 */
 @Test
 public void testCreateObject_StaticFactory(){
 ApplicationContext context =
  new ClassPathXmlApplicationContext("applicationContext.xml");
 HelloWorld helloWorld = (HelloWorld)context.getBean("helloWorld2");
 helloWorld.hello();
 }

 /**
 * 实例工厂方法创建对象
 * <bean id="helloWorldFactory"
 * class="com.itheima10.spring.createobject.method.HelloWorldFactory2"></bean>
 * <bean id="helloWorld3"
 factory-bean="helloWorldFactory"
 factory-method="getInstance"></bean>
 spring容器内部做的事情:
  1、创建一个helloWorldFactory对象
  2、由该对象调用getInstance产生helloWorld对象
 */
 @Test
 public void testCreateObject_InstanceFactory(){
 ApplicationContext context =
  new ClassPathXmlApplicationContext("applicationContext.xml");
 HelloWorld helloWorld = (HelloWorld)context.getBean("helloWorld3");
 helloWorld.hello();
 }
}
2 对象的scope
对象的scope有两个属性:singleton 与prototype。singleton表示单例
2.1 singleton(默认值)
在每个Spring IoC容器中一个bean定义只有一个对象实例(共享)。
2.2 prototype
允许bean可以被多次实例化(使用一次就创建一个实例) . Spring不能对一个prototype bean的整个生命周期负责.这就意味着清楚prototype作用域的对象并释放任何prototype bean所持有的昂贵资源都是客户端的责任。
<bean id="helloWorld" class="com.itheima10.spring.scope.HelloWorld" scope="singleton"></bean>
<bean id="helloWorld" class="com.itheima10.spring.scope.HelloWorld" scope="prototype"></bean>
建立HelloWorld类
public class HelloWorld {
 public List<String> lists = new ArrayList<String>();
 public HelloWorld(){
 System.out.println("new instance");
 }
 public void hello(){
 System.out.println("hello");
 }
}
建立测试类ScopeTest
package com.itheima10.spring.scope;

import org.junit.Test;
import org.springframework.context.ApplicationContext;
import org.springframework.context.support.ClassPathXmlApplicationContext;

public class ScopeTest {
 /**
 * 把一个bean放入到spring容器中,默认的是单例
 * 如果一个类放入到spring容易中,而这个类是单例的,那么该类中的属性将会成为共享的
 */
 @Test
 public void testCreateObject_Scope_Default(){
 ApplicationContext context =
  new ClassPathXmlApplicationContext("applicationContext.xml");
 HelloWorld hello1 = (HelloWorld)context.getBean("helloWorld");
 hello1.lists.add("aaaa");
 hello2= (HelloWorld)context.getBean("helloWorld");
 hello2.lists.add("bbbb");
 System.out.println(helloWorld.lists.size());//2,并且只输出一次new instance
 }

 /**
 * 如果spring的配置文件如下:
 * <bean id="helloWorld"
 class="com.itheima10.spring.scope.HelloWorld"
 scope="prototype"></bean>
 那么spring容器会为创建多个对象
 */
 @Test
 public void testCreateObject_Scope_Prototype(){
 ApplicationContext context =
  new ClassPathXmlApplicationContext("applicationContext.xml");
 HelloWorld hello1 = (HelloWorld)context.getBean("helloWorld");
 hello1.lists.add("aaaa");
 hello2= (HelloWorld)context.getBean("helloWorld");
 hello2.lists.add("bbbb");
 System.out.println(helloWorld.lists.size());//1,并且只输出两次new instance
 }
}
3 初始化bean时机
懒加载——默认情况下会在容器启动时初始化bean,但我们可以指定Bean节点的lazy-init=“true”来延迟初始化bean,这时候,只有第一次获取bean会才初始化bean。如:
<bean id="xxx" class="cn.itcast.OrderServiceBean" lazy-init="true"/>
如果想对所有bean都应用延迟初始化,可以在根节点beans设置default-lazy-init=“true“,如下:
<beans default-lazy-init="true“ ...>
Spring默认在启动时将所有singleton bean提前进行实例化。提前实例化意味着作为初始化的一部分,ApplicationContext会自动创建并配置所有的singleton bean.通常情况下这是件好事。因为这样在配置中有任何错误能立即发现。
Lazy-init 为false,spring容器将在启动的时候报错(比较好的一种方式)
Lazy-init 为true,spring容器将在调用该类的时候出错。
配置applicationContext.xml
<bean id="helloWorld"
 class="com.itheima10.spring.createobject.when.HelloWorld"
 scope="prototype"></bean>
</beans>
建立测试类CreateObjectWhenTest
package com.itheima10.spring.createobject.when;

import org.junit.Test;
import org.springframework.context.ApplicationContext;
import org.springframework.context.support.ClassPathXmlApplicationContext;

public class CreateObjectWhenTest {
 /**
 * 默认情况下的顺序
 * 1、启动spring容器
 * 2、创建HelloWorld对象
 * 3、对象调用方法
 *
 * <bean id="helloWorld" class="com.itheima10.spring.createobject.when.HelloWorld"></bean>
  <bean id="helloWorld2" class="com.itheima10.spring.createobject.when.HelloWorld"></bean>
  因为在spring容器中声明了两个bean,所以spring容器要创建两个对象
  说明:
  如果struts2,hibernate,spring容器整合,如果spring的配置文件中出现错误
  当 tomcat容器启动的时候,就会报错,错误会特别早的显示出来

  如果一个bean存放了大量的数据,这种方式不好,有可能会把数据过早的停留在内存中

  如果一个bean不是单例,那么不管怎么样配置,都在是context.getBean时才要创建对象
 */
 @Test
 public void testCreateObject_When_Default(){
 ApplicationContext context =
   new ClassPathXmlApplicationContext("applicationContext.xml");
 context.getBean("helloWorld");
 }

 /**
 * <bean id="helloWorld"
 class="com.itheima10.spring.createobject.when.HelloWorld"
 lazy-init="true"></bean>
 * 顺序
 * 1、启动spring容器
 * 2、context.getBean
 * 3、调用构造器函数创建对象
 * 说明:
  如果struts2,hibernate,spring容器整合,如果spring的配置文件中出现错误
  只有当用到该bean的时候才会报错。

  如果一个bean存放了大量的数据,需要的时候才要加载数据
 */
 @Test
 public void testCreateObject_When_Lazy(){
 ApplicationContext context =
   new ClassPathXmlApplicationContext("applicationContext.xml");
 context.getBean("helloWorld");
 }
}
4 init、destroy方法
Spring初始化bean或销毁bean时,有时需要作一些处理工作,因此spring可以在创建和拆卸bean的时候调用bean的两个生命周期方法。可以指定方法进行操作。
<bean id=“foo” class=“...Foo” init-method=“setup” destory-method=“teardown”/>
当foo被载入到Spring容器中时调用init-method方法。当foo从容器中删除时调用destory-method(scope = singleton有效)
编写HelloWorld
public class HelloWorld {
 public HelloWorld(){
 System.out.println("new instance");
 }

 public void init(){
 System.out.println("init");
 }

 public void destroy(){
 System.out.println("destroy");
 }

 public void hello(){
 System.out.println("hello");
 }
}
编写测试类InitDestroyTest
package com.itheima10.spring.ioc.initdestroy;
import org.junit.Test;
import org.springframework.context.ApplicationContext;
import org.springframework.context.support.ClassPathXmlApplicationContext;
public class InitDestroyTest {
/**
* init-method="init"
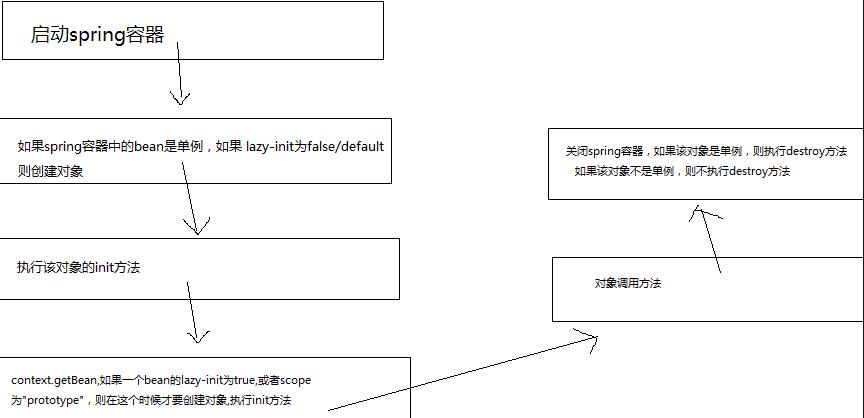
* 执行顺序:
* 1、启动spring容器
* 2、创建helloWorld对象
* 3、执行init方法
* spring容器内部自动执行的
* 4、对象调用方法
* 5、只有当spring容器关闭掉的情况下才能执行destroy方法 前提条件:bean是单例的
* 该方法也是由spring容器内部调用的
* 说明:
* 如果一个bean不是单例的,则spring容器不负责对象的销毁。
* 在spring容器中,只有一个bean是单例的情况下,spring容器才要负责对象的创建、初始化、销毁工作
* 如果一个bean不是单例,spring容器只负责创建、初始化
*/
@Test
public void testInitDestroy(){
ApplicationContext context =
new ClassPathXmlApplicationContext("applicationContext.xml");
HelloWorld helloWorld = (HelloWorld)context.getBean("helloWorld");
helloWorld.hello();
ClassPathXmlApplicationContext applicationContext = (ClassPathXmlApplicationContext)context;
applicationContext.close();
}
}
执行顺序图:
以上就是本文的全部内容,希望对大家的学习有所帮助,也希望大家多多支持PHPERZ。