Android仿网易严选底部弹出菜单效果
发布于 2017-10-14 07:54:59 | 170 次阅读 | 评论: 0 | 来源: 网友投递
Android移动端操作系统
Android是一种基于Linux的自由及开放源代码的操作系统,主要使用于移动设备,如智能手机和平板电脑,由Google公司和开放手机联盟领导及开发。尚未有统一中文名称,中国大陆地区较多人使用“安卓”或“安致”。
这篇文章主要为大家详细介绍了Android仿网易严选底部弹出菜单效果,具有一定的参考价值,感兴趣的小伙伴们可以参考一下
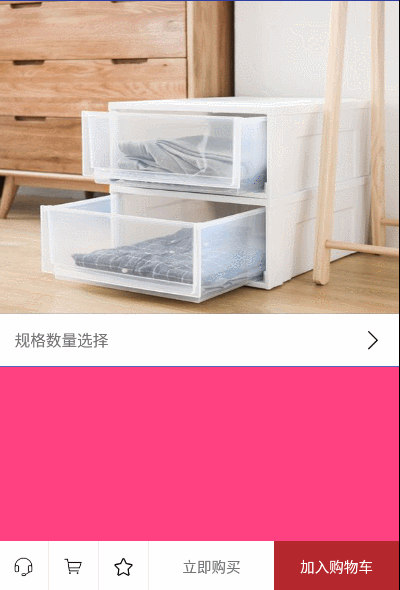
在网易严选的看东西的时候在商品详情页里看到他的底部弹出菜单,本能反应是想用DottomSheetDialog或者PopupWindow来实现,可是发现实现不了他那种效果,于是就自己模仿一个像严选这样的底部弹出菜单。
不管是DottomSheetDialog或者PopupWindow他们的阴影背景都是全部覆盖的,这就造成除了菜单内容的View之外其他都是阴影的,而严选不是这样的。唠叨到此,首先展示效果图如下:
是不是还可以呢,由于代码量不多却注释详细,所以先贴出代码再一一详说:
BottomPopupWindowView类:
 public class BottomPopupWindowView extends LinearLayout{

  private AnimatorListener animatorListener;
  //底部内容的View
  private FrameLayout base_view;
  //内容的View
  private FrameLayout content_view;
  //背景的View
  private RelativeLayout popup_bg;
  //xml加载的View
  private View bottomPopouView;
  //外部加载的内容View
  private View contentView;
  //外部加载的底部内容View
  private View baseView;
  //手势的最小值
  private float minVelocity=0;
  //加载一次的判断值
  private boolean mDrawable=true;

  public void setAnimatorListener(AnimatorListener animatorListener) {
    this.animatorListener = animatorListener;
  }

  public void setBaseView(View baseView){
    this.baseView=baseView;
  }

  public void setContextView(View view){
    this.contentView=view;
  }

  public void setContentView(int id){
    this.contentView=LayoutInflater.from(getContext()).inflate(id,null);
  }

  public BottomPopupWindowView(Context context) {
    this(context,null);
  }

  public BottomPopupWindowView(Context context, @Nullable AttributeSet attrs) {
    this(context,attrs,0);
  }

  public BottomPopupWindowView(Context context, @Nullable AttributeSet attrs, int defStyleAttr) {
    super(context, attrs, defStyleAttr);
    //初始化各种数值
    minVelocity=ViewConfiguration.get(getContext()).getScaledTouchSlop();
    bottomPopouView= LayoutInflater.from(getContext()).inflate(R.layout.layout_bottom_popup,null);
    base_view=(FrameLayout)bottomPopouView.findViewById(R.id.bottom_view);
    content_view=(FrameLayout)bottomPopouView.findViewById(R.id.content_view);
    popup_bg=(RelativeLayout)bottomPopouView.findViewById(R.id.popup_bg);
    //把整个View都加载在LinearLayout里以显示出来
    addView(bottomPopouView);
    //背景颜色监听
    popup_bg.setOnClickListener(new OnClickListener() {
      @Override
      public void onClick(View v) {
        disMissPopupView();
      }
    });

    //屏蔽内容区域点击事件
    content_view.setOnClickListener(new OnClickListener() {
      @Override
      public void onClick(View view){}
    });

    //屏蔽底部内容区域点击事件
    base_view.setOnClickListener(new OnClickListener() {
      @Override
      public void onClick(View view){}
    });

    //内容区域判断是否向下,手势向下就关闭弹框
    content_view.setOnTouchListener(new OnTouchListener() {
      @Override
      public boolean onTouch(View view, MotionEvent motionEvent) {
        float y1=0,y2=0;
        if(motionEvent.getAction() == MotionEvent.ACTION_DOWN) {
          y1 = motionEvent.getY();
        }
        if(motionEvent.getAction() == MotionEvent.ACTION_UP){
          y2 = motionEvent.getY();
          if((y2-y1)>minVelocity){
            disMissPopupView();
          }
        }
        return false;
      }
    });

  }

  @Override
  protected void onDraw(Canvas canvas) {
    super.onDraw(canvas);
    if(mDrawable&&baseView!=null){
      //刚开始加载底部内容区域,只需一次就行,多次报错
      base_view.addView(baseView);
      mDrawable=false;
    }
  }

  public void showPopouView(){
    if(contentView!=null){
      //开始动画数据
      startAnimation();
      //开启背景颜色的渐变动画
      popup_bg.setVisibility(View.VISIBLE);
      popup_bg.setAnimation(AnimationUtils.loadAnimation(getContext(), R.anim.bp_bottom_bg_in));
      //把这个区域全部显示出来
      ((BottomPopupWindowView)this).setLayoutParams(new RelativeLayout.LayoutParams(
          RelativeLayout.LayoutParams.MATCH_PARENT,RelativeLayout.LayoutParams.MATCH_PARENT));
      //假如内容区域
      content_view.addView(contentView,0);
      content_view.setVisibility(View.VISIBLE);
      //开启内容区域动画
      content_view.setAnimation(AnimationUtils.loadAnimation(getContext(),R.anim.bp_bottom_view_in));
    }
  }

  public void disMissPopupView(){
    //开始关闭动画数据
    endAnimation();
    //开启内容区域动画
    content_view.setVisibility(View.GONE);
    Animation animation=AnimationUtils.loadAnimation(getContext(),R.anim.bp_bottom_view_out);
    animation.setAnimationListener(new Animation.AnimationListener() {
      @Override
      public void onAnimationStart(Animation animation) {}
      @Override
      public void onAnimationRepeat(Animation animation) {}
      @Override
      public void onAnimationEnd(Animation animation) {
        //等内容区域动画结束后,清楚所有View
        content_view.removeAllViews();
        //开启背景颜色的渐变动画
        popup_bg.setVisibility(View.GONE);
        popup_bg.setAnimation(AnimationUtils.loadAnimation(getContext(), R.anim.bp_bottom_bg_out));
        //把整个控件的大小恢复到底部View区域的大小
        RelativeLayout.LayoutParams layoutParams=new RelativeLayout.LayoutParams(
            RelativeLayout.LayoutParams.MATCH_PARENT,getViewHeight((BottomPopupWindowView)BottomPopupWindowView.this));
        layoutParams.addRule(RelativeLayout.ALIGN_PARENT_BOTTOM,-1);
        ((BottomPopupWindowView)BottomPopupWindowView.this).setLayoutParams(layoutParams);
      }
    });
    //开始动画
    content_view.setAnimation(animation);
  }

  //获取View的高度
  public int getViewHeight(View view){
    int width =View.MeasureSpec.makeMeasureSpec(0,View.MeasureSpec.UNSPECIFIED);
    int height =View.MeasureSpec.makeMeasureSpec(0,View.MeasureSpec.UNSPECIFIED);
    view.measure(width,height);
    return view.getMeasuredHeight();
  }

  //开始动画数据变化
  public void startAnimation(){
    ValueAnimator valueAnimator = ValueAnimator.ofInt(0,40);
    valueAnimator.setDuration(250);
    valueAnimator.addUpdateListener(new ValueAnimator.AnimatorUpdateListener() {
      @Override
      public void onAnimationUpdate(ValueAnimator valueAnimator) {
        if(animatorListener!=null){
          animatorListener.startValue((int) valueAnimator.getAnimatedValue());
        }
      }
    });
    valueAnimator.start();
  }

  //结束动画数值变化
  public void endAnimation() {
    ValueAnimator valueAnimator = ValueAnimator.ofInt(40,0);
    valueAnimator.setDuration(250);
    valueAnimator.addUpdateListener(new ValueAnimator.AnimatorUpdateListener() {
      @Override
      public void onAnimationUpdate(ValueAnimator valueAnimator) {
        if(animatorListener!=null){
          animatorListener.endValue((int) valueAnimator.getAnimatedValue());
        }
      }
    });
    valueAnimator.start();
  }

}
对应的加载的xml布局是:
layout_bottom_popou.xml如下:
<?xml version="1.0" encoding="utf-8"?>
<RelativeLayout xmlns:android="http://schemas.android.com/apk/res/android"
  android:orientation="vertical"
  android:layout_width="match_parent"
  android:layout_height="wrap_content"
  android:background="#707A7A7A">

  <RelativeLayout
    android:id="@+id/popup_bg"
    android:layout_width="match_parent"
    android:layout_height="match_parent"
    android:background="#707A7A7A"
    android:layout_above="@+id/bottom_view"></RelativeLayout>

  <FrameLayout
    android:id="@+id/content_view"
    android:layout_width="match_parent"
    android:layout_height="wrap_content"
    android:layout_above="@+id/bottom_view"
    android:orientation="horizontal">
  </FrameLayout>

  <FrameLayout
    android:id="@+id/bottom_view"
    android:layout_width="match_parent"
    android:layout_height="wrap_content"
    android:layout_alignParentBottom="true"></FrameLayout>

</RelativeLayout>
1.在BottomPopupWindowView是继承LinearLayout,而layout_bottom_popou.xml是这整个BottomPopupWindowView里的骨架,然后在BottomPopupWindowView初始化的时候通过addView()来加载整个骨架布局。在onDraw()里只需加载一次baseView就可以了,不然后重复加载导致报错。这样就初始化成功了,刚开始只会加载baseView的界面,就相当于严选最下面的购物车立即购买等界面。
2.当调用showPopouView()时显示菜单的。startAnimation()方法只是为了产生动画的数据。
popup_bg.setVisibility(View.VISIBLE);
popup_bg.setAnimation(AnimationUtils.loadAnimation(getContext(), R.anim.bp_bottom_bg_in));
只是为了开启背景渐变的动画没什么说的。最重要的是显示菜单实现是把BottomPopupWindowView的大小扩展到全屏,所以设置((BottomPopupWindowView)this).setLayoutParams(new RelativeLayout.LayoutParams(RelativeLayout.LayoutParams.MATCH_PARENT,RelativeLayout.LayoutParams.MATCH_PARENT));,然后把弹出菜单的View即contentView装进content_view即可,然后开启弹出动画就实现了。
3.最后是disMissPopupView()方法关闭弹窗。endAnimation()方法只是为了产生动画的数据。再启动内容域View即content_View的退出动画,在动画结束后用content_view.removeAllViews();
起初菜单内容,再像上面一样开启背景颜色渐变动画,最后只需使BottomPopupWindowView恢复原来的baseView的大小及可以了,具体如下:
RelativeLayout.LayoutParams layoutParams=new RelativeLayout.LayoutParams(
     RelativeLayout.LayoutParams.MATCH_PARENT,getViewHeight((BottomPopupWindowView)BottomPopupWindowView.this));
        layoutParams.addRule(RelativeLayout.ALIGN_PARENT_BOTTOM,-1);
        ((BottomPopupWindowView)BottomPopupWindowView.this).setLayoutParams(layoutParams);
这就是核心的代码功能了,代码量不多具体细节看上面的源码。
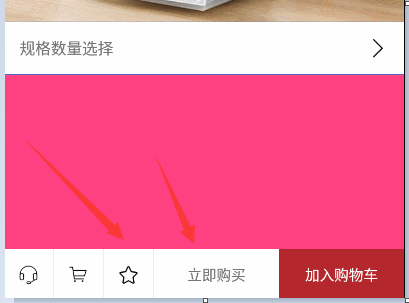
有人或许会问返回动画的数据有什么用,很简单就是为了实现严选菜单框出来时整个上面详情的缩放。具体看如下demo,首先给出界面xml,如下:
<?xml version="1.0" encoding="utf-8"?>
<RelativeLayout xmlns:android="http://schemas.android.com/apk/res/android"
  android:layout_width="match_parent"
  android:layout_height="match_parent">

  <LinearLayout
    android:id="@+id/main_view"
    android:layout_width="match_parent"
    android:layout_height="match_parent"
    android:background="@color/colorAccent"
    android:orientation="vertical">

    <ImageView
      android:id="@+id/banner_img"
      android:layout_width="match_parent"
      android:layout_height="300dp"
      android:scaleType="fitXY"
      android:src="@mipmap/banner"/>

    <View
      android:layout_width="match_parent"
      android:layout_height="0.1dp"
      android:background="@color/colorPrimary"></View>

    <RelativeLayout
      android:id="@+id/guige"
      android:layout_width="match_parent"
      android:layout_height="50dp"
      android:background="#ffffff">

      <TextView
        android:layout_width="wrap_content"
        android:layout_height="wrap_content"
        android:layout_centerVertical="true"
        android:layout_marginLeft="15dp"
        android:textSize="15dp"
        android:text="规格数量选择"/>

      <ImageView
        android:layout_width="20dp"
        android:layout_height="20dp"
        android:layout_alignParentRight="true"
        android:layout_centerVertical="true"
        android:layout_marginRight="15dp"
        android:src="@mipmap/ic_jiantou"/>

    </RelativeLayout>

    <View
      android:layout_width="match_parent"
      android:layout_height="0.1dp"
      android:background="@color/colorPrimary"></View>


  </LinearLayout>

  <com.jack.bottompopupwindowview.BottomPopupWindowView
    android:id="@+id/bottom_popup"
    android:layout_width="match_parent"
    android:layout_height="50dp"
    android:background="@android:color/transparent"
    android:layout_alignParentBottom="true">
  </com.jack.bottompopupwindowview.BottomPopupWindowView>

</RelativeLayout>
这就是上面效果图的界面布局,没什么可以说的,再看事例代码如下:
public class MainActivity extends AppCompatActivity implements View.OnClickListener, AnimatorListener {

  private BottomPopupWindowView bottomPopupWindowView;
  private View contentView;
  private View bottomView;
  private LinearLayout mainView;

  @Override
  protected void onCreate(Bundle savedInstanceState) {
    super.onCreate(savedInstanceState);
    setContentView(R.layout.activity_main);
    mainView=(LinearLayout)findViewById(R.id.main_view);

    bottomView=LayoutInflater.from(this).inflate(R.layout.layout_bottom_view,null);
    (bottomView.findViewById(R.id.promptly_buy)).setOnClickListener(this);
    (findViewById(R.id.guige)).setOnClickListener(this);
    bottomPopupWindowView=(BottomPopupWindowView)findViewById(R.id.bottom_popup);
    bottomPopupWindowView.setOnClickListener(this);
    bottomPopupWindowView.setBaseView(bottomView);
    contentView=LayoutInflater.from(this).inflate(R.layout.layout_content_view,null);
    bottomPopupWindowView.setContextView(contentView);
    (contentView.findViewById(R.id.ic_cancel)).setOnClickListener(this);
    bottomPopupWindowView.setAnimatorListener(this);
  }

  @Override
  public void onClick(View view) {
    switch(view.getId()){
      case R.id.promptly_buy:
      case R.id.ic_cancel:
        bottomPopupWindowView.disMissPopupView();
        break;
      case R.id.guige:
        bottomPopupWindowView.showPopouView();
        break;
    }
  }

  @Override
  public void startValue(int value) {
    setMargins (mainView,value-10,value,value-10,value);
  }

  @Override
  public void endValue(int value) {
    setMargins (mainView,value,value,value,value);
  }

  public static void setMargins (View v, int l, int t, int r, int b) {
    if (v.getLayoutParams() instanceof ViewGroup.MarginLayoutParams) {
      ViewGroup.MarginLayoutParams p = (ViewGroup.MarginLayoutParams) v.getLayoutParams();
      p.setMargins(l, t, r, b);
      v.requestLayout();
    }
  }
}
其中设置内容菜单的View
BottomPopupWindowView.setContextView(bottomView);
设置没有显示菜单时候显示的View(注:bottomView的高度要和BottomPopupWindowView的高度一样,具体看demo)
BottomPopupWindowView.setBaseView(bottomView);
而回调的public void startValue(int value)和public void endValue(int value)设置动画监听放回的数据,以便根据数据实现动画,严选的弹出和显示商品详情动画很简单就是不断设设置View的间距就可以了。
最后附上demo和源码链接https://github.com/jack921/BottomPopupWindowDemo
以上就是本文的全部内容,希望对大家的学习有所帮助,也希望大家多多支持PHPERZ。