Android属性动画实现布局的下拉展开效果
发布于 2017-10-09 20:53:28 | 219 次阅读 | 评论: 0 | 来源: 网友投递
Android移动端操作系统
Android是一种基于Linux的自由及开放源代码的操作系统,主要使用于移动设备,如智能手机和平板电脑,由Google公司和开放手机联盟领导及开发。尚未有统一中文名称,中国大陆地区较多人使用“安卓”或“安致”。
这篇文章主要为大家详细介绍了Android属性动画实现布局的下拉展开效果,具有一定的参考价值,感兴趣的小伙伴们可以参考一下
在Android的3.0之后,google又提出了属性动画的这样一个框架,他可以更好的帮助我们实现更丰富的动画效果。所以为了跟上技术的步伐,今天就聊一聊属性动画。
这一次的需求是这样的:当点击一个View的时候,显示下面隐藏的一个View,要实现这个功能,需要将V iew的visibility属性设置gone为visible即可,但是这个过程是一瞬间的,并不能实现我们要的效果。所以,属性动画是个不错的方案。
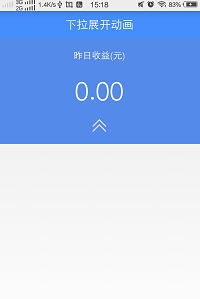
先把效果贴上
第一个:
第二个:
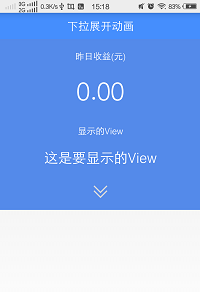
前面的这个是隐藏着,后面这个是显示的。当点击这个箭头的时候,来切换显示或者隐藏。
现在开始编码:
布局文件如下
<LinearLayout xmlns:android="http://schemas.android.com/apk/res/android"
  xmlns:tools="http://schemas.android.com/tools"
  android:layout_width="match_parent"
  android:layout_height="match_parent"
  android:orientation="vertical"
  tools:context="com.ltl.mpiggybank.MainActivity" >

  <RelativeLayout
    android:layout_width="match_parent"
    android:layout_height="wrap_content"
    android:background="#458EFD"
    android:padding="10dip" >

    <TextView
      android:layout_width="wrap_content"
      android:layout_height="wrap_content"
      android:layout_centerInParent="true"
      android:gravity="center_vertical"
      android:text="下拉展开动画"
      android:textColor="#ffffff"
      android:textSize="20sp" />
  </RelativeLayout>

  <LinearLayout
    android:layout_width="match_parent"
    android:layout_height="wrap_content"
    android:background="#548AEA"
    android:gravity="center"
    android:orientation="vertical" >

    <TextView
      android:layout_width="wrap_content"
      android:layout_height="wrap_content"
      android:layout_margin="20dip"
      android:text="昨日收益(元)"
      android:textColor="#ffffff"
      android:textSize="16sp" />

    <TextView
      android:layout_width="wrap_content"
      android:layout_height="wrap_content"
      android:text="0.00"
      android:textColor="#ffffff"
      android:textSize="45sp" />
  </LinearLayout>

  <LinearLayout
    android:id="@+id/linear_hidden"
    android:layout_width="match_parent"
    android:layout_height="120dip"
    android:background="#548AEA"
    android:gravity="center"
    android:orientation="vertical" >

    <TextView
      android:layout_width="wrap_content"
      android:layout_height="wrap_content"
      android:layout_margin="20dip"
      android:text="显示的View"
      android:textColor="#ffffff"
      android:textSize="16sp" />

    <TextView
      android:layout_width="wrap_content"
      android:layout_height="wrap_content"
      android:text="0.00"
      android:textColor="#ffffff"
      android:textSize="35sp" />
  </LinearLayout>

  <LinearLayout
    android:layout_width="match_parent"
    android:layout_height="wrap_content"
    android:background="#548AEA"
    android:gravity="center"
    android:onClick="onClick"
    android:orientation="vertical" >

    <ImageView
      android:id="@+id/my_iv"
      android:layout_width="25dip"
      android:layout_height="25dip"
      android:layout_margin="20dip"
      android:src="@drawable/scroll" />
  </LinearLayout>

</LinearLayout>
这里面代码并不多,也很简单,三个线性布局,里面装载着各自的控件,并且还设置了ID。按钮是一个线性布局,采用了onClick自身的点击事件。接下来,当点击了这个线性布局的时候,需要隐藏的控件最终到达一个高度,这个就是我们的目标值,只需要通过布局中的dp转换成像素就行了。
mDensity = getResources().getDisplayMetrics().density;
mHiddenViewMeasuredHeight = (int) (mDensity * 120 + 0.5);
这里是120就是我们布局里面定义的高度。
然后给这个过程增加一个动画效果。
  ValueAnimator animator = ValueAnimator.ofInt(start, end);
    animator.addUpdateListener(new AnimatorUpdateListener() {

      @Override
      public void onAnimationUpdate(ValueAnimator arg0) {
        int value = (int) arg0.getAnimatedValue();
        ViewGroup.LayoutParams layoutParams = v.getLayoutParams();
        layoutParams.height = value;
        v.setLayoutParams(layoutParams);

      }
    });
通过这样一个简单的ValueAnimator ,就可以很方便的实现显示和隐藏的动画效果了。
下面是完整的代码。
import android.animation.Animator;
import android.animation.AnimatorListenerAdapter;
import android.animation.ValueAnimator;
import android.animation.ValueAnimator.AnimatorUpdateListener;
import android.os.Bundle;
import android.support.v7.app.ActionBarActivity;
import android.view.View;
import android.view.ViewGroup;
import android.view.Window;
import android.view.animation.Animation;
import android.view.animation.RotateAnimation;
import android.widget.ImageView;
import android.widget.LinearLayout;

public class MainActivity extends ActionBarActivity {
  private LinearLayout mHiddenLayout;

  private float mDensity;

  private int mHiddenViewMeasuredHeight;

  private ImageView mIv;

  @Override
  protected void onCreate(Bundle savedInstanceState) {
    super.onCreate(savedInstanceState);
    requestWindowFeature(Window.FEATURE_NO_TITLE);
    setContentView(R.layout.activity_main);

    mHiddenLayout = (LinearLayout) findViewById(R.id.linear_hidden);
    mIv = (ImageView) findViewById(R.id.my_iv);

    mDensity = getResources().getDisplayMetrics().density;

    mHiddenViewMeasuredHeight = (int) (mDensity * 120 + 0.5);

  }

  public void onClick(View v) {
    if (mHiddenLayout.getVisibility() == View.GONE) {
      animateOpen(mHiddenLayout);
      animationIvOpen();
    } else {
      animateClose(mHiddenLayout);
      animationIvClose();
    }
  }

  private void animateOpen(View v) {
    v.setVisibility(View.VISIBLE);
    ValueAnimator animator = createDropAnimator(v, 0,
        mHiddenViewMeasuredHeight);
    animator.start();

  }

  private void animationIvOpen() {
    RotateAnimation animation = new RotateAnimation(0, 180,
        Animation.RELATIVE_TO_SELF, 0.5f, Animation.RELATIVE_TO_SELF,
        0.5f);
    animation.setFillAfter(true);
    animation.setDuration(100);
    mIv.startAnimation(animation);
  }

  private void animationIvClose() {
    RotateAnimation animation = new RotateAnimation(180, 0,
        Animation.RELATIVE_TO_SELF, 0.5f, Animation.RELATIVE_TO_SELF,
        0.5f);
    animation.setFillAfter(true);
    animation.setDuration(100);
    mIv.startAnimation(animation);
  }

  private void animateClose(final View view) {
    int origHeight = view.getHeight();
    ValueAnimator animator = createDropAnimator(view, origHeight, 0);
    animator.addListener(new AnimatorListenerAdapter() {
      @Override
      public void onAnimationEnd(Animator animation) {
        view.setVisibility(View.GONE);
      }

    });
    animator.start();
  }

  private ValueAnimator createDropAnimator(final View v, int start, int end) {
    ValueAnimator animator = ValueAnimator.ofInt(start, end);
    animator.addUpdateListener(new AnimatorUpdateListener() {

      @Override
      public void onAnimationUpdate(ValueAnimator arg0) {
        int value = (int) arg0.getAnimatedValue();
        ViewGroup.LayoutParams layoutParams = v.getLayoutParams();
        layoutParams.height = value;
        v.setLayoutParams(layoutParams);

      }
    });
    return animator;
  }

}
以上就是本文的全部内容,希望对大家的学习有所帮助,也希望大家多多支持PHPERZ。
推荐阅读
最新资讯