Android仿京东首页轮播文字效果
发布于 2017-10-08 12:15:10 | 149 次阅读 | 评论: 0 | 来源: 网友投递
Android移动端操作系统
Android是一种基于Linux的自由及开放源代码的操作系统,主要使用于移动设备,如智能手机和平板电脑,由Google公司和开放手机联盟领导及开发。尚未有统一中文名称,中国大陆地区较多人使用“安卓”或“安致”。
这篇文章主要介绍了Android仿京东首页轮播文字效果,又名垂直跑马灯,具有一定的参考价值,感兴趣的小伙伴们可以参考一下
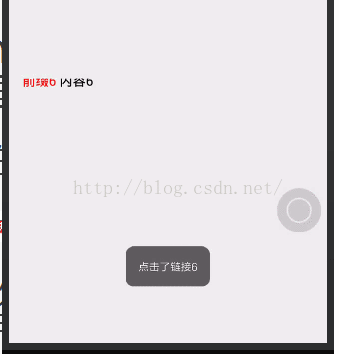
京东客户端的轮播文字效果:

本次要实现的只是后面滚动的文字(前面的用ImageView或者TextView实现即可),看一下实现的效果
实现思路
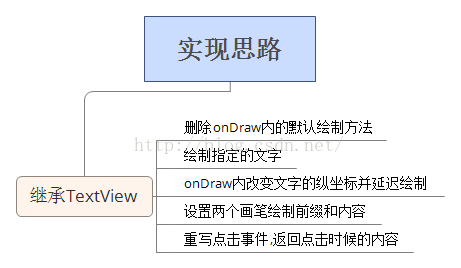
上图只是一个大概的思路,要实现还需要完善更多的细节,下面会一步步的来实现这个效果:
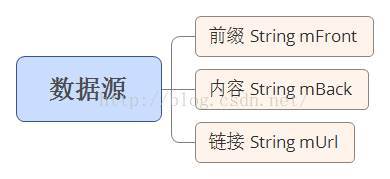
1.封装数据源:从图上可以看到,轮播的文字是分为两个部分的,暂且把它们分别叫做前缀和内容,而且实际的使用过程中点击轮播图肯定是需要跳转页面的,而且大部分应该是WebView,不妨我们就设置点击时候需要获取的内容就是一个链接,那么数据源的结构就很明了了
创建ADEnity类并完善一些基本的方法,代码如下
public class ADEnity {
 private String mFront ; //前面的文字
 private String mBack ; //后面的文字
 private String mUrl ;//包含的链接

 public ADEnity(String mFront, String mBack,String mUrl) {
  this.mFront = mFront;
  this.mBack = mBack;
  this.mUrl = mUrl;
 }

 public String getmUrl() {
  return mUrl;
 }

 public void setmUrl(String mUrl) {
  this.mUrl = mUrl;
 }

 public String getmFront() {
  return mFront;
 }

 public void setmFront(String mFront) {
  this.mFront = mFront;
 }

 public String getmBack() {
  return mBack;
 }

 public void setmBack(String mBack) {
  this.mBack = mBack;
 }
}
2.接下来应该是定制这个自定义View了,首先理一下思路,看一个构造图
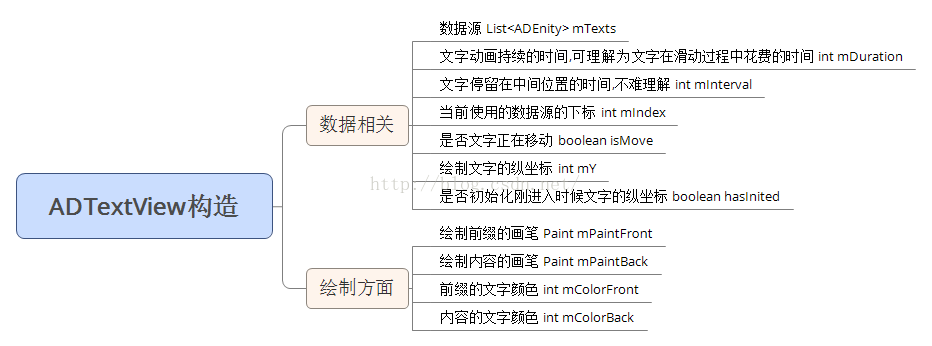
实现这个自定义View的所有参数都在上表列出了,大部分参数很容易理解,个别参数加进去是很有必要的,比如说是否初始化进入文字的纵坐标,文字是否在移动中这两个参数,之后的内容会详细的叙述一下. 在动手绘制之前还得需要知道一点基础的知识,就是关于绘制文字的方法,里面有很多细节需要处理
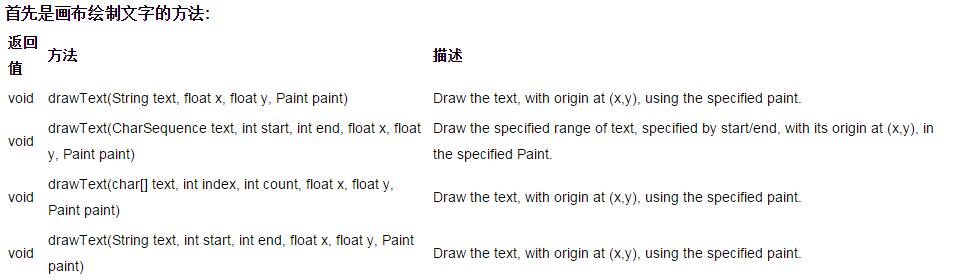
方法都比较好理解,绘制指定字符串(可以指定范围)在坐标( x , y )处,但是其中的x,y并不是我们所理解的应该是文字左上角的坐标点.其中的x坐标是根据Paint的属性可变换的,默认的x是文字的左边坐标,如果Paint设置了paint.setTextAlign(Paint.Align.CENTER);那就是字符的中心位置.Y坐标是文字的baseline的y坐标. 关于绘制文字的baseline:
用图来说话吧
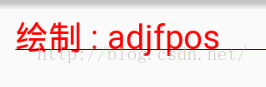
图中蓝色的线即为baseline,可以看出他既不是顶部坐标也不是底部坐标,那么当我们绘制文字的时候肯定是希望能把文字绘制在正中间.这时候就要引入paint.getTextBound()方法了 getTextBounds(String text, int start, int end, Rect bounds),传入一个Rect对象,调用此方法之后则会填充这个rect对象,而填充的内容就是所绘制的文字相对于baseline的偏移坐标,将这个Rect加上baseline的坐标,绘制后是这样的:
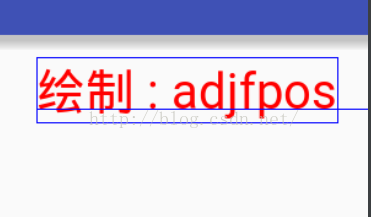
但其实他的值只是(2,-25,76,3),是相对于baseline的位置,画个图会比较好理解
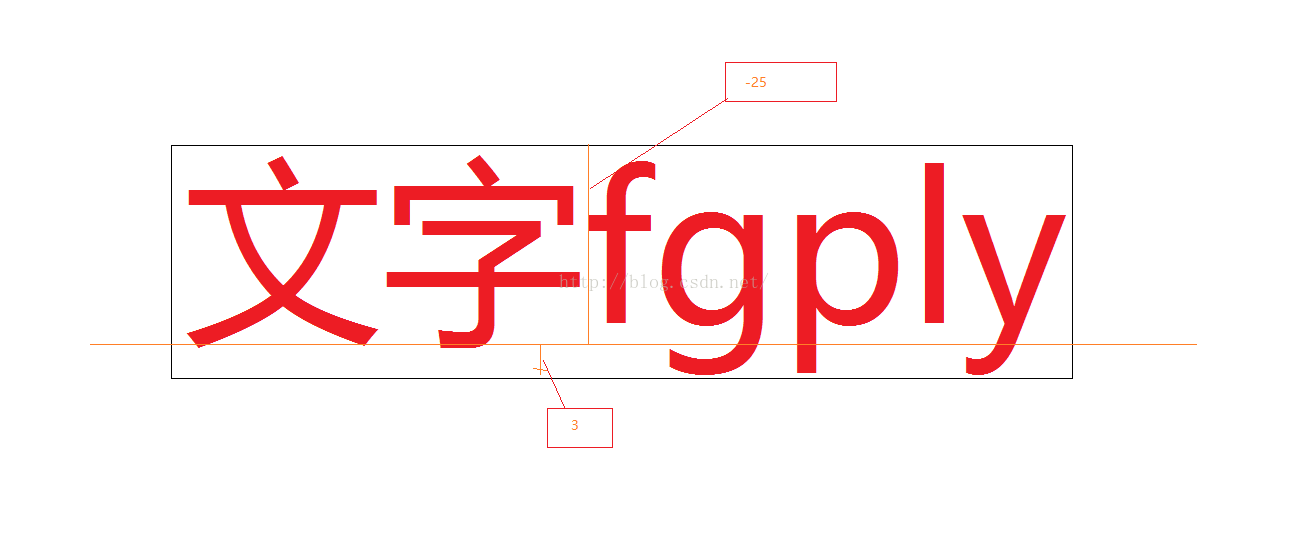
那么要将文字绘制在中间那么实际绘制baseline的坐标应该是组件的中心加上文字中心即图中框的中间坐标相对于baseline的偏移值">那么要将文字绘制在中间,那么实际绘制baseline的坐标应该是组件的中心,加上文字中心(即图中框的中间坐标)相对于baseline的偏移值
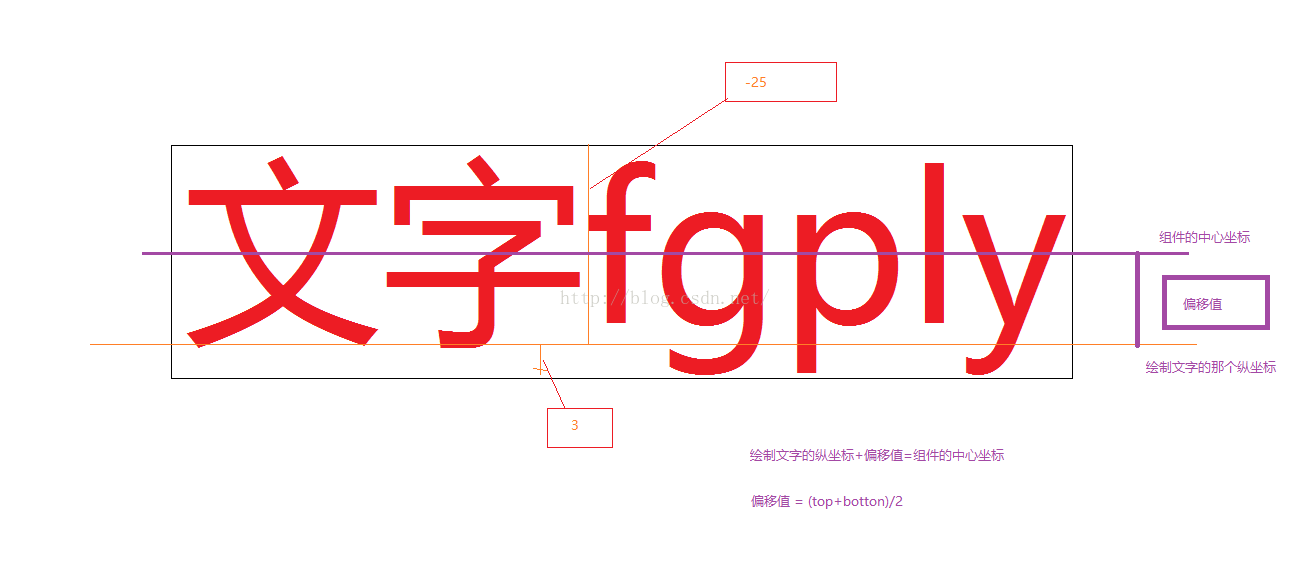
这张图中应该会好理解实际绘制文字的坐标与组件中心坐标的关系.关于偏移值的计算,按常规的几何计算方法,应该是组件的中心坐标+偏移值的绝对值==baseline坐标(即实际绘制的坐标),但是由于框的坐标值都是相对于baseline来计算的,top为负值,botton为正值,那么这个偏移值就可以直接用(top+bottom)/2来表示,没看懂的同学可以画个草图,用top=-25,bottom=3来算一下,看是否结果是一致的.
经过上面的理解,那我们来绘制正确绘制文字的方法也就确定了
已获得组件的高度int mHeight , 文字外框Rect bound的情况下
绘制文字在正中间
 mHeight / 2 - (bound.top + bound.bottom) / 2
//在纵坐标为mY的地方绘制文字
//计算方式
//mheight /2 = mY + (bound.top + bound.bottom) / 2 ;
文字滚动到最高点
mY == 0 - bound.bottom
//在纵坐标为mY的地方绘制,此时文字刚好移动到最高点
//计算方式
//mY + bound.bottom = 0 ;
文字滚动到最低点,刚好滚出组件
 mY = mHeight - indexBound.top;
//在纵坐标为mY的地方绘制,此时文字刚好移动到最高点
//计算方式
//mY + bound.top = mHeight ;
知道了如何正确的绘制文字和边界情况的坐标判断,下面就到了绘制文字的步骤了
首先初始化数据,设置默认值
//初始化默认值
private void init() {
 mDuration = 500;
 mInterval = 1000;
 mIndex = 0;
 mPaintFront = new Paint();
 mPaintFront.setAntiAlias(true);
 mPaintFront.setDither(true);
 mPaintFront.setTextSize(30);


 mPaintBack = new Paint();
 mPaintBack.setAntiAlias(true);
 mPaintBack.setDither(true);
 mPaintBack.setTextSize(30);

}
前面的叙述中我们知道,刚开始进入的时候文字应该是位于组件的底部的,但是这个值是需要获取组件的高度和当前显示文字的情况下来判断的,所以应该放在onDraw内来初始化这个值,所以需要前面的是否初始化的属性,判断当mY==0并且未初始化的时候给mY赋值.
接下来就是onDraw内的处理
获取当前的数据
//获取当前的数据
ADEnity model = mTexts.get(mIndex);
String font = model.getmFront();
String back = model.getmBack();
// 绘制前缀的外框
Rect indexBound = new Rect();
mPaintFront.getTextBounds(font, 0, font.length(), indexBound);

//绘制内容的外框
Rect contentBound = new Rect();
mPaintBack.getTextBounds(back, 0, back.length(), contentBound);
对mY进行初始化
if (mY == 0 && hasInit == false) {
 mY = getMeasuredHeight() - indexBound.top;
 hasInit = true;
}
对边界情况的处理
/
/移动到最上面
if (mY == 0 - indexBound.bottom) {
 Log.i(TAG, "onDraw: " + getMeasuredHeight());
 mY = getMeasuredHeight() - indexBound.top;//返回底部
 mIndex++;//换下一组数据
}
//移动到中间
if (mY == getMeasuredHeight() / 2 - (indexBound.top + indexBound.bottom) / 2) {
 isMove = false;//停止移动
 Timer timer = new Timer();
 timer.schedule(new TimerTask() {
  @Override
  public void run() {
   postInvalidate();//通知重绘
   isMove = true;//设置移动为true
  }
 }, mInterval);//停顿多少毫秒之后再次移动
}
移动的处理与数据源的处理
mY -= 1;//每次只移动一个像素,尽量保证平滑显示
//循环使用数据
if (mIndex == mTexts.size()) {
 mIndex = 0;
}
//如果是处于移动状态时的,则延迟绘制
//计算公式为一个比例,一个时间间隔移动组件高度,则多少毫秒来移动1像素
if (isMove) {
 postInvalidateDelayed(mDuration / getMeasuredHeight());
}
至此对逻辑的处理就完成了,接下来要设置点击事件
public interface onClickLitener {
 public void onClick(String mUrl);
}

private onClickLitener onClickLitener;

public void setOnClickLitener(TextViewAd.onClickLitener onClickLitener) {
 this.onClickLitener = onClickLitener;
}
//重写onTouchEvent事件,并且要返回true,表明当前的点击事件由这个组件自身来处理
@Override
public boolean onTouchEvent(MotionEvent event) {
 int action = event.getAction();

 switch (action) {
  case MotionEvent.ACTION_DOWN:
   //调用回调,将当前数据源的链接传出去
   if (onClickLitener != null) {
    onClickLitener.onClick(mTexts.get(mIndex).getmUrl());
   }

   break;
 }
 return true;
}
暴露一些其他属性的设置方式
//设置数据源
public void setmTexts(List mTexts) {
 this.mTexts = mTexts;
}

//设置广告文字的停顿时间
public void setmInterval(int mInterval) {
 this.mInterval = mInterval;
}

//设置文字从出现到消失的时长
public void setmDuration(int mDuration) {
 this.mDuration = mDuration;
}

//设置前缀的文字颜色
public void setFrontColor(int mFrontColor) {
 mPaintFront.setColor(mFrontColor);
}

//设置正文内容的颜色
public void setBackColor(int mBackColor) {
 mPaintBack.setColor(mBackColor);
}
有兴趣的同学可以将这些属性设置到attrs.xml文件中然后就可以在布局文件中设置属性了,这里就不演示了,因为觉得每次copy这个View还得把xml文件也copy比较麻烦,毕竟as有自动补全,可以很方便的看到暴露在外面的方法.(个人感受而已).
贴一下完整的ADTextView的代码,方便查看
package com.qiyuan.jindongshangcheng.view;

import android.content.Context;
import android.graphics.Canvas;
import android.graphics.Paint;
import android.graphics.Rect;
import android.util.AttributeSet;
import android.util.Log;
import android.view.MotionEvent;
import android.widget.TextView;

import com.qiyuan.jindongshangcheng.enity.ADEnity;

import java.util.List;
import java.util.Timer;
import java.util.TimerTask;

/**
 * Created by huanghaojie on 2016/9/30.
 */

public class TextViewAd extends TextView {

 private int mDuration; //文字从出现到显示消失的时间
 private int mInterval; //文字停留在中间的时长切换的间隔
 private List<ADEnity> mTexts; //显示文字的数据源
 private int mY = 0; //文字的Y坐标
 private int mIndex = 0; //当前的数据下标
 private Paint mPaintBack; //绘制内容的画笔
 private Paint mPaintFront; //绘制前缀的画笔
 private boolean isMove = true; //文字是否移动
 private String TAG = "ADTextView";
 private boolean hasInit = false;//是否初始化刚进入时候文字的纵坐标

 public interface onClickLitener {
  public void onClick(String mUrl);
 }

 private onClickLitener onClickLitener;

 public void setOnClickLitener(TextViewAd.onClickLitener onClickLitener) {
  this.onClickLitener = onClickLitener;
 }

 public TextViewAd(Context context) {
  this(context, null);
 }

 public TextViewAd(Context context, AttributeSet attrs) {
  super(context, attrs);
  init();
 }
 //重写onTouchEvent事件,并且要返回true,表明当前的点击事件由这个组件自身来处理
 @Override
 public boolean onTouchEvent(MotionEvent event) {
  int action = event.getAction();

  switch (action) {
   case MotionEvent.ACTION_DOWN:
    //调用回调,将当前数据源的链接传出去
    if (onClickLitener != null) {
     onClickLitener.onClick(mTexts.get(mIndex).getmUrl());
    }

    break;
  }
  return true;
 }

 //设置数据源
 public void setmTexts(List mTexts) {
  this.mTexts = mTexts;
 }

 //设置广告文字的停顿时间
 public void setmInterval(int mInterval) {
  this.mInterval = mInterval;
 }

 //设置文字从出现到消失的时长
 public void setmDuration(int mDuration) {
  this.mDuration = mDuration;
 }

 //设置前缀的文字颜色
 public void setFrontColor(int mFrontColor) {
  mPaintFront.setColor(mFrontColor);
 }

 //设置正文内容的颜色
 public void setBackColor(int mBackColor) {
  mPaintBack.setColor(mBackColor);
 }

 //初始化默认值
 private void init() {
  mDuration = 500;
  mInterval = 1000;
  mIndex = 0;
  mPaintFront = new Paint();
  mPaintFront.setAntiAlias(true);
  mPaintFront.setDither(true);
  mPaintFront.setTextSize(30);


  mPaintBack = new Paint();
  mPaintBack.setAntiAlias(true);
  mPaintBack.setDither(true);
  mPaintBack.setTextSize(30);

 }

 @Override
 protected void onSizeChanged(int w, int h, int oldw, int oldh) {
  super.onSizeChanged(w, h, oldw, oldh);
  Log.i(TAG, "onSizeChanged: " + h);
 }

 @Override
 protected void onDraw(Canvas canvas) {
  if (mTexts != null) {
   Log.i(TAG, "onDraw: " + mY);
   //获取当前的数据
   ADEnity model = mTexts.get(mIndex);
   String font = model.getmFront();
   String back = model.getmBack();
   // 绘制前缀的外框
   Rect indexBound = new Rect();
   mPaintFront.getTextBounds(font, 0, font.length(), indexBound);

   //绘制内容的外框
   Rect contentBound = new Rect();
   mPaintBack.getTextBounds(back, 0, back.length(), contentBound);
   //刚开始进入的时候文字应该是位于组件的底部的 ,但是这个值是需要获取组件的高度和当前显示文字的情况下来判断的,
   // 所以应该放在onDraw内来初始化这个值,所以需要前面的是否初始化的属性,判断当mY==0并且未初始化的时候给mY赋值.
   if (mY == 0 && hasInit == false) {
    mY = getMeasuredHeight() - indexBound.top;
    hasInit = true;
   }
   //移动到最上面
   if (mY == 0 - indexBound.bottom) {
    Log.i(TAG, "onDraw: " + getMeasuredHeight());
    mY = getMeasuredHeight() - indexBound.top;//返回底部
    mIndex++;//换下一组数据
   }
   canvas.drawText(back, 0, back.length(), (indexBound.right - indexBound.left) + 20, mY, mPaintBack);
   canvas.drawText(font, 0, font.length(), 10, mY, mPaintFront);
   //移动到中间
   if (mY == getMeasuredHeight() / 2 - (indexBound.top + indexBound.bottom) / 2) {
    isMove = false;//停止移动
    Timer timer = new Timer();
    timer.schedule(new TimerTask() {
     @Override
     public void run() {
      postInvalidate();//通知重绘
      isMove = true;//设置移动为true
     }
    }, mInterval);//停顿多少毫秒之后再次移动
   }
   //移动的处理与数据源的处理
   mY -= 1;//每次只移动一个像素,尽量保证平滑显示
   //循环使用数据
   if (mIndex == mTexts.size()) {
    mIndex = 0;
   }
   //如果是处于移动状态时的,则延迟绘制
   //计算公式为一个比例,一个时间间隔移动组件高度,则多少毫秒来移动1像素
   if (isMove) {
    postInvalidateDelayed(mDuration / getMeasuredHeight());
   }
  }

 }
}

怎么使用呢?
1,现在xml文件里引入这个自定义控件
<?xml version="1.0" encoding="utf-8"?>
<LinearLayout xmlns:android="http://schemas.android.com/apk/res/android"
 android:layout_width="match_parent"
 android:layout_height="match_parent"
 android:orientation="vertical">
 <com.qiyuan.jindongshangcheng.view.TextViewAd
  android:id="@+id/textad"
  android:layout_width="match_parent"
  android:layout_height="wrap_content" />

</LinearLayout>

2.在MainActivity中使用
/**
 * Created by huanghaojie on 2016/9/30.
 */

public class MainActivity extends Activity {
 private TextViewAd textViewAd;
 private List<ADEnity> mList;

 @Override
 protected void onCreate(Bundle savedInstanceState) {
  super.onCreate(savedInstanceState);
  setContentView(R.layout.activity_main4);
  textViewAd = (TextViewAd) findViewById(R.id.textad);
  mList = new ArrayList<>();
  for (int i = 0; i < 10; i++) {
   ADEnity adEnity = new ADEnity("前缀" + i, "后缀" + i, "http://www.baidu.com"+i);
   mList.add(adEnity);
  }
  textViewAd.setmTexts(mList);
  textViewAd.setFrontColor(Color.RED);
  textViewAd.setBackColor(Color.BLUE);
  textViewAd.setmDuration(1000);
  textViewAd.setmInterval(1000);
  textViewAd.setOnClickLitener(new TextViewAd.onClickLitener() {
   @Override
   public void onClick(String mUrl) {
    Toast.makeText(MainActivity.this,"点击了"+mUrl,Toast.LENGTH_LONG).show();
   }
  });
 }
}
以上就是本文的全部内容,希望对大家的学习有所帮助,也希望大家多多支持PHPERZ。