Android中PopuWindow实现下拉列表实例
发布于 2017-10-05 03:18:23 | 111 次阅读 | 评论: 0 | 来源: 网友投递
Android移动端操作系统
Android是一种基于Linux的自由及开放源代码的操作系统,主要使用于移动设备,如智能手机和平板电脑,由Google公司和开放手机联盟领导及开发。尚未有统一中文名称,中国大陆地区较多人使用“安卓”或“安致”。
本篇文章主要介绍了Android中PopuWindow实现下拉列表实例,小编觉得挺不错的,现在分享给大家,也给大家做个参考。一起跟随小编过来看看吧
前言
之前讲过一篇关于PopuWindow的基本使用的文章,想了解的同学可以参考:PopupWindow的基本使用
其实,下拉列表Spanner(不知道控件拼写是否正确)就能实现,但是基于ui美化方面的考虑,用popuwindow实现是一个不错的选择,今天就来讲讲PopuWindow实现下拉列表的具体实现吧。
正文
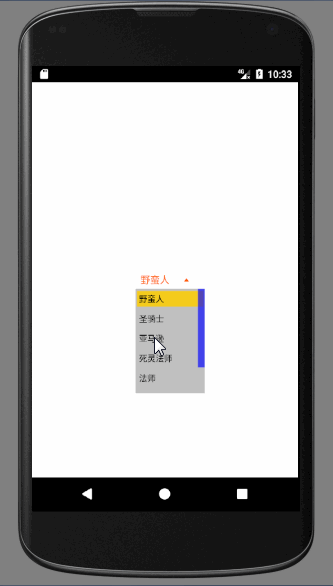
文章可能会有点长,大家将就着看吧。先上波效果图才是厚道的:
下面开始正式讲解。
基础依赖,由于下拉列表是用RecycleView实现,然后控件初始化用到ButterKnife,所以要在app的gradle中添加相关依赖:
 //RecycleView
  compile 'com.android.support:recyclerview-v7:25.2.0'
  //butterKnife
  compile 'com.jakewharton:butterknife:8.5.1'
  //这条千万不能忘记!!
  annotationProcessor 'com.jakewharton:butterknife-compiler:8.5.1'
第一步,不言而喻,肯定是上BasePopupWindow代码:
/***
 * PopupWindow基类
 *
 * @author pei
 * @version 1.0
 * @cretae 2016-7-21
 * @注:若要popwindow点击外部消失,则设置 this.setFocusable(true)
 *   若要popwindow点击外部不消失,不做setFocusable设置,也不要设置成this.setFocusable(false)
 *
 */
public abstract class BasePopupWindow extends PopupWindow {

  protected View mLayoutView;
  protected int mLayoutId;
  protected Context mContext;
  protected int mWidth;
  protected int mHeight;

  public BasePopupWindow(int width, int height, int layoutId, Context context) {
    this.mWidth = width;
    this.mHeight = height;
    this.mLayoutId = layoutId;
    this.mContext = context;
    mLayoutView = LayoutInflater.from(context).inflate(mLayoutId, null);
    setWindow();
  }

  /** PopupWindow基本设置 **/
  protected void setWindow() {
    this.setContentView(mLayoutView);
    this.setWidth(mWidth);
    this.setHeight(mHeight);
    // this.setFocusable(true);// 可点击
    // 实例化一个ColorDrawable颜色为半透明(半透明遮罩颜色代码#66000000)
    ColorDrawable dw = new ColorDrawable(Color.TRANSPARENT);
    this.setBackgroundDrawable(dw);
  }

  /** PopupWindow背景设置 **/
  protected void setBackground(int color) {
    // 实例化一个ColorDrawable颜色为半透明
    ColorDrawable dw = new ColorDrawable(color);
    this.setBackgroundDrawable(dw);
  }

  protected abstract void initView();
  protected abstract void initData();
  protected abstract void setListener();

  /** PopupWindow点击间隙处理,根据实际情况重写 **/
  protected void onTouchdimiss() {
    // mMenuView添加OnTouchListener监听判断获取触屏位置如果在选择框外面则销毁弹出框
    mLayoutView.setOnTouchListener(new OnTouchListener() {
      @Override
      public boolean onTouch(View view, MotionEvent event) {
//        int height = mLayoutView.getTop();
//        int y = (int) event.getY();
//        if (event.getAction() == MotionEvent.ACTION_UP) {
//          if (y < height) {
//            dismiss();
//          }
//        }
        return false;
      }
    });
  }

  /**
   * 显示在控件正上方
   *
   * @param view
   *      依赖的控件
   * @param marginDp
   *      设置的间距(直接写数字即可,已经做过dp2px转换)
   */
  public void showAtLocationTop(View view, float marginDp) {
    mLayoutView.measure(MeasureSpec.UNSPECIFIED, MeasureSpec.UNSPECIFIED);
    int popupWidth = mLayoutView.getMeasuredWidth();
    int popupHeight = mLayoutView.getMeasuredHeight();
    int[] location = new int[2];
    view.getLocationOnScreen(location);
    showAtLocation(view, Gravity.NO_GRAVITY, (location[0] + view.getWidth() / 2) - popupWidth / 2, location[1] - popupHeight - dp2px(marginDp));
    update();
  }

  /**
   * 显示在控件正下方
   *
   * @param view
   *      依赖的控件
   * @param marginDp
   *      设置的间距(直接写数字即可,已经做过dp2px转换)
   */
  public void showAtLocationGravityBottom(View view, float marginDp) {
    mLayoutView.measure(MeasureSpec.UNSPECIFIED, MeasureSpec.UNSPECIFIED);
    int popupWidth = mLayoutView.getMeasuredWidth();
    int popupHeight = mLayoutView.getMeasuredHeight();
    int[] location = new int[2];
    view.getLocationOnScreen(location);
    showAtLocation(view, Gravity.NO_GRAVITY, (location[0]+view.getWidth()/2)-popupWidth/2,
        location[1]+view.getHeight()+dp2px(marginDp));
    update();
  }

  /**显示在控件下方
   *
   * @param view 依赖的控件
   * @param marginDp 设置的间距(直接写数字即可,已经做过dp2px转换)
   */
  public void showAtLocationBottom(View view, float marginDp){
    showAsDropDown(view, 0, dp2px(marginDp));
    update();
  }


  /**
   * 显示在控件左方
   *
   * @param view
   *      依赖的控件
   * @param marginDp
   *      设置的间距(直接写数字即可,已经做过dp2px转换)
   */
  public void showAtLocationLeft(View view, float marginDp) {
    mLayoutView.measure(MeasureSpec.UNSPECIFIED, MeasureSpec.UNSPECIFIED);
    int popupWidth = mLayoutView.getMeasuredWidth();
    int popupHeight = mLayoutView.getMeasuredHeight();
    int[] location = new int[2];
    view.getLocationOnScreen(location);
    showAtLocation(view, Gravity.NO_GRAVITY, location[0] - popupWidth - dp2px(marginDp), (location[1] + view.getHeight() / 2) - popupHeight / 2);
    update();
  }

  /**
   * 显示在控件右方
   *
   * @param view
   *      依赖的控件
   * @param marginDp
   *      设置的间距(直接写数字即可,已经做过dp2px转换)
   */
  public void showAtLocationRight(View view, float marginDp) {
    mLayoutView.measure(MeasureSpec.UNSPECIFIED, MeasureSpec.UNSPECIFIED);
    int popupWidth = mLayoutView.getMeasuredWidth();
    int popupHeight = mLayoutView.getMeasuredHeight();
    int[] location = new int[2];
    view.getLocationOnScreen(location);
    showAtLocation(view, Gravity.NO_GRAVITY, location[0] + view.getWidth() + dp2px(marginDp), (location[1] + view.getHeight() / 2) - popupHeight / 2);
    update();
  }

  /** dp转px **/
  private int dp2px(float dpVal) {
    return (int) TypedValue.applyDimension(TypedValue.COMPLEX_UNIT_DIP, dpVal, mContext.getResources().getDisplayMetrics());
  }

  /** 通过id获得view **/
  @SuppressWarnings("unchecked")
  protected <T extends View> T getView(int viewId) {
    View view = null;
    if (mLayoutView == null) {
      mLayoutView = LayoutInflater.from(mContext).inflate(mLayoutId, null);
    }
    view = mLayoutView.findViewById(viewId);
    return (T) view;
  }

}
第二步,写一个OrderPop继承于BasePopupWindow:
/**
 * Instruction:下拉列表Pop
 * <p>
 * Author:pei
 * Date: 2017/6/28
 * Description:
 */


public class OrderPop extends BasePopupWindow{

  private RecyclerView mRecyclerView;
  private List<String>mDatas;
  private ManagerPopuAdapter<String> managerPopuAdapter;

  public OrderPop(Context context, List<String>datas) {
    super(ScreenUtil.dp2px(100,context), ScreenUtil.dp2px(150,context), R.layout.pop_order, context);
    this.mDatas=datas;

    initView();
    initData();
    setListener();
  }

  @Override
  protected void initView() {
    mRecyclerView=getView(R.id.recycler_view);
  }

  @Override
  protected void initData() {
    setFocusable(true);
    setAnimationStyle(R.style.popuwindow_up_style);//popuwindow显示隐藏的动画

    mRecyclerView.setHasFixedSize(true);
    mRecyclerView.setLayoutManager(new LinearLayoutManager(mContext));
    managerPopuAdapter = new ManagerPopuAdapter<String>(mContext, mDatas);
    mRecyclerView.setAdapter(managerPopuAdapter);
  }

  @Override
  protected void setListener(){

  }

  public ManagerPopuAdapter getAdapter(){
    return managerPopuAdapter;
  }

  public void notifyDataSetChanged(){
    if(managerPopuAdapter!=null){
      managerPopuAdapter.notifyDataSetChanged();
    }
  }

  public void setCurrentIndex(int position){
    if(managerPopuAdapter!=null){
      managerPopuAdapter.setIndex(position);
    }
  }
}
OrderPop类中涉及到的内容挺多,以下将细细讲解。
1.--- 声明中涉及到RecycleView的一个适配器ManagerPopuAdapter,其代码如下:
/**
 * Instruction: Orderpop的适配器
 * <p>
 * Author:pei
 * Date: 2017/6/29
 * Description:
 */


public class ManagerPopuAdapter<T> extends RecyclerView.Adapter {

  protected Context mContext;
  protected View mLayoutView;
  protected List<T> mData;
  private ViewHolder mViewHolder;
  protected OnRecyclerItemClickListener mOnRecyclerItemClickListener;

  private int mIndex;

  public void setOnRecyclerItemClickListener(OnRecyclerItemClickListener onRecyclerItemClickListener) {
    this.mOnRecyclerItemClickListener = onRecyclerItemClickListener;
  }

  public ManagerPopuAdapter(Context context, List<T> data) {
    this.mContext = context;
    this.mData = data;
  }

  @Override
  public RecyclerView.ViewHolder onCreateViewHolder(ViewGroup parent, int viewType) {
    //注:不可使用view=LayoutInflater.from(mContext).inflate(R.layout.item_layout,null);不然会报错
    mLayoutView = LayoutInflater.from(mContext).inflate(R.layout.item_popu_order_layout, parent, false);
    return new ViewHolder(mLayoutView);
  }

  @Override
  public int getItemViewType(int position) {
    return super.getItemViewType(position);
  }

  @Override
  public int getItemCount() {
    return mData == null ? 0 : mData.size();
  }

  @Override
  public void onBindViewHolder(RecyclerView.ViewHolder holder, int position) {
    mViewHolder = ((ViewHolder) holder);

    initData(position);
    setListener(position);
  }

  private void initData(int position) {
    String content =mData.get(position).toString();
    mViewHolder.tvContent.setText(content);

    if(mIndex==position){
      mViewHolder.tvContent.setSelected(true);
    }else{
      mViewHolder.tvContent.setSelected(false);
    }

  }

  private void setListener(final int position) {
    mViewHolder.tvContent.setOnClickListener(new View.OnClickListener() {
      @Override
      public void onClick(View v) {
        if (mOnRecyclerItemClickListener != null) {
          mOnRecyclerItemClickListener.onRecyclerClick(position);
        }
      }
    });
  }

  public void setIndex(int index){
    this.mIndex=index;
  }

  class ViewHolder extends RecyclerView.ViewHolder {

    TextView tvContent;

    public ViewHolder(View view) {
      super(view);
      tvContent=(TextView)view.findViewById(R.id.tv_content);
    }
  }

  public interface OnRecyclerItemClickListener {
    void onRecyclerClick(int position);
  }
}
2.--- ManagerPopuAdapter.java对应的layout----- item_popu_order_layout.xml代码:
<?xml version="1.0" encoding="utf-8"?>
<LinearLayout xmlns:android="http://schemas.android.com/apk/res/android"
  android:layout_width="match_parent"
  android:layout_height="wrap_content"
  android:layout_marginTop="3dp"
  android:layout_marginBottom="3dp">

  <TextView
    android:id="@+id/tv_content"
    android:layout_width="match_parent"
    android:layout_height="wrap_content"
    android:lineSpacingExtra="1dp"
    android:lineSpacingMultiplier="1.0"
    android:layout_marginLeft="2dp"
    android:layout_marginRight="2dp"
    android:padding="3dp"
    android:background="@drawable/manager_fragment_popu_bg"
    android:textColor="@drawable/text_color_bg"
    android:textSize="12sp"/>

</LinearLayout>
3.--- item_popu_order_layout.xml中android:background="@drawable/manager_fragment_popu_bg"对应的drawable文件为:
<?xml version="1.0" encoding="utf-8"?>
<selector xmlns:android="http://schemas.android.com/apk/res/android">
  <item android:drawable="@drawable/manager_fragment_popu_pressed" android:state_selected="true" />
  <item android:drawable="@drawable/manager_fragment_popu_normal" android:state_selected="false"/>
</selector>
manager_fragment_popu_pressed和manager_fragment_popu_normal对应的其实都是纯颜色xml文件。
manager_fragment_popu_pressed.xml代码如下:
<?xml version="1.0" encoding="utf-8"?>
<shape xmlns:android="http://schemas.android.com/apk/res/android" >
  <solid android:color="@color/color_f5cc1d"></solid>
</shape>
manager_fragment_popu_normal.xml代码如下:
<?xml version="1.0" encoding="utf-8"?>
<shape xmlns:android="http://schemas.android.com/apk/res/android" >
  <solid android:color="@color/transparent"></solid>
</shape>
也许有的同学会问android:background="@drawable/manager_fragment_popu_bg文件中为什恶魔不直接用color属性设置背景切换,而要用color写个drawable供调用,其实我一开始也是这样弄的,无奈报错,具体原因不详,知道的同学可以回复下,此处不做重点。
4.--- item_popu_order_layout.xml中android:textColor="@drawable/text_color_bg"对应的drawable文件如下:
<?xml version="1.0" encoding="utf-8"?>
<selector xmlns:android="http://schemas.android.com/apk/res/android">
  <item android:color="@color/color_ff5b0a" android:state_selected="true"/>
  <item android:color="@color/black" android:state_selected="false"/>
</selector>
5.---讲讲OrderPop的构造函数
 public OrderPop(Context context, List<String>datas) {
    super(ScreenUtil.dp2px(100,context), ScreenUtil.dp2px(150,context), R.layout.pop_order, context);
    this.mDatas=datas;

    initView();
    initData();
    setListener();
  }
这里我其实是图方便,所以直接传了个固定宽度 ScreenUtil.dp2px(100,context) 进去了,实际开发中因为是点击某个控件然后在控件下面显示出来,那么应该传那个控件的宽度。
6.---OrderPop的layout布局pop_order.xml代码如下:
<?xml version="1.0" encoding="utf-8"?>
<LinearLayout xmlns:android="http://schemas.android.com/apk/res/android"
  android:layout_width="match_parent"
  android:layout_height="match_parent"
  android:background="@color/color_c0c0c0">

  <android.support.v7.widget.RecyclerView
    android:id="@+id/recycler_view"
    android:layout_width="match_parent"
    android:layout_height="match_parent"
    android:scrollbars="vertical"
    android:scrollbarThumbVertical="@color/blue"
    android:scrollbarStyle="outsideOverlay"/>

</LinearLayout>
其中,android:scrollbars="vertical"是设置滚动条方向,android:scrollbarThumbVertical="@color/blue"是设置滚动条颜色,android:scrollbarStyle="outsideOverlay"设置滚动条样式
7.---讲讲OrderPop的显隐动画问题
在OrderPop类中的initData()方法中涉及到这样一行代码:
setAnimationStyle(R.style.popuwindow_up_style);//popuwindow显示隐藏的动画
涉及到popuwindow的显隐动画问题,大家可以参考的前言中提到的popuwindow的基本使用文章,这里就不废话了。
第三步,OrderPop写好了,就该看看在MainActivity中是怎么调用的了,贴出MainActivity的代码:
/**
 * Created by Admin on 2017/5/19.
 */

public class MainActivity extends BaseActivity implements View.OnClickListener{

  @BindView(R.id.tv_order)
  TextView mTvOrder;

  private static final int DEFAULT_INDEX=0;
  private List<String> mOrderList=new ArrayList<>();
  private OrderPop mOrderPop;

  @Override
  protected int getContentViewId() {
    return R.layout.activity_main;
  }

  @Override
  protected void initData() {
    initOrderTextBar();
  }

  /**订单列表**/
  private void initOrderTextBar(){
    mOrderList.add("野蛮人");
    mOrderList.add("圣骑士");
    mOrderList.add("亚马逊");
    mOrderList.add("死灵法师");
    mOrderList.add("法师");
    mOrderList.add("德鲁伊");
    mOrderList.add("刺客");
    mOrderPop=new OrderPop(mContext,mOrderList);
    setBarContent(mTvOrder,mOrderList,DEFAULT_INDEX);

    mOrderPop.setOnDismissListener(new PopupWindow.OnDismissListener() {
      @Override
      public void onDismiss(){
        mTvOrder.setSelected(false);
      }
    });
    //mOrderPop项点击事件
    mOrderPop.getAdapter().setOnRecyclerItemClickListener(new ManagerPopuAdapter.OnRecyclerItemClickListener() {
      @Override
      public void onRecyclerClick(int position) {
        showShortToast(mOrderList.get(position));
        //更新mTvOrder显示内容
        setBarContent(mTvOrder,mOrderList,position);
        //更新mOrderPop视图选中背景
        mOrderPop.setCurrentIndex(position);
        mOrderPop.notifyDataSetChanged();
      }
    });
  }


  @Override
  protected void setListener() {
    mTvOrder.setOnClickListener(this);
  }

  @Nullable
  @Override
  protected BasePresenter getPresenter() {
    return null;
  }

  @Override
  protected void onDestroy(){
    super.onDestroy();
  }

  @Override
  public void onClick(View v) {
    switch (v.getId()) {
      case R.id.tv_order:
        if(mOrderPop!=null&&!mOrderPop.isShowing()){
          mTvOrder.setSelected(true);//控制mTvOrder变色
          mOrderPop.showAtLocationGravityBottom(mTvOrder,3);//显示mOrderPop
          //更新mOrderPop视图选中背景
          mOrderPop.setCurrentIndex(getIndexByTag(mTvOrder));
          mOrderPop.notifyDataSetChanged();
        }
        break;
      default:
        break;
    }
  }

  private void setBarContent(TextView textView,List<String>data,int position){
    textView.setTag(position);
    textView.setText(data.get(position).toString());
  }

  private int getIndexByTag(TextView textView){
    int index=DEFAULT_INDEX;
    Object obj=textView.getTag();
    if(obj!=null){
      try {
        index=Integer.valueOf(obj.toString());
      } catch (NumberFormatException e) {
        e.printStackTrace();
      }
    }
    return index;
  }
}
MainActivity对应的布局activity_main.xml代码如下:
<LinearLayout xmlns:android="http://schemas.android.com/apk/res/android"
  xmlns:tools="http://schemas.android.com/tools"
  android:layout_width="match_parent"
  android:layout_height="match_parent"
  android:background="@color/white"
  android:gravity="center"
  android:orientation="vertical">


  <TextView
    android:id="@+id/tv_order"
    android:layout_width="80dp"
    android:layout_height="wrap_content"
    android:lineSpacingExtra="1dp"
    android:lineSpacingMultiplier="1.0"
    android:paddingLeft="5dp"
    android:paddingRight="5dp"
    android:drawableRight="@drawable/manager_fragment_order_bg"
    android:textColor="@drawable/text_color_bg"
    android:textSize="14sp"/>
</LinearLayout>
android:drawableRight="@drawable/manager_fragment_order_bg"中manager_fragment_order_bg.xml对应的代码如下:
<?xml version="1.0" encoding="utf-8"?>
<selector xmlns:android="http://schemas.android.com/apk/res/android">
  <item android:drawable="@mipmap/ic_drop_up" android:state_selected="true" />
  <item android:drawable="@mipmap/ic_drop_down" android:state_selected="false"/>
</selector>
ic_drop_up和ic_drop_down对应的分别是一张箭头向上的图片和一张箭头向下的图片,这里就不多说了。
android:textColor="@drawable/text_color_bg"的话是设置文字选中和未被选中时显示的颜色,在上面的第二步第四条已经讲过了,这里就不说了。
ok,整个实现过程大致就是这样的。今天关于PopuWindow实现下拉列表的知识就讲到这里了,谢谢诶。希望对大家的学习有所帮助,也希望大家多多支持PHPERZ。