Android自定义相机界面的实现代码
发布于 2017-10-03 09:05:57 | 193 次阅读 | 评论: 0 | 来源: 网友投递
Android移动端操作系统
Android是一种基于Linux的自由及开放源代码的操作系统,主要使用于移动设备,如智能手机和平板电脑,由Google公司和开放手机联盟领导及开发。尚未有统一中文名称,中国大陆地区较多人使用“安卓”或“安致”。
这篇文章主要为大家详细介绍了Android自定义相机界面的实现代码,具有一定的参考价值,感兴趣的小伙伴们可以参考一下
我们先实现拍照按钮的圆形效果哈,Android开发中,当然可以找美工人员设计图片,然后直接拿进来,不过我们可以自己写代码实现这个效果哈,最常用的的是用layout-list实现图片的叠加,我们这个layout命名为btn_take_photo.xml,这是一个自定义的drawable文件,所以按照规范,我们要将它放在drawable文件夹里。
注意:drawable文件夹一般是来放自定义的drawable文件的,可以将它看成自己写的背景样式等等哦
解释代码:
layer-list里面放3个item,先实现一个白色背景的椭圆,属性android:shape="oval"是实现椭圆的
android:shape=["rectangle" | "oval" | "line" | "ring"]
shape的形状,默认为矩形,可以设置为矩形(rectangle)、椭圆形(oval)、线性形状(line)、环形(ring)
然后再放入一个item,这个item是一个左右上下都等长的椭圆
ok,这样一个等边的椭圆就做好了
接着再次放入一个一个蓝色背景的椭圆
<?xml version="1.0" encoding="utf-8"?>
<layer-list xmlns:android="http://schemas.android.com/apk/res/android">
 <item>
  <shape android:shape="oval">
   <solid android:color="@color/white" />
  </shape>
 </item>
 <item
  android:bottom="6dp"
  android:left="6dp"
  android:right="6dp"
  android:top="6dp">
  <shape android:shape="oval">
   <solid android:color="@color/blue" />
  </shape>
 </item>
 <item>
  <shape android:shape="oval">
   <stroke
    android:width="1dp"
    android:color="@color/blue"
    android:dashWidth="0dp" />
  </shape>
 </item>
</layer-list> 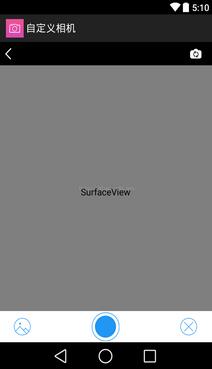
这是一个界面:activity_take_photo.xml
界面的很简单,这里只是提供参考学习的,解释代码:
SurfaceView是用来拍照用的,注意这个类只要和视频或者拍照的都需要用到,不过项目里一般都是自己写的。
这些代码只是参考互相学习,功能的话,自己还在做,所以先提供这些学习的...,希望可以帮助学习的人,然后自己写博客的目的也是对自己学习的技术进行收录和共享,只是本着互相学习的目的。
<FrameLayout xmlns:android="http://schemas.android.com/apk/res/android"
 android:layout_width="match_parent"
 android:layout_height="match_parent"
 android:background="#ffffff">

 <!-- 显示预览图形 -->

 <SurfaceView
  android:id="@+id/surfaceView"
  android:layout_width="match_parent"
  android:layout_height="match_parent" />

 <RelativeLayout
  android:id="@+id/buttonLayout"
  android:layout_width="match_parent"
  android:layout_height="match_parent"
  android:background="@drawable/pic">

  <RelativeLayout
   android:id="@+id/panel_take_photo"
   android:layout_width="fill_parent"
   android:layout_height="wrap_content"
   android:layout_alignParentBottom="true"
   android:background="@color/white"
   android:gravity="center_vertical"
   android:padding="2dp">


   <Button
    android:id="@+id/btn_take_photo"
    android:layout_width="50dp"
    android:layout_height="50dp"
    android:background="@drawable/btn_take_photo"
    android:layout_centerHorizontal="true"
    android:layout_alignTop="@+id/iv_album" />

   <ImageView
    android:id="@+id/iv_album"
    android:layout_width="40dp"
    android:layout_height="40dp"
    android:layout_alignParentLeft="true"
    android:layout_centerVertical="true"
    android:layout_marginLeft="20dp"
    android:padding="5dp"
    android:src="@drawable/camera_library" />

   <ImageView
    android:id="@+id/title_btn_black"
    android:layout_width="40dp"
    android:layout_height="40dp"
    android:layout_alignParentRight="true"
    android:layout_centerVertical="true"
    android:layout_marginRight="20dp"
    android:padding="5dp"
    android:src="@drawable/camera_back" />
  </RelativeLayout>


  <LinearLayout
   android:id="@+id/photo_area"
   android:layout_width="fill_parent"
   android:layout_height="wrap_content"
   android:layout_above="@id/panel_take_photo"
   android:layout_centerVertical="true"
   android:background="@color/white"
   android:orientation="horizontal"></LinearLayout>

  <!-- 自定义的标题栏-->
  <RelativeLayout
   android:id="@+id/camera_top"
   android:layout_width="fill_parent"
   android:layout_height="40dp"
   android:layout_alignParentTop="true"
   android:background="@color/black">

   <ImageView
    android:id="@+id/btn_black"
    android:layout_width="wrap_content"
    android:layout_height="fill_parent"
    android:layout_alignParentLeft="true"
    android:paddingBottom="10dp"
    android:paddingLeft="10dp"
    android:paddingTop="10dp"
    android:src="@drawable/back" />

   <ImageView
    android:id="@+id/btn_change"
    android:layout_width="wrap_content"
    android:layout_height="fill_parent"
    android:layout_alignParentRight="true"
    android:layout_centerVertical="true"
    android:paddingBottom="10dp"
    android:paddingRight="10dp"
    android:paddingTop="10dp"
    android:src="@drawable/camera_flip" />

  </RelativeLayout>

  <!-- 自定义的CameraGrid-->
  <org.personality.camera.ui.view.CameraGrid
   android:id="@+id/masking"
   android:layout_width="match_parent"
   android:layout_height="match_parent"
   android:layout_above="@id/photo_area"
   android:layout_alignParentTop="true" />

  <View
   android:id="@+id/focus_index"
   android:layout_width="40dp"
   android:layout_height="40dp"
   android:layout_above="@id/photo_area"
   android:background="@drawable/cam_focus"
   android:visibility="invisible" />
 </RelativeLayout>

</FrameLayout>
提供自定义CameraGrid类:
/**
 * 自定义的View
 * 照相机井字线
 *
 */
public class CameraGrid extends View {

 private int topBannerWidth = 0;
 private Paint mPaint;

 public CameraGrid(Context context) {
  this(context,null);
 }

 public CameraGrid(Context context, AttributeSet attrs) {
  super(context, attrs);
  init();
 }

 private void init(){
  mPaint = new Paint();
  mPaint.setColor(Color.WHITE);
  mPaint.setAlpha(120);
  mPaint.setStrokeWidth(1f);
 }


 private boolean showGrid = true;

 public boolean isShowGrid() {
  return showGrid;
 }

 public void setShowGrid(boolean showGrid) {
  this.showGrid = showGrid;
 }

 public int getTopWidth() {
  return topBannerWidth;
 }
}
以上就是本文的全部内容,希望对大家的学习有所帮助,也希望大家多多支持PHPERZ。