Android自定义view实现动态柱状图
发布于 2017-09-13 06:03:42 | 186 次阅读 | 评论: 0 | 来源: 网友投递
Android移动端操作系统
Android是一种基于Linux的自由及开放源代码的操作系统,主要使用于移动设备,如智能手机和平板电脑,由Google公司和开放手机联盟领导及开发。尚未有统一中文名称,中国大陆地区较多人使用“安卓”或“安致”。
这篇文章主要为大家详细介绍了Android自定义view实现动态柱状图的相关资料,具有一定的参考价值,感兴趣的小伙伴们可以参考一下
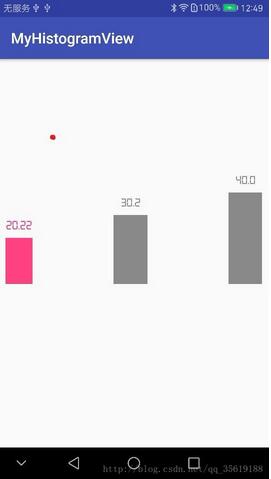
先看一下动态柱状图效果。
主要功能是可以自定义指定的字体,柱状图颜色,动态效果。
在自定义view
public class Histogram extends View {
 int MAX = 100;//矩形显示的最大值
 int corner = 0; //矩形的角度。 设置为0 则没有角度。
 double data = 0.0;//显示的数
 double tempData = 0; //初始数据
 int textPadding = 50; //字体与矩形图的距离
  Paint mPaint;
 int mColor;
  Context mContext;


 //构造函数
 public Histogram(Context context) {
  super(context);
  mContext = context;
 }

 public Histogram(Context context, @Nullable AttributeSet attrs) {
  super(context, attrs);
  mContext = context;
  initPaint();
 }

 public Histogram(Context context, @Nullable AttributeSet attrs, int defStyleAttr) {
  super(context, attrs, defStyleAttr);
  mContext = context;
  initPaint();
 }

 //画笔方法
 private void initPaint() {
  mPaint = new Paint();
  mPaint.setAntiAlias(true);
  mColor = mContext.getResources().getColor(R.color.gary);
  mPaint.setColor(mColor);
 }

 @Override
 public void draw(Canvas canvas) {
  super.draw(canvas);

  if (data == 0.0) {
   mPaint.setTextSize(getWidth() / 2);
   RectF oval3 = new RectF(0, getHeight() - DensityUtils.pxTodip(mContext, 20), getWidth(), getHeight());// 设置个新的长方形
   canvas.drawRoundRect(oval3, DensityUtils.pxTodip(mContext, corner), DensityUtils.pxTodip(mContext, corner), mPaint);

   canvas.drawText("0",
     getWidth() * 0.5f - mPaint.measureText("0") * 0.5f,
     getHeight() - DensityUtils.pxTodip(mContext, 20) - 2 * DensityUtils.pxTodip(mContext, textPadding),
     mPaint);
   return;
  }

  //防止数值很大的的时候,动画时间过长
  int step = (int) (data / 100 + 1.0);

  if (tempData < data - step) {
   tempData = tempData + step;
  } else {
   tempData = data;
  }
  //画圆角矩形
  String S = tempData + ""; //如果数字后面需要加% 则在""中添加%
  //设置显示的字体
  Typeface typeface = Typeface.createFromAsset(getContext().getAssets(),"digital-7.ttf");
  mPaint.setTypeface(typeface);
//  //一个字和两,三个字的字号相同
  if (S.length() < 4) {
   mPaint.setTextSize(getWidth()/2 );
  } else {
   mPaint.setTextSize(50); //可以通过getWidth()/2 改变字体大小 也可以通过设置数字来改变自己想要的字体大小 当超出矩形图宽度时不能显示全部
  }
//
  float textH = mPaint.ascent() + mPaint.descent();
  float MaxH = getHeight() - textH - 2 * DensityUtils.pxTodip(mContext, textPadding);
//  //圆角矩形的实际高度
  float realH = (float) (MaxH / MAX * tempData);
  RectF oval3 = new RectF(0, getHeight() - realH, getWidth(), getHeight());// 设置个新的长方形
  canvas.drawRoundRect(oval3, DensityUtils.pxTodip(mContext, corner), DensityUtils.pxTodip(mContext, corner), mPaint);
  //写数字
  canvas.drawText(S,
    getWidth() * 0.5f - mPaint.measureText(S) * 0.5f,
    getHeight() - realH - 2 * DensityUtils.pxTodip(mContext, textPadding),
    mPaint);
  if (tempData != data) {
   postInvalidate();
  }
 }

 public void setData(double data, int MAX) {
  this.data = data;
  this.MAX = MAX;
  postInvalidate();
 }

 public int getmColor() {
  return mColor;
 }

 public void setmColor(int mColor) {
  this.mColor = mColor;
 }

}
布局
<?xml version="1.0" encoding="utf-8"?>
<LinearLayout
 xmlns:android="http://schemas.android.com/apk/res/android"
 android:id="@+id/activity_main"
 android:layout_width="match_parent"
 android:layout_height="match_parent"
 android:layout_weight="1"
 >
 <View
  android:layout_width="0dp"
  android:layout_height="match_parent"
  android:layout_weight="0.2"/>
 <com.mieasy.myhistogramview.Histogram
  android:id="@+id/column_one"
  android:layout_width="0dp"
  android:layout_height="300dp"
  android:layout_weight="0.8"/>

 <View
  android:layout_width="0dp"
  android:layout_height="match_parent"
  android:layout_weight="2.4"/>

 <com.mieasy.myhistogramview.Histogram
  android:id="@+id/column_two"
  android:layout_width="0dp"
  android:layout_height="300dp"
  android:layout_weight="1"/>

 <View
  android:layout_width="0dp"
  android:layout_height="match_parent"
  android:layout_weight="2.4"/>

 <com.mieasy.myhistogramview.Histogram
  android:id="@+id/column_three"
  android:layout_width="0dp"
  android:layout_height="300dp"
  android:layout_weight="1"/>
 <View
  android:layout_width="0dp"
  android:layout_height="match_parent"
  android:layout_weight="0.2"/>


</LinearLayout>
MainActivity调用initAllViews()方法
 private void initAllViews() {
  column_one = (Histogram) findViewById(R.id.column_one);
  column_two = (Histogram) findViewById(R.id.column_two);
  column_three = (Histogram) findViewById(R.id.column_three);

  column_one.setData( 20.22, 100);
  column_two.setData(30.2, 100);
  column_three.setData(40, 100);
  column_one.mPaint.setColor(getResources().getColor(R.color.colorAccent)); //改变柱状图的颜色
 }
以上就是本文的全部内容,希望对大家的学习有所帮助,也希望大家多多支持PHPERZ。
推荐阅读
最新资讯