在ABP框架中使用BootstrapTable组件的方法
发布于 2017-08-26 07:23:45 | 297 次阅读 | 评论: 0 | 来源: 网友投递
Bootstrap Web前端CSS框架
Bootstrap是Twitter推出的一个开源的用于前端开发的工具包。它由Twitter的设计师Mark Otto和Jacob Thornton合作开发,是一个CSS/HTML框架。Bootstrap提供了优雅的HTML和CSS规范,它即是由动态CSS语言Less写成。Bootstrap一经推出后颇受欢迎,一直是GitHub上的热门开源项目,包括NASA的MSNBC(微软全国广播公司)的Breaking News都使用了该项目。
ABP是“ASP.NET Boilerplate Project (ASP.NET样板项目)”的简称,它是一个成熟的开源框架,基于DDD+Repository模式,自带Zero权限和认证模块,避免了从零开始搭建框架的烦恼。今天来分享下如何在ABP框架的模式里面使用bootstrapTable组件。
一、关于ABP
ABP是“ASP.NET Boilerplate Project (ASP.NET样板项目)”的简称,它是一个成熟的开源框架,基于DDD+Repository模式,自带Zero权限和认证模块,避免了从零开始搭建框架的烦恼。关于ABP的框架优势就此打住,因为这样说下去要说三天三夜,脱离文本主题。
关于ABP的入门,博主不想说太多,园子里面tkb至简和阳光铭睿有很多入门级的文章,有兴趣的可以了解下,还是给出它的官网和开源地址。
ABP官方网站:http://www.aspnetboilerplate.com
ABP开源项目:https://github.com/aspnetboilerplate
PS:如果你不愿意去看它的源码,可以直接查看ABP官网上面的演示地址:https://aspnetzero.com/?ref=abptmplpage
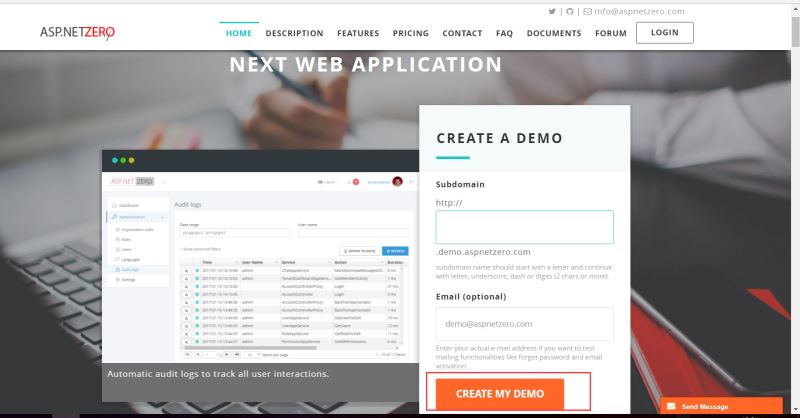
点击CREATE MY DEMO按钮,系统会自动为你生成演示地址
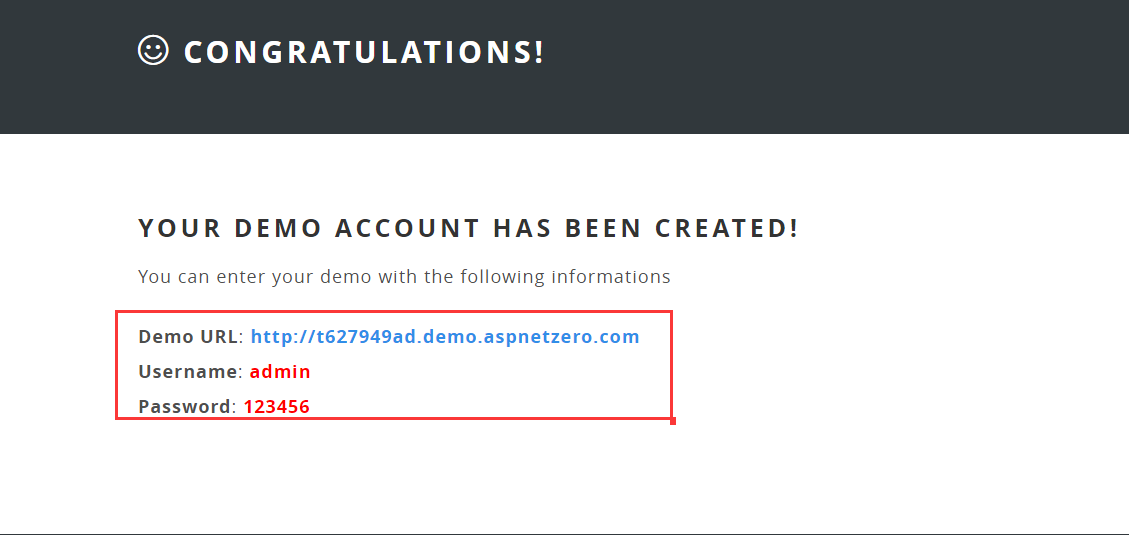
进入对应的Demo URL
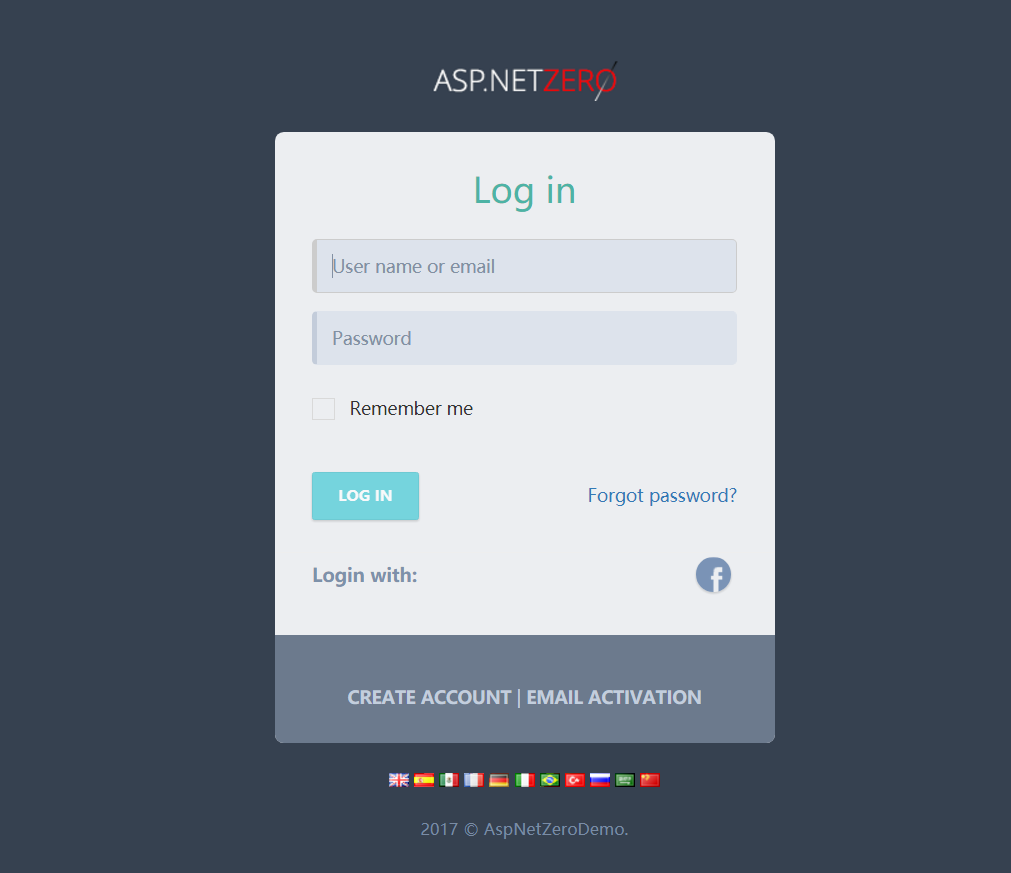
使用演示的用户名和密码登陆进去
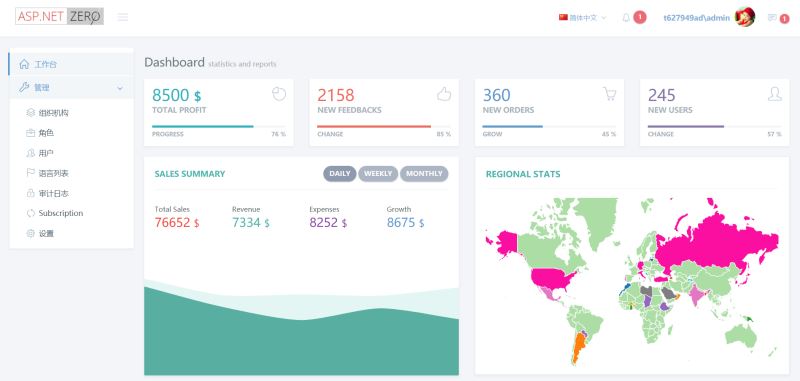
可以看到Zero模块的实现效果。
二、jTable在ABP中的运用
如果你下载ABP的源码,并且选择的是混合开发模式(ABP提供了两种开发模式,一种是基于MVVM的Angular.js的模式;另一种就是MVC+jQuery的混合开发模式),如下图:

当你Down下来源码之后你就会发现,ABP的源码里面的UI部分的表格都是使用jTable去实现的。为什么会用jTable?原因很简单,jTable是ABP的作者kalkan写的一款开源插件,自己写的肯定用自己的东西喽。下面jTable的效果来一发。
来一个jtable的父子表:

如果是不带父子表的简单表格,其实jTable的效果其实还行,可是加上一些复杂的功能之后,那一片片蓝色的区域不忍直视,并且jTable的api还有待完善,很多需要的功能都需要自己去实现,于是就接到了将所有的表格组件换成BootstrapTable的需求,才有了今天的主题:在ABP中封装BootstrapTable。
三、Bootstrap Table在ABP中的封装
接到需求,博主各种百度、各种谷歌,都找不到Bootstrap Table组件在ABP中的封装,有的只是在ABP的项目里面简单的用传统的方式去初始化组件,这并不是博主想要的。说到这里不得不说一下,如果你使用ABP开发的过程中遇到一些难题,你会发现很难从百度里面搜索到相关答案,谷歌里面有时能找到,但大部分都是英文社区,所以如果你英文较弱,在查找资料上面会很吃亏,有时一个简单的配置问题需要折腾很久。
1、jTable在ABP项目里面的初始化
首先来看看jTable在一般的ABP项目里面是如何初始化的。比如我们在Application里面有一个如下的接口和实现
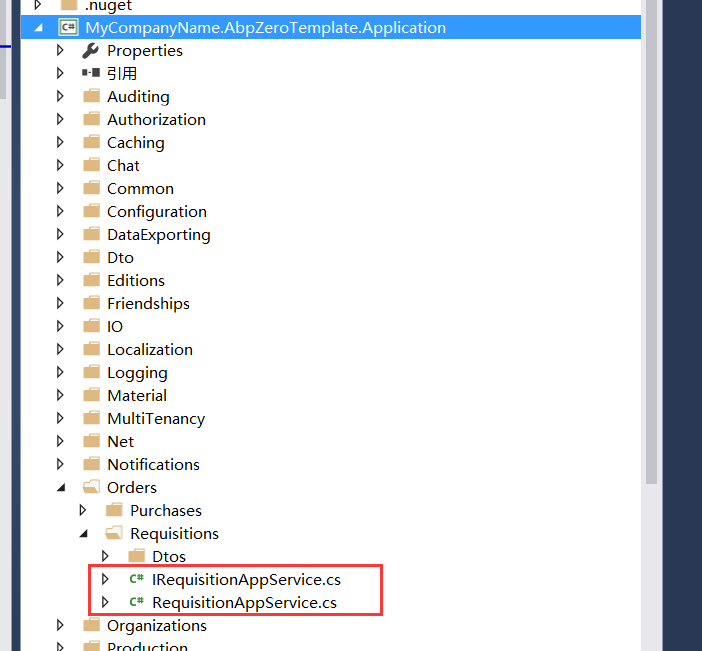
public interface IRequisitionAppService : IApplicationService
{
Task<PagedResultDto<RequisitionListDto>> GetRequisitionListAsync(GetRequisitionListInput input);
}
[AbpAuthorize(OrderAppPermissions.Pages_Order_Requisition)]
public class RequisitionAppService : AbpZeroTemplateAppServiceBase, IRequisitionAppService
{
private readonly IRepository<Requisition, long> _requisitionRepository;
public RequisitionAppService(IRepository<Requisition, long> requisitionRepository)
{
_requisitionRepository = requisitionRepository;
}
public async Task<PagedResultDto<RequisitionListDto>> GetRequisitionListAsync(GetRequisitionListInput input)
{
var query = _requisitionRepository.GetAll()
.WhereIf(input.Status != null, w => (int)w.Status == input.Status.Value)
.WhereIf(
!input.Filter.IsNullOrWhiteSpace(),
u =>
u.No.Contains(input.Filter) ||
u.Remark.Contains(input.Filter)
);
var count = await query.CountAsync();
var list = await query
.OrderBy(input.Sorting)
.PageBy(input)
.ToListAsync();
var dtos = list.MapTo<List<RequisitionListDto>>();
return new PagedResultDto<RequisitionListDto>(
count,
dtos
);
}
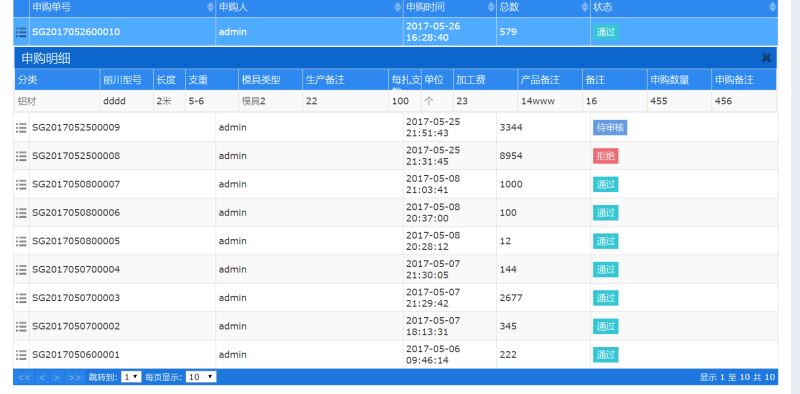
}然后我们前端有一个页面的列表数据从这个接口GetRequisitionListAsync()获取
<div class="portlet-body">
<div id="dataListTable"></div>
</div>
(function () {
$(function () {
var _$dataListTable = $('#dataListTable');
var _service = abp.services.app.requisition;
_$dataListTable.jtable({
paging: true,
sorting: true,
selecting: true,
actions: {
listAction: {
method: _service.getRequisitionListAsync
}
},
fields: {
id: {
key: true,
list: false
},
details: {
width: '1%',
sorting: false,
edit: false,
create: false,
listClass: 'child-opener-image-column',
display: function (detailData) {
var $img = $('<img class="child-opener-image" src="/Common/Images/list_metro.png" title="申购明细" />');
$img.click(function () {
_$dataListTable.jtable('openChildTable',
$img.closest('tr'),
{
title: "申购明细",
showCloseButton: true,
actions: {
listAction: {
method: _service.getRequisitionDetailListByIdAsync
}
},
fields: {
materialClassParentNameAndName: {
title: app.localize('MaterialClassName'),
width: '8%'
},
materialInfoTypeNo: {
title: app.localize('TypeNo'),
width: '5%'
},
materialInfoLengthDisplayName: {
title: app.localize('LengthDisplayName'),
width: '3%'
},
materialInfoWeight: {
title: app.localize('Weight'),
width: '5%',
display: function (data) {
return data.record.materialInfoMinWeight + '-' + data.record.materialInfoMaxWeight;
}
},
materialInfoMouldTypeDisplayName: {
title: app.localize('MouldTypeDisplayName'),
width: '6%'
},
materialInfoProductionRemark: {
title: app.localize('ProductionRemark'),
width: '8%'
},
materialInfoBundleCountDisplayName: {
title: app.localize('BundleCountDisplayName'),
width: '3%'
},
materialInfoUnitDisplayName: {
title: app.localize('UnitDisplayName'),
width: '3%'
},
materialInfoProcessCost: {
title: app.localize('ProcessCost'),
width: '6%'
},
materialInfoProductRemark: {
title: app.localize('ProductRemark'),
width: '6%'
},
materialInfoRemark: {
title: app.localize('Remark'),
width: '6%'
},
count: {
title: app.localize('申购数量'),
width: '6%'
},
remark: {
title: app.localize('申购备注'),
width: '6%'
}
}
}, function (data) {
data.childTable.jtable('load',
{ requisitionId: detailData.record.id }
);
});
});
return $img;
}
},
no: {
title: "申购单号",
width: '20%'
},
creatorUserName: {
title: "申购人",
width: '20%'
},
creationTime: {
title: "申购时间",
width: '10%',
display: function (data) {
return moment(data.record.creationTime).format('YYYY-MM-DD HH:mm:ss');
}
},
sumCount: {
title: "总数",
width: '10%'
},
status: {
title: "状态",
width: '20%',
display: function (data) {
if (data.record.status === app.order.requisitionAuditStatus.audit)
return '<span class="label label-info">' + app.localize('Autdit') + '</span>'
else if (data.record.status === app.order.requisitionAuditStatus.auditPass)
return '<span class="label label-success">' + app.localize('Pass') + '</span>'
else if (data.record.status === app.order.requisitionAuditStatus.auditReject)
return '<span class="label label-danger">' + app.localize('Reject') + '</span>'
else if (data.record.status === app.order.requisitionAuditStatus.delete)
return '<span class="label label-danger">' + app.localize('Abandon') + '</span>'
else
return '<span class="label label-danger">' + app.localize('Unknown') + '</span>'
}
}
}
});
});
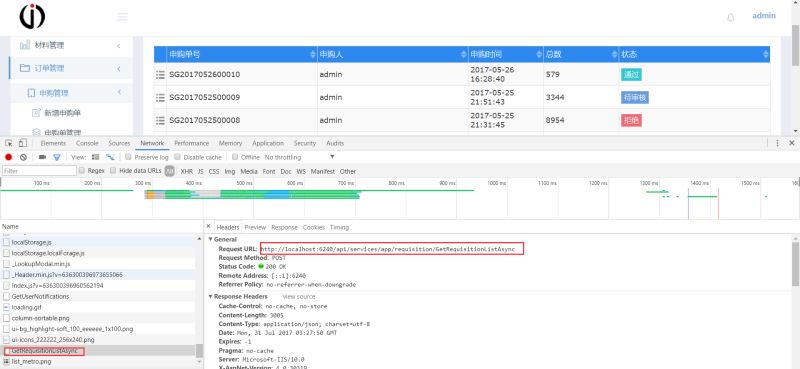
})();得到如下效果:
代码释疑:
(1) var _service = abp.services.app.requisition; 这一句声明当前页面需要使用哪个服务。
(2) _service.getRequisitionListAsync 这一句对应的是服务调用的方法,你会发现在后台方法名是GetRequisitionListAsync(),而在js里面却变成了getRequisitionListAsync(),我们暂且称之为“潜规则”。
2、bootstrapTable在ABP项目里面的封装
通过上述代码你会发现,ABP在application层里面定义的方法,最终会生成某一些js对应的function,这里难点来了。我们找遍了bootstrapTable组件的api,都没有通过某一个function去获取数据的啊。这可如何是好?为这个问题,博主折腾了两天。最开始博主想,function最终还不是要换成http请求的,我们只要拿到http请求的url,然后将function转换为url不就行了么:
我们使用bootstrapTable组件初始化的时候声明 {url:'/api/services/app/requisition/GetRequisitionListAsync'} 这样不就行了么?呵呵,经过测试,这样确实能正确取到数据。但是不够理想,因为这前面的前缀是ABP给我们生成的,是否会变化我们尚且不说,给每一个url加上这么一长串着实看着很不爽,于是进一步想,是否我们的bootstrapTable也可以使用function去初始化呢,组件没有,难道我们就不能给他扩展一个吗?我们不用url获取数据,通过调用这个function取到数据,然后将数据渲染到组件不就行了。思路有了,那么这里有两个难题:一是如何将原来url的方式变成这里的调用function的方式呢?二是参数的封装。经过查看组件的源码发现,如果是服务端分页,组件最终是进入到initServer()这个方法去获取数据,然后渲染到页面上面的,组件原始的initServer()方法如下:
BootstrapTable.prototype.initServer = function (silent, query) {
  var that = this,
   data = {},
   params = {
    pageSize: this.options.pageSize === this.options.formatAllRows() ?
     this.options.totalRows : this.options.pageSize,
    pageNumber: this.options.pageNumber,
    searchText: this.searchText,
    sortName: this.options.sortName,
    sortOrder: this.options.sortOrder
   },
   request;
  if (!this.options.url && !this.options.ajax) {
   return;
  }
  if (this.options.queryParamsType === 'limit') {
   params = {
    search: params.searchText,
    sort: params.sortName,
    order: params.sortOrder
   };
   if (this.options.pagination) {
    params.limit = this.options.pageSize === this.options.formatAllRows() ?
     this.options.totalRows : this.options.pageSize;
    params.offset = this.options.pageSize === this.options.formatAllRows() ?
: this.options.pageSize * (this.options.pageNumber - 1);
   }
  }
  if (!($.isEmptyObject(this.filterColumnsPartial))) {
   params['filter'] = JSON.stringify(this.filterColumnsPartial, null);
  }
  data = calculateObjectValue(this.options, this.options.queryParams, [params], data);
  $.extend(data, query || {});
  // false to stop request
  if (data === false) {
   return;
  }
  if (!silent) {
   this.$tableLoading.show();
  }
  request = $.extend({}, calculateObjectValue(null, this.options.ajaxOptions), {
   type: this.options.method,
   url: this.options.url,
   data: this.options.contentType === 'application/json' && this.options.method === 'post' ?
    JSON.stringify(data) : data,
   cache: this.options.cache,
   contentType: this.options.contentType,
   dataType: this.options.dataType,
   success: function (res) {
    res = calculateObjectValue(that.options, that.options.responseHandler, [res], res);
    that.load(res);
    that.trigger('load-success', res);
   },
   error: function (res) {
    that.trigger('load-error', res.status, res);
   },
   complete: function () {
    if (!silent) {
     that.$tableLoading.hide();
    }
   }
  });
  if (this.options.ajax) {
   calculateObjectValue(this, this.options.ajax, [request], null);
  } else {
   $.ajax(request);
  }
 };
代码不难读懂,解析参数,整合参数,得到参数,发送ajax请求,在success事件里面将得到的数据渲染到界面。读懂了这段代码,我们再来封装function就容易多了。
最终我们封装的代码如下:
(function ($) {
 'use strict';
 //debugger;
 //通过构造函数获取到bootstrapTable里面的初始化方法
 var BootstrapTable = $.fn.bootstrapTable.Constructor,
  _initData = BootstrapTable.prototype.initData,
  _initPagination = BootstrapTable.prototype.initPagination,
  _initBody = BootstrapTable.prototype.initBody,
  _initServer = BootstrapTable.prototype.initServer,
  _initContainer = BootstrapTable.prototype.initContainer;
 //重写
 BootstrapTable.prototype.initData = function () {
  _initData.apply(this, Array.prototype.slice.apply(arguments));
 };
 BootstrapTable.prototype.initPagination = function () {
  _initPagination.apply(this, Array.prototype.slice.apply(arguments));
 };
 BootstrapTable.prototype.initBody = function (fixedScroll) {
  _initBody.apply(this, Array.prototype.slice.apply(arguments));
 };
 BootstrapTable.prototype.initServer = function (silent, query) {
  //构造自定义参数
  for (var key in this.options.methodParams) {
   $.fn.bootstrapTable.defaults.methodParams[key] = this.options.methodParams[key];
  }
  //如果传了url,则走原来的逻辑
  if (this.options.url) {
   _initServer.apply(this, Array.prototype.slice.apply(arguments));
   return;
  }
  //如果定义了abpMethod,则走abpMethod的逻辑
  if (!this.options.abpMethod) {
   return;
  }
  var that = this,
   data = {},
   params = {
    pageSize: this.options.pageSize === this.options.formatAllRows() ?
     this.options.totalRows : this.options.pageSize,
    pageNumber: this.options.pageNumber,
    searchText: this.searchText,
    sortName: this.options.sortName,
    sortOrder: this.options.sortOrder
   },
   request;
  //debugger;
  if (this.options.queryParamsType === 'limit') {
   params = {
    search: params.searchText,
    sort: params.sortName,
    order: params.sortOrder
   };
   if (this.options.pagination) {
    params.limit = this.options.pageSize === this.options.formatAllRows() ?
     this.options.totalRows : this.options.pageSize;
    params.offset = this.options.pageSize === this.options.formatAllRows() ?
     0 : this.options.pageSize * (this.options.pageNumber - 1);
   }
  }
  if (!($.isEmptyObject(this.filterColumnsPartial))) {
   params['filter'] = JSON.stringify(this.filterColumnsPartial, null);
  }
  data = $.fn.bootstrapTable.utils.calculateObjectValue(this.options, this.options.queryParams, [params], data);
  $.extend(data, query || {});
  // false to stop request
  if (data === false) {
   return;
  }
  if (!silent) {
   this.$tableLoading.show();
  }
  this.options.abpMethod(data).done(function (result) {
   result = $.fn.bootstrapTable.utils.calculateObjectValue(that.options, that.options.responseHandler, [result], result);
   that.load(result);
   that.trigger('load-success', result);
  });
  request = $.extend({}, $.fn.bootstrapTable.utils.calculateObjectValue(null, this.options.ajaxOptions), {
   type: this.options.method,
   url: this.options.url,
   data: this.options.contentType === 'application/json' && this.options.method === 'post' ?
    JSON.stringify(data) : data,
   cache: this.options.cache,
   contentType: this.options.contentType,
   dataType: this.options.dataType,
   success: function (res) {
    debugger;
    res = $.fn.bootstrapTable.utils.calculateObjectValue(that.options, that.options.responseHandler, [res], res);
    that.load(res);
    that.trigger('load-success', res);
   },
   error: function (res) {
    that.trigger('load-error', res.status, res);
   },
   complete: function () {
    if (!silent) {
     that.$tableLoading.hide();
    }
   }
  });
  if (this.options.ajax) {
   $.fn.bootstrapTable.utils.calculateObjectValue(this, this.options.ajax, [request], null);
  } else {
   $.ajax(request);
  }
 }
 BootstrapTable.prototype.initContainer = function () {
  _initContainer.apply(this, Array.prototype.slice.apply(arguments));
 };
 abp.bootstrapTableDefaults = {
  striped: false,
  classes: 'table table-striped table-bordered table-advance table-hover',
  pagination: true,
  cache: false,
  sidePagination: 'server',
  uniqueId: 'id',
  showRefresh: false,
  search: false,
  method: 'post',
  //toolbar: '#toolbar',
  pageSize: 10,
  paginationPreText: '上一页',
  paginationNextText: '下一页',
  queryParams: function (param) {
   //$.fn.bootstrapTable.defaults.methodParams.propertyIsEnumerable()
   var abpParam = {
    Sorting: param.sort,
    filter: param.search,
    skipCount: param.offset,
    maxResultCount: param.limit
   };
   for (var key in $.fn.bootstrapTable.defaults.methodParams) {
    abpParam[key] = $.fn.bootstrapTable.defaults.methodParams[key];
   }
   return abpParam;
  },
  responseHandler: function (res) {
   if (res.totalCount)
    return { total: res.totalCount, rows: res.items };
   else
    return { total: res.result.totalCount, rows: res.result.items };
  },
  methodParams: {},
  abpMethod: function () { }
 };
 $.extend($.fn.bootstrapTable.defaults, abp.bootstrapTableDefaults);
})(jQuery);
代码释疑:增加两个参数 methodParams: {},abpMethod: function () { } 来获取abp的function和参数,然后获取数据的时候如果定义了abpMethod,则通过function获取数据,否则还是走原来的逻辑。
然后我们调用就简单了
//选取界面上要先数据的表格
  var _$SendOrdersTable = $('#SendOrdersTable');
  //获取服务层方法
  var _SendOrderService = abp.services.app.sendOrder;
  _$SendOrdersTable.bootstrapTable({
   abpMethod: _SendOrderService.getSendOrderListAsync,
   detailView: true,
   onExpandRow: function (index, row, $detail) {
    var cur_table = $detail.html('<table></table>').find('table');
    $(cur_table).bootstrapTable({
     showRefresh: false,
     search: false,
     pagination: false,
     abpMethod: _SendOrderService.getSendOrderDetailListAsync,
     methodParams: { SendOrderId: row.id },
     columns: [
      {
       field: 'materialClassName',
       title: app.localize('MaterialClassName'),
       width: '8%'
      },
      {
       field: 'typeNo',
       title: app.localize('TypeNo'),
       width: '8%'
      }
     ]
    });
   },
   columns: [{
    field: 'no',
    title: app.localize('SendOrderNO'),
    align: 'center'
   },
   {
    field: 'supplierName',
    title: app.localize('SupplierName'),
    align: 'center'
   },
   {
    title: app.localize('SendOrderTime'),
    align: 'center',
    field: 'createdDate',
    formatter: function (data) {
     return moment(data).format('YYYY-MM-DD HH:mm:ss');
    }
   },
   {
    field: 'status',
    align: 'center',
    title: app.localize('SendOrderStatus'),
    formatter: function (data) {
     var value = "";
     if (data == 1) {
      value = '<span class="label label-info">' + app.localize('Autdit') + '</span>';
     }
     else if (data == 2) {
      value = '<span class="label label-success">' + app.localize('Pass') + '</span>';
     }
     else if (data == 3) {
      value = '<span class="label label-default">' + app.localize('Reject') + '</span>';
     }
     else
      value = '<span class="label label-default">' + app.localize('Abandon') + '</span>';
     return value;
    }
   },
   {
    field: 'createName',
    align: 'center',
    title: app.localize('SendOrderCreator'),
   },
   {
    field: 'sumCount',
    align: 'center',
    title: app.localize('SendOrderTotalCount'),
   },
   ]
  });
得到如下效果
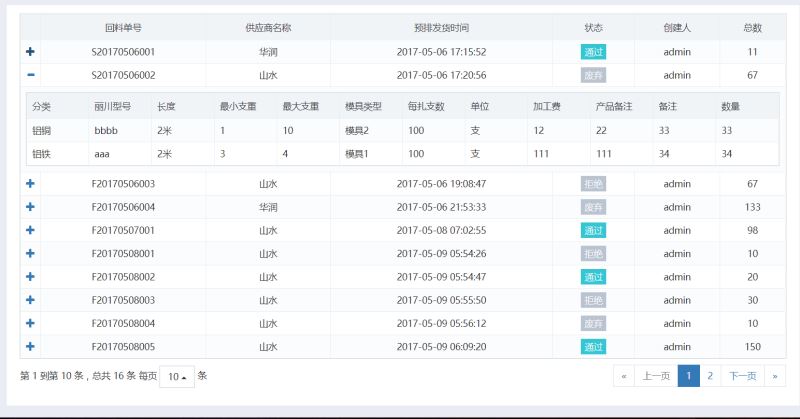
总结
以上所述是小编给大家介绍的在ABP框架中使用BootstrapTable组件的方法,希望对大家有所帮助,如果大家有任何疑问请给我留言,小编会及时回复大家的。在此也非常感谢大家对phperz网站的支持!