Css3制作变形与动画效果
发布于 2017-07-17 01:37:44 | 167 次阅读 | 评论: 0 | 来源: 网友投递
CSS3 层叠样式表
CSS即层叠样式表(Cascading StyleSheet)。 在网页制作时采用层叠样式表技术,可以有效地对页面的布局、字体、颜色、背景和其它效果实现更加精确的控制。 只要对相应的代码做一些简单的修改,就可以改变同一页面的不同部分,或者页数不同的网页的外观和格式。
这篇文章主要介绍了Css3制作变形与动画效果,css3制作动画主要用到:变形(transform),过渡(transition)和动画(animation)三个属性,需要的朋友可以参考下
下面通过图文并茂的方式给大家展示下css3制作变形与动画效果
css3制作动画的几个属性:变形(transform),过渡(transition)和动画(animation)。
下面介绍:过渡transition。
一、例子
先通过一个例子感性认识一下transition的动画效果。
鼠标放上去,div宽度从100px增大到200px。
<style type="text/css">
div{
width: 100px;
height: 100px;
background-color: red;
}
div:hover{
width: 200px;
}</style><div></div>
这效果其实也算是动画,但是非常变化非常快,不平滑。
如果想让鼠标放上去后div宽度在5s内平滑过渡到200px。只需要加一行代码;
div:hover{

width: 200px;

transition:width 5s ease-in;}
这效果其实也算是动画,但是非常变化非常快,不平滑。
如果想让鼠标放上去后div宽度在5s内平滑过渡到200px。只需要加一行代码;
div:hover{

width: 200px;

transition:width 5s ease-in;}
这里用到的就是transition属性,它就是用来实现属性值平滑过渡,视觉上产生动画效果。
上面用的transition是缩写,包含四个属性:transition-property,transition-duration,transition-timing-function,transition-delay,下面会一一介绍。
二、transition
css3新增transition属性,可以在事件触发元素的样式变化时,让效果更加细腻平滑。
transition用来描述如何让css属性值在一段时间内平滑的从一个值过渡到另一个值。这种过渡效果可以在鼠标点击、获得焦点、被点击或对元素任何改变中触发。
语法:
transition :
[<'transition-property'> || <'transition-duration'> || <'transition-timing-function'> ||
<'transition-delay'> [, [<'transition-property'> || <'transition-duration'> ||
<'transition-timing-function'> || <'transition-delay'>]]*
transition有四个属性值:
transition-property:执行过渡的属性。
transition-duration:指定完成过渡需要的时间。
transition-timing-function,在延续时间段,过渡变换的速率变化,简单理解就是指定过渡函数。
transition-delay:过渡延迟时间。
1、transition-property
transition-property用来指定哪个属性使用过渡动画效果。
语法:
transition-property : none | all | [ <IDENT> ] [ ',' <IDENT> ]*
none:所有属性都不应用过渡效果。
all:默认值。当值为all时,元素产生任何属性值变化时都将执行transition效果。
ident:元素属性名。通过ident指定具体哪些属性。如果指定的多个属性中有某个属性不能应用过渡效果,其他属性还是生效的。
过渡属性只有具备一个中点值的属性(需要产生动画的属性)才能具备过渡效果。在w3c中列出了所有可以实现transition效果的css属性值以及值的类型
Property Name
Typebackground-color
as colorbackground-position
as repeatable list of simple list of length, percentage, or calcborder-bottom-color
as colorborder-bottom-width
as lengthborder-left-color
as colorborder-left-width
as lengthborder-right-color
as colorborder-right-width
as lengthborder-spacing
as simple list of lengthborder-top-color
as colorborder-top-width
as lengthbottom
as length, percentage, or calcclip
as rectanglecolor
as colorfont-size
as lengthfont-weight
as font weightheight
as length, percentage, or calcleft
as length, percentage, or calcletter-spacing
as lengthline-height
as either number or lengthmargin-bottom
as lengthmargin-left
as lengthmargin-right
as lengthmargin-top
as lengthmax-height
as length, percentage, or calcmax-width
as length, percentage, or calcmin-height
as length, percentage, or calcmin-width
as length, percentage, or calcopacity
as numberoutline-color
as coloroutline-width
as lengthpadding-bottom
as lengthpadding-left
as lengthpadding-right
as lengthpadding-top
as lengthright
as length, percentage, or calctext-indent
as length, percentage, or calctext-shadow
as shadow listtop
as length, percentage, or calcvertical-align
as lengthvisibility
as visibilitywidth
as length, percentage, or calcword-spacing
as lengthz-index
as integerNote:并不是什么属性改变都会触发transiton动画效果,比如页面的自适应宽度,当浏览器改变宽度时,并不会触发transition的效果。但上述表格所示的属性类型改变都会触发一个transition动作效果。
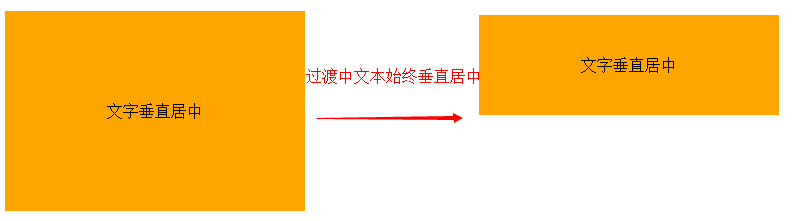
举例:可以同时给几个属性设置动画效果,比如给height和line-height同时设置动画效果,实现div变高文字仍然垂直居中。
<!DOCTYPE html><html><head>
<meta charset="utf-8">
<title>变形与动画</title>
<style type="text/css">div {
width: 300px;
height: 200px;
line-height: 200px;
text-align: center;
background-color: orange;
margin: 20px auto;
-webkit-transition-property: height line-height;
transition-property: height line-height;
-webkit-transition-duration: 1s;
transition-duration: 1s;
-webkit-transition-timing-function: ease-out;
transition-timing-function: ease-out;
-webkit-transition-delay: .2s;
transition-delay: .2s;}div:hover {
height: 100px;
line-height: 100px;}</style></head><body>
<div>文字垂直居中</div></body></html>
2、transition-duration
transition-duration用来设置从旧属性过渡到新属性需要的时间,即持续时间。
3、transition-timing-function
语法:
<single-transition-timing-function> = ease | linear | ease-in | ease-out | ease-in-out | step-start | step-end | steps(<integer>[, [ start | end ] ]?) | cubic-bezier(<number>, <number>, <number>, <number>)
transition-timing-function属性指的是过渡的“缓动函数”。通过这个函数会建立一条加速度曲线,因此在整个transition变化过程中,变化速度可以不断改变。主要包括以下几种函数。
ease:默认值,元素样式从初始状态过渡到终止状态速度由快到慢,逐渐变慢。linear:意思是线性过渡,即过渡过程恒速。ease-in:速度越来越快,呈现加速状态,通常称为“渐显效果”。ease-out:速度越来越慢,呈现减速状态,通常称为“渐隐效果”。ease-in-out速度先加速后减速,称为“渐显渐隐效果”。
举例:鼠标经过问号,帮助信息渐显渐隐。
<!doctype html><html><head>
<meta charset="utf-8">
<title>transition-demo by starof</title>
<style>#help{
width:20px;
height:20px;
border-radius:10px;
color:#fff;
background:#000;
text-align:center;
position:relative;
margin:50px 20px;
cursor:pointer;}#help .tips{
position:absolute;
width:300px;
height:100px;
background:#000;
top:-30px;
left:35px;
border-radius:10px;
opacity:0;
/*渐隐效果*/
transition: opacity .8s ease-in-out;
-moz-transition: opacity .8s ease-in-out;
-webkit-transition: opacity .8s ease-in-out;}.tips:before{
content:"";
border-width:10px;
border-style:solid;
 border-color:transparent #000 transparent transparent;
 position:absolute;
 left:-20px;
 top:30px;}#help:hover .tips{
 opacity:0.5;
 /*渐显效果*/
 transition: opacity .8s ease-in-out;
 -moz-transition: opacity .8s ease-in-out;
 -webkit-transition: opacity .8s ease-in-out;}</style></head><body>
 <div id="help">
 ?
 <div >帮助信息</div>
</div></body></html>
4、transition-delay
transition-delay设置改变属性值后多长时间开始执行动画。
5、属性简写
在改变多个css属性的transition效果时,把几个transition声明用逗号隔开,然后每个属性就都有各自的过渡时间和效果。
Note:第一个时间是时长,第二个是延时。
a{

transition: background 0.8s ease-in 0.3,

color 0.6s ease-out 0.3;}
三、贝塞尔曲线和transition
transition的数学模型就是贝塞尔曲线,下面介绍。
曲线其实就是两点之间插值的效果,贝塞尔曲线是一种插值算法,比线性插值复杂一点。
贝塞尔曲线:起始点,终止点(也称锚点),控制点。通过调整控制点,贝塞尔曲线的形状发生变化。
k阶贝塞尔插值算法需要k+1个控制点。
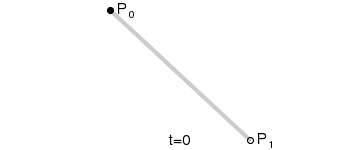
一阶贝塞尔曲线(线段):意思就是从P0到P1的连续点,用来描述一段线段。一次贝塞尔插值就是线性插值。

二阶贝塞尔曲线(抛物线):P0-P1是曲线在P0处的切线。


三阶贝塞尔曲线:

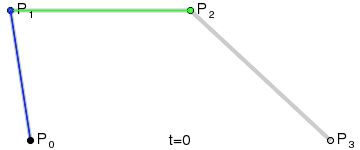
transition用到的就是三阶贝塞尔插值算法,如下图。
时间在0,1区间,待变换属性也认为是0,1区间。P0和P3的坐标一直是(0,0)和(1,1)。transition-timing-function属性用来确定P1和P2的坐标。
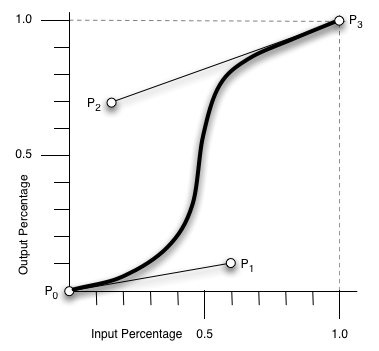
ease [0, 0] [0.25, 0.1] [0.25, 1.0] [1.0,1.0]
linear [0, 0] [0.0, 0.0] [1.0, 1.0] [1.0,1.0]
ease-in [0, 0] [0.42, 0] [1.0, 1.0] [1.0,1.0]
ease-out [0, 0] [0, 0] [0.58, 1.0] [1.0,1.0]
ease-in-out [0, 0] [0.42, 0] [0.58, 1.0] [1.0,1.0]
step-start steps(1,start)
step-end steps(1,end)
cubic-bezier(x1,y1,x2,y2) [0, 0] [x1, y1] [x2, y2] [1.0,1.0]
四、其他相关资料
canvas画贝塞尔曲线
<!DOCTYPE html PUBLIC "-//W3C//DTD XHTML 1.0 Transitional//EN" "http://www.w3.org/TR/xhtml1/DTD/xhtml1-transitional.dtd">
<html xmlns="http://www.w3.org/1999/xhtml">
<head>
<meta http-equiv="Content-Type" content="text/html; charset=utf-8">
<title>bezier demo</title>
</head>
<body>
<div style="width:800px;height:600px;background-color:#fac0c0;">
<canvas id="cvs" width="800" height="600">骚瑞,您的浏览器不支持canvas</canvas>
</div>
<script type="text/javascript">var cvs=document.getElementById("cvs"),
context=cvs.getContext("2d"),points=[];function getXY(node){var x=0,y=0;if (node.offsetParent)
{while (node.offsetParent)
{x += node.offsetLeft;y += node.offsetTop;node = node.offsetParent;}}
else {node.x && (x += node.x);node.y && (y += node.y);}return [x,y];}
function drawPoint(x,y,c,b) {!b && (b=2);context.fillStyle=c || "red";
context.fillRect(x,y,b,b);}function bezier(points,t){var i,n=points.length-1,x=0,y=0;function fn(p,n,i,t){return arrangement(n,i)*p*Math.pow(1-t,n-i)*Math.pow(t,i);}for(i=0;i<n+1;i++){x+=fn(points[i][0],n,i,t);
y+=fn(points[i][1],n,i,t);}return [x,y];}function factorial(n){if(isNaN(n) || n<=0 || Math.floor(n)!==n){return 1;}var s=1;
while(n){s*=n--;}return s;}function arrangement(n,r){return factorial(n)/(factorial(r)*factorial(n-r));}
cvs.addEventListener("click",function(event){var i,point=getXY(this),x=event.clientX-point[0]+(document.documentElement.scrollLeft || document.body.scrollLeft),y=event.clientY-point[1]+(document.documentElement.scrollTop || document.body.scrollTop);points.push([x,y]);context.clearRect(0,0,screen.width,screen.height);context.beginPath();
//pointsfor(i=0;i<points.length;i++){drawPoint(points[i][0],points[i][1],"blue",4);}//bezierfor (i = 0; i < 1; i += 0.001)
{drawPoint.apply(this, bezier(points,i));}//lineif(points.length==1){context.moveTo(points[0][0],points[0][1]);}else if (points.length>1){for(i=0;i<points.length;i++){context.lineTo(points[i][0],points[i][1]);}
context.lineWidth=0.2;context.stroke();context.closePath();}},true);</script>
</body>
</html>
希望这些内容可以帮助到大家,谢谢。