Android实现探探图片滑动效果
发布于 2017-06-29 10:04:57 | 198 次阅读 | 评论: 0 | 来源: 网友投递
Android移动端操作系统
Android是一种基于Linux的自由及开放源代码的操作系统,主要使用于移动设备,如智能手机和平板电脑,由Google公司和开放手机联盟领导及开发。尚未有统一中文名称,中国大陆地区较多人使用“安卓”或“安致”。
这篇文章主要为大家详细介绍了Android实现探探图片滑动效果,具有一定的参考价值,感兴趣的小伙伴们可以参考一下
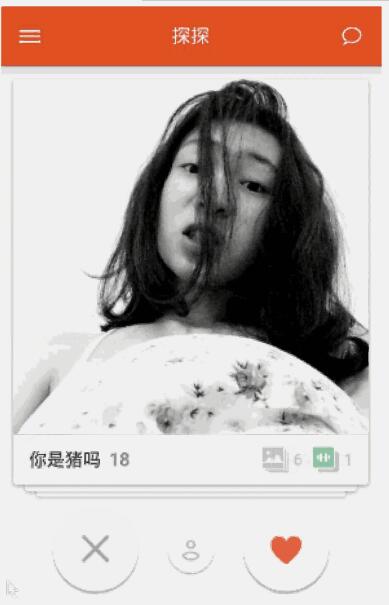
之前一段时间,在朋友的推荐下,玩了探探这一款软件,初玩的时候,就发现,这款软件与一般的社交软件如陌陌之类的大相径庭,让我耳目一新,特别是探探里关于图片滑动操作让人觉得非常新鲜。所以在下通过网上之前的前辈的经历加上自己的理解,也来涉涉水。下面是网上找的探探的原界面
当时就非常想通过自己来实现这种仿探探式的效果,然而却没什么思路。不过毋庸置疑的是,这种效果的原理肯定和 ListView /RecyclerView 类似,涉及到 Item View 的回收和重用,否则早就因为大量的 Item View 而 OOM 了。
从View入手,RecyclerView 是自带 Item View 回收和重用功能的,而且,RecyclerView 的布局方式是通过设置 LayoutManager 来实现的,这样就充分地把布局和 RecyclerView 搞定了。
继承 RecyclerView.LayoutManager , 显示自己管理布局, 比如最多显示4个view, 并且都是居中显示.
底部的View还需要进行缩放,平移操作.
public class OverLayCardLayoutManager extends RecyclerView.LayoutManager {
  private static final String TAG = "swipecard";
  public static int MAX_SHOW_COUNT = 4;
  public static float SCALE_GAP = 0.05f;
  public static int TRANS_Y_GAP;

  public OverLayCardLayoutManager(Context context) {
    //平移时, 需要用到的参考值
    TRANS_Y_GAP = (int) (20 * context.getResources().getDisplayMetrics().density);
  }

  @Override
  public RecyclerView.LayoutParams generateDefaultLayoutParams() {
    //必须要实现的方法
    return new RecyclerView.LayoutParams(ViewGroup.LayoutParams.WRAP_CONTENT, ViewGroup.LayoutParams.WRAP_CONTENT);
  }

  @Override
  public void onLayoutChildren(RecyclerView.Recycler recycler, RecyclerView.State state) {
    //在这个方法中进行View的布局操作.此方法会被调用多次.
    detachAndScrapAttachedViews(recycler);
    int itemCount = getItemCount();
    if (itemCount < 1) {
      return;
    }
    //top-3View的position
    int bottomPosition;
    //边界处理
    if (itemCount < MAX_SHOW_COUNT) {
      bottomPosition = 0;
    } else {
      bottomPosition = itemCount - MAX_SHOW_COUNT;
    }

    //从可见的最底层View开始layout,依次层叠上去
    for (int position = bottomPosition; position < itemCount; position++) {
      //1:重recycler的缓存机制中拿到一个View
      View view = recycler.getViewForPosition(position);
      //2:和自定义ViewGroup一样, 需要先addView
      addView(view);
      //3:和自定义ViewGroup一样, 也需要测量View的大小
      measureChildWithMargins(view, 0, 0);
      int widthSpace = getWidth() - getDecoratedMeasuredWidth(view);
      int heightSpace = getHeight() - getDecoratedMeasuredHeight(view);
      //4:和自定义ViewGroup的onLayout一样, 需要layout View.对View进行布局
      //我们在布局时,将childView居中处理,这里也可以改为只水平居中
      layoutDecoratedWithMargins(view, widthSpace / 2, heightSpace / 2,
          widthSpace / 2 + getDecoratedMeasuredWidth(view),
          heightSpace / 2 + getDecoratedMeasuredHeight(view));
      /**
       * TopView的Scale 为1,translationY 0
       * 每一级Scale相差0.05f,translationY相差7dp左右
       *
       * 观察人人影视的UI,拖动时,topView被拖动,Scale不变,一直为1.
       * top-1View 的Scale慢慢变化至1,translation也慢慢恢复0
       * top-2View的Scale慢慢变化至 top-1View的Scale,translation 也慢慢变化只top-1View的translation
       * top-3View的Scale要变化,translation岿然不动
       */

      //第几层,举例子,count =7, 最后一个TopView(6)是第0层,
      int level = itemCount - position - 1;

      //如果不需要缩放平移, 那么下面的代码可以注释掉...
      //除了顶层不需要缩小和位移
      if (level > 0 /*&& level < mShowCount - 1*/) {
        //每一层都需要X方向的缩小
        view.setScaleX(1 - SCALE_GAP * level);
        //前N层,依次向下位移和Y方向的缩小
        if (level < MAX_SHOW_COUNT - 1) {
          view.setTranslationY(TRANS_Y_GAP * level);
          view.setScaleY(1 - SCALE_GAP * level);
        } else {//第N层在 向下位移和Y方向的缩小的成都与 N-1层保持一致
          view.setTranslationY(TRANS_Y_GAP * (level - 1));
          view.setScaleY(1 - SCALE_GAP * (level - 1));
        }
      }
    }
  }
}
谷歌官方提供了一个ItemTouchHelper工具类, 对滑动进行了优越封装
使用方法: new ItemTouchHelper(callback).attachToRecyclerView(recyclerView);就这么简单,
接下来的操作, 都在回调callback里面进行.
public class RenRenCallback extends ItemTouchHelper.SimpleCallback {

  private static final String TAG = "RenRen";
  private static final int MAX_ROTATION = 15;
  OnSwipeListener mSwipeListener;
  boolean isSwipeAnim = false;

  public RenRenCallback() {
    //第一个参数决定可以拖动排序的方向, 这里由于不需要拖动排序,所以传0
    //第二个参数决定可以支持滑动的方向,这里设置了上下左右都可以滑动.
    super(0, ItemTouchHelper.DOWN | ItemTouchHelper.UP | ItemTouchHelper.LEFT | ItemTouchHelper.RIGHT);
  }

  public void setSwipeListener(OnSwipeListener swipeListener) {
    mSwipeListener = swipeListener;
  }

  //水平方向是否可以被回收掉的阈值
  public float getThreshold(RecyclerView recyclerView, RecyclerView.ViewHolder viewHolder) {
    //2016 12 26 考虑 探探垂直上下方向滑动,不删除卡片,这里参照源码写死0.5f
    return recyclerView.getWidth() * /*getSwipeThreshold(viewHolder)*/ 0.5f;
  }

  @Override
  public boolean onMove(RecyclerView recyclerView, RecyclerView.ViewHolder viewHolder, RecyclerView.ViewHolder target) {
    //由于不支持滑动排序, 所以不需要处理此方法
    return false;
  }

  @Override
  public void onSwiped(RecyclerView.ViewHolder viewHolder, int direction) {
    //当view需要滑动的时候,会回调此方法
    //但是这个方法只是告诉你View需要滑动, 并不是对View和Adapter进行额外的操作,
    //所以, 如果你需要实现滑动删除, 那么需要在此方法中remove item等.

    //我们这里需要对滑动过后的View,进行恢复操作.
    viewHolder.itemView.setRotation(0);//恢复最后一次的旋转状态
    if (mSwipeListener != null) {
      mSwipeListener.onSwipeTo(viewHolder, 0);
    }
    notifyListener(viewHolder.getAdapterPosition(), direction);
  }

  private void notifyListener(int position, int direction) {
    Log.w(TAG, "onSwiped: " + position + " " + direction);
    if (mSwipeListener != null) {
      mSwipeListener.onSwiped(position, direction);
    }
  }

  @Override
  public float getSwipeThreshold(RecyclerView.ViewHolder viewHolder) {
    //滑动的比例达到多少之后, 视为滑动
    return 0.3f;
  }


  @Override
  public void onChildDraw(Canvas c, RecyclerView recyclerView, RecyclerView.ViewHolder viewHolder, float dX, float dY, int actionState, boolean isCurrentlyActive) {
    super.onChildDraw(c, recyclerView, viewHolder, dX, dY, actionState, isCurrentlyActive);
    //当你在滑动的过程中, 此方法一直会被回调, 就跟onTouch事件一样...
    //先根据滑动的dx dy 算出现在动画的比例系数fraction
    float swipeValue = (float) Math.sqrt(dX * dX + dY * dY);
    final float threshold = getThreshold(recyclerView, viewHolder);
    float fraction = swipeValue / threshold;
    //边界修正 最大为1
    if (fraction > 1) {
      fraction = 1;
    } else if (fraction < -1) {
      fraction = -1;
    }
    //对每个ChildView进行缩放 位移
    int childCount = recyclerView.getChildCount();
    for (int i = 0; i < childCount; i++) {
      View child = recyclerView.getChildAt(i);
      //第几层,举例子,count =7, 最后一个TopView(6)是第0层,
      int level = childCount - i - 1;
      if (level > 0) {
        child.setScaleX(1 - SCALE_GAP * level + fraction * SCALE_GAP);

        if (level < MAX_SHOW_COUNT - 1) {
          child.setScaleY(1 - SCALE_GAP * level + fraction * SCALE_GAP);
          child.setTranslationY(TRANS_Y_GAP * level - fraction * TRANS_Y_GAP);
        } else {
          //child.setTranslationY((float) (mTranslationYGap * (level - 1) - fraction * mTranslationYGap));
        }
      } else {
        //最上层
        //rotate
        if (dX < -50) {
          child.setRotation(-fraction * MAX_ROTATION);
        } else if (dX > 50) {
          child.setRotation(fraction * MAX_ROTATION);
        } else {
          child.setRotation(0);
        }

        if (mSwipeListener != null) {
          RecyclerView.LayoutParams params = (RecyclerView.LayoutParams) child.getLayoutParams();
          final int adapterPosition = params.getViewAdapterPosition();
          mSwipeListener.onSwipeTo(recyclerView.findViewHolderForAdapterPosition(adapterPosition), dX);
        }
      }
    }
  }

  //扩展实现:点击按钮实现左滑效果
  public void toLeft(RecyclerView recyclerView) {
    if (check(recyclerView)) {
      animTo(recyclerView, false);
    }
  }

  //扩展实现:点击按钮实现右滑效果
  public void toRight(RecyclerView recyclerView) {
    if (check(recyclerView)) {
      animTo(recyclerView, true);
    }
  }

  private void animTo(final RecyclerView recyclerView, boolean right) {
    final int position = recyclerView.getAdapter().getItemCount() - 1;
    final View view = recyclerView.findViewHolderForAdapterPosition(position).itemView;

    TranslateAnimation translateAnimation = new TranslateAnimation(Animation.RELATIVE_TO_SELF, 0,
        Animation.RELATIVE_TO_SELF, right ? 1f : -1f,
        Animation.RELATIVE_TO_SELF, 0f, Animation.RELATIVE_TO_SELF, 1.3f);
    translateAnimation.setFillAfter(true);
    translateAnimation.setDuration(300);
    translateAnimation.setInterpolator(new DecelerateInterpolator());
    translateAnimation.setAnimationListener(new Animation.AnimationListener() {
      @Override
      public void onAnimationStart(Animation animation) {

      }

      @Override
      public void onAnimationEnd(Animation animation) {
        isSwipeAnim = false;
        recyclerView.removeView(view);
        notifyListener(position,
            x > view.getMeasuredWidth() / 2
                ?
                ItemTouchHelper.RIGHT : ItemTouchHelper.LEFT);
      }

      @Override
      public void onAnimationRepeat(Animation animation) {

      }
    });
    view.startAnimation(translateAnimation);
  }

  private boolean check(RecyclerView recyclerView) {
    if (isSwipeAnim) {
      return false;
    }
    if (recyclerView == null || recyclerView.getAdapter() == null) {
      return false;
    }
    if (recyclerView.getAdapter().getItemCount() == 0) {
      return false;
    }
    isSwipeAnim = true;
    return true;
  }

  public interface OnSwipeListener {

    /**
     * @param direction {@link ItemTouchHelper#LEFT} / {@link ItemTouchHelper#RIGHT}
     *         {@link ItemTouchHelper#UP} or {@link ItemTouchHelper#DOWN}).
     */
    void onSwiped(int adapterPosition, int direction);

    /**
     * 最上层View滑动时回调.
     *
     * @param viewHolder 最上层的ViewHolder
     * @param offset   距离原始位置的偏移量
     */
    void onSwipeTo(RecyclerView.ViewHolder viewHolder, float offset);
  }

  public static class SimpleSwipeCallback implements OnSwipeListener {

    /**
     * {@inheritDoc}
     */
    @Override
    public void onSwiped(int adapterPosition, int direction) {

    }

    /**
     * {@inheritDoc}
     */
    @Override
    public void onSwipeTo(RecyclerView.ViewHolder viewHolder, float offset) {

    }
  }
}
布局文件:卡片内容
<LinearLayout  xmlns:android="http://schemas.android.com/apk/res/android"
  android:layout_width="wrap_content"
  android:layout_height="wrap_content"
  android:layout_gravity="center_horizontal|bottom"
  android:layout_marginBottom="20dp"
  android:orientation="horizontal">

  <ImageView
    android:id="@+id/left"
    android:layout_width="wrap_content"
    android:layout_height="wrap_content"
    android:layout_gravity="center"
    android:layout_margin="10dp"
    android:background="@drawable/home_buttons_dislike"
    android:onClick="left" />

  <ImageView
    android:id="@+id/info"
    android:layout_width="wrap_content"
    android:layout_height="wrap_content"
    android:layout_gravity="center"
    android:layout_margin="10dp"

    android:background="@drawable/home_buttons_info" />

  <ImageView
    android:id="@+id/right"
    android:layout_width="wrap_content"
    android:layout_height="wrap_content"
    android:layout_margin="10dp"
    android:background="@drawable/home_buttons_like"
    />

</LinearLayout>
布局文件:点击按钮
<?xml version="1.0" encoding="utf-8"?>
<LinearLayout xmlns:android="http://schemas.android.com/apk/res/android"
  android:layout_width="wrap_content"
  android:layout_height="wrap_content"
  android:layout_gravity="center_horizontal|bottom"
  android:layout_marginBottom="20dp"
  android:orientation="horizontal">

  <ImageView
    android:id="@+id/left"
    android:layout_width="wrap_content"
    android:layout_height="wrap_content"
    android:layout_gravity="center"
    android:layout_margin="10dp"
    android:background="@drawable/home_buttons_dislike"
    android:onClick="left" />

  <ImageView
    android:id="@+id/info"
    android:layout_width="wrap_content"
    android:layout_height="wrap_content"
    android:layout_gravity="center"
    android:layout_margin="10dp"

    android:background="@drawable/home_buttons_info" />

  <ImageView
    android:id="@+id/right"
    android:layout_width="wrap_content"
    android:layout_height="wrap_content"
    android:layout_margin="10dp"
    android:background="@drawable/home_buttons_like"
    />

</LinearLayout>
监听函数:
    flingContainer = (SwipeFlingAdapterView) findViewById(R.id.frame);
   //设置适配器
    flingContainer.setAdapter(adapter);
    flingContainer.setFlingListener(new SwipeFlingAdapterView.onFlingListener() {
      @Override
      public void removeFirstObjectInAdapter() {
        al.remove(0);
        adapter.notifyDataSetChanged();
      }
      @Override
      public void onLeftCardExit(Object dataObject) {
        makeToast(MainActivity.this, "不喜欢");
      }

      @Override
      public void onRightCardExit(Object dataObject) {
        makeToast(MainActivity.this, "喜欢");
      }

      @Override
      public void onAdapterAboutToEmpty(int itemsInAdapter) {
        al.add(new CardMode("循环测试", 18, list.get(itemsInAdapter % imageUrls.length - 1)));
        adapter.notifyDataSetChanged();
        i++;
      }

      @Override
      public void onScroll(float scrollProgressPercent) {
        View view = flingContainer.getSelectedView();
        view.findViewById(R.id.item_swipe_right_indicator).setAlpha(scrollProgressPercent < 0 ? -scrollProgressPercent : 0);
        view.findViewById(R.id.item_swipe_left_indicator).setAlpha(scrollProgressPercent > 0 ? scrollProgressPercent : 0);
      }
    });
总结一下,在这整个代码流程中我们主要是运用了自定义 LayoutManager 以及 ItemTouchHelper.Callback
接下来,我们看看效果:

以上就是本文的全部内容,希望对大家的学习有所帮助,也希望大家多多支持PHPERZ。