Nginx实现浏览器可实时查看访问日志的步骤详解
发布于 2017-06-21 11:47:07 | 192 次阅读 | 评论: 0 | 来源: 网友投递
这里有新鲜出炉的Nginx开发从入门到精通,程序狗速度看过来!
Nginx WEB服务器
Nginx 是一个高性能的 HTTP 和 反向代理 服务器,也是一个 IMAP/POP3/SMTP 代理服务器。 Nginx 是由 Igor Sysoev 为俄罗斯访问量第二的 Rambler.ru 站点开发的,第一个公开版本0.1.0发布于2004年10月4日。其将源代码以类BSD许可证的形式发布,因它的稳定性、丰富的功能集、示例配置文件和低系统资源的消耗而闻名。
我们经常需要在页面上实时查看nginx的日志输出,并且能在页面上显示,那么下面小编就给大家说下怎么在浏览器上实时动态的查看nginx的访问日志,有需要的朋友们可以参考借鉴。
一、首先查看nginx版本,我使用的是1.9.7的版本,安装目录在/application/nginx-1.9.7
[root@AnSheng ~]# /application/nginx-1.9.7/sbin/nginx -V
nginx version: nginx/1.9.7
built by gcc 4.4.7 20120313 (Red Hat 4.4.7-16) (GCC)
configure arguments: --prefix=/application/nginx-1.9.7 --user=nginx --group=nginx --with-http_stub_status_module
二、检查语法并启动nginx
[root@AnSheng ~]# /application/nginx-1.9.7/sbin/nginx -t
nginx: the configuration file /application/nginx-1.9.7/conf/nginx.conf syntax is ok
nginx: configuration file /application/nginx-1.9.7/conf/nginx.conf test is successful
[root@AnSheng ~]# /application/nginx-1.9.7/sbin/nginx
三、把nginx配置文件内多余的注视行和空行删掉
[root@AnSheng ~]# cd /application/nginx-1.9.7/conf/
[root@AnSheng conf]# egrep -v "#|^$" nginx.conf.default
worker_processes 1;
events {
 worker_connections 1024;
}
http {
 include mime.types;
 default_type application/octet-stream;
 sendfile on;
 keepalive_timeout 65;
 server {
  listen 80;
  server_name localhost;
  location / {
   root html;
   index index.html index.htm;
  }
  error_page 500 502 503 504 /50x.html;
  location = /50x.html {
   root html;
  }
 }
}
[root@AnSheng conf]# egrep -v "#|^$" nginx.conf.default nginx.conf
四、在nginx配置文件的server标签内加入以下标签和内容
location /logs {
alias /application/nginx-1.9.7/logs;
#Nginx日志目录
autoindex on;
#打开目录浏览功能
autoindex_exact_size off;
#默认为on,显示出文件的确切大小,单位是bytes
#显示出文件的大概大小,单位是kB或者MB或者GB
autoindex_localtime on;
#默认为off,显示的文件时间为GMT时间。
#改为on后,显示的文件时间为文件的服务器时间
add_header Cache-Control no-store;
#让浏览器不保存临时文件
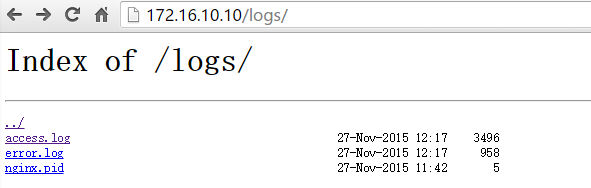
}五、开启在浏览器打开log文件,如果不开启再点击文件的时候就下载而不是打开
[root@AnSheng conf]# vim mime.types
types {
 text/html html htm shtml;
 text/log log;
 text/css css;
 text/xml xml;
 .............
六、检测语法,然后让nginx配置生效,在浏览器查看
[root@AnSheng conf]# /application/nginx-1.9.7/sbin/nginx -t
nginx: the configuration file /application/nginx-1.9.7/conf/nginx.conf syntax is ok
nginx: configuration file /application/nginx-1.9.7/conf/nginx.conf test is successful
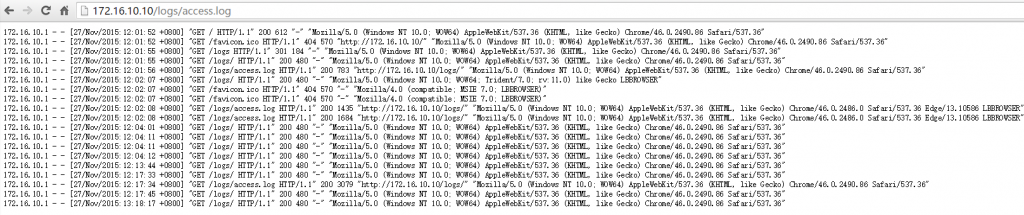
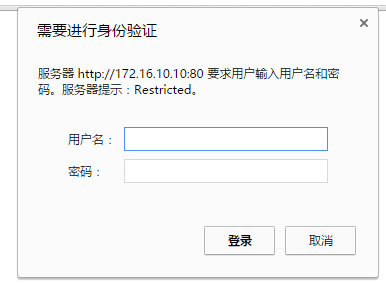
[root@AnSheng conf]# /application/nginx-1.9.7/sbin/nginx -s reload打开浏览器输入域名或者IP,后面加上logs,然后点击文件就可以打开了,如果日志随随便便就可以被别人查看是不是很不安全,所以我们要在加一层nginx用户认证。
七、安装httpd-tools,用于帐号密码生成
[root@AnSheng ~]# yum -y install httpd-tools八、创建认证的账号
[root@AnSheng ~]# htpasswd -c /application/nginx-1.9.7/conf/loguser loguser
New password:
Re-type new password:
Adding password for user loguser
#密码需要输入两次
九、编辑nginx配置文件,在logs的location加入下面的内容
location /logs {
 ......
 alias PATH;
 autoindex on;
 autoindex_exact_size off;
 autoindex_localtime on;
 add_header Cache-Control no-store;
 auth_basic "Restricted";
 #Nginx认证
 auth_basic_user_file /application/nginx-1.9.7/conf/loguser;
 #认证账号密码保存的文件
}
十、然后再打开的时候就会提示输入账号和密码,登陆之后才可以查看。
十一、总结
以上就是利用Nginx实现浏览器可实时查看访问日志的全部步骤,希望对大家的学习或者工作有所帮助,如果有疑问大家可以留言交流。
推荐阅读
最新资讯