JavaScript 高级篇之DOM文档,简单封装及调用、动态添加、删除样式(六)
发布于 2017-04-20 10:16:13 | 85 次阅读 | 评论: 0 | 来源: 网友投递
这里有新鲜出炉的Javascript教程,程序狗速度看过来!
JavaScript客户端脚本语言
Javascript 是一种由Netscape的LiveScript发展而来的原型化继承的基于对象的动态类型的区分大小写的客户端脚本语言,主要目的是为了解决服务器端语言,比如Perl,遗留的速度问题,为客户提供更流畅的浏览效果。
学习是有趣的,但有过滤的学习内容就更好,本博主就专门为刚接触javascript客户端编程的朋友提供及分享个人学习经历!建议大家看看:(汤姆大叔的博客)
http://www.cnblogs.com/TomXu/archive/2012/02/16/2351331.html , 在回来看这里文章,你一定会有更深刻的认识。因为我在这里介绍概念上的东西比较少,看下面的例子,对初学的朋友可能会有些吃力!
1、DOM的架构
<html>
<head>
<title>document</title>
</head>
<body>
<h1>CSS Demo</h1>
<p>我喜欢美女,特别是高个的美女</p>
</body>
</html>
这个文档的DOM表示如下图:
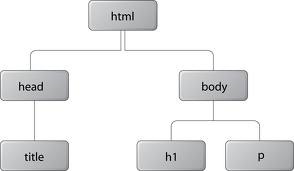
图片表示一个HTML文档的树.
所有DOM树结构表现为不同种类的Node对象的一个数,firstChild,lastChild,nextSibling,previousSibling和ParentNode属性提供遍历节点的树的一种办法,appendChild,removeChild,replaceChildh和insertBefore这样的方法可以像文档中添加节点或者从文档中删除节点。不明白没关系接下来我将用大量的例子让你明白。
1、先创建一个使用CSS美化的列表
<style type="text/css">
body{ margin:0px; padding:0px; }
#container{font-family:tahoma;font-size:14px;border:solid 1px #99ffcc; width:200px;height:140px; float:left; }
#container ul{list-style:none;padding:1px 0px 0px 0px; margin:0px;}
#container ul li{ border-bottom:solid 1px #99ffcc; margin:0px;height:27px;}
#container ul li a{background-color:gray;text-decoration:none;display:block; border-left:solid 10px red;margin:0px; padding:5px 0px 5px 10px;}
#container ul li a:hover{background-color:red; color:#000000; }
</style>
2、加一个div 元素.
<div id="container">
<ul id="list">
<li><a href="#">Home</a></li>
<li id="myblog"><a href="#">MyBlog</a></li>
<li><a href="#">Sport</a></li>
<li><a href="#">News</a></li>
<li><a href="#">Contane</a></li>
</ul>
</div>
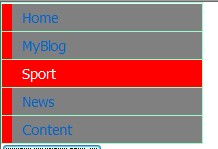
3、你现在应该看到如下图:
var Tools = {};
Tools.getElementCount = function(e){
var count =0;
elementTotal(e);
document.table.txt.value = "element:"+ count;
function elementTotal(e)
{
if(e.nodeType == 1) count++;
var children = e.childNodes;
for(var i = 0;i<children.length;i++)
{
elementTotal(children[i]);
}
}
};
备注:大家使用可以再body加入<button type ="button" onclick = "alert(Tools.getElementCount(document))">获取元素个数</button>
5、将文本全部大写
Tools.ModifyElement = function modify(e){
if(e.nodeType == 3)
e.data = e.data.toUpperCase();
else
{
for(var i = e.firstChild;i!=null;i=i.nextSibling)
modify(i);
}
};
备注:大家使用可以再body加入<button type ="button" onclick = "Tools.ModifyElement(document)">大写</button>
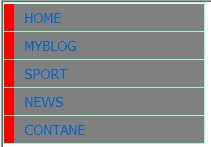
效果:
Tools.documentSort = function(e){
var textArray = [];
if(typeof e =="string") e = document.getElementById(e);
for(var x = e.firstChild; x!= null;x=x.nextSibling)
if(x.nodeType == 1) textArray.push(x);
textArray.sort(function(n,m){
var s = n.firstChild.firstChild.data;
var t = m.firstChild.firstChild.data;
if(s>t) return -1;
else if(s<t) return 1;
else return 0;
});
备注:大家使用可以再body加入<button type ="button" onclick = "Tools.documentSort('list')">排序</button>
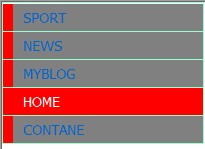
效果:
Tools.insertElement = function(n,e){
if(typeof n == "string") n = document.getElementById(n);
var li = document.createElement(e);
var a = document.createElement("a");
a.setAttribute("href","#");
var txt = document.createTextNode("HotBlog");
a.appendChild(txt);
li.appendChild(a);
var parent = n.parentNode;
parent.insertBefore(li,n);
};
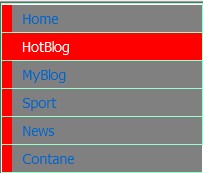
备注:大家使用可以再body加入<button type ="button" onclick="Tools.insertElement('myblog','li');">插入</button>
效果:
1、样式表
.tooltip{background:url('2.jpg'); border:solid 1px #99ffcc; width:200px;height:200px;}//这里的图片大家要该一下
.toolcontent{background-color:#ffffff; border:solid 1px #99ff00; padding:5px; font:tahoma 12px; color:#000000;}
2、javascript类
function Tooltip()
{
this.tooltip = document.createElement("div");
this.tooltip.style.position = "absolute";
this.tooltip.className = "tooltip";
this.content = document.createElement("div");
this.content.style.position = "relative";
this.content.className = "toolcontent";
this.tooltip.appendChild(this.content);
}
Tooltip.prototype.show = function(text,x,y)
{
this.content.innerHTML = text;
this.tooltip.style.left = x+"px";
this.tooltip.style.top = y+"px";
this.tooltip.style.visibility = "visible";
if(this.tooltip.parentNode != document.body)
document.body.appendChild(this.tooltip);
};
Tooltip.prototype.hide = function(){ this.tooltip.style.visibility ="hidden";};
var t = new Tooltip();
function hide()
{
t.hide();
}
function show()
{
t.show("hello ",300,0);
}
function init()
{
document.operator.show.onclick = show;
document.operator.hide.onclick = hide;
}
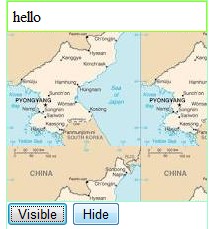
备注:配合上面使用必须还完成以下步骤:1、将body中的onload=init();2 在body中添加 :
<form name = "operator">
<input type = "button" value = "隐藏" name = "hide"/>
<input type = "button" value = "显示" name = "show">
</form>
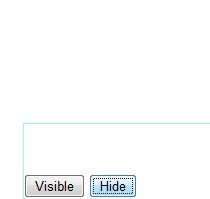
效果:(隐藏看到什么了)
1、样式表
.container{font-family:tahoma;font-size:14px;border:solid 1px #99ffcc; width:200px;height:140px;float:left;}
.container ul{list-style:none;padding:1px 0px 0px 0px; margin:0px;}
.container ul li{ border-bottom:solid 1px #99ffcc; margin:0px;height:27px;}
.container ul li a{background-color:gray;text-decoration:none;display:block; border-left:solid 10px red;margin:0px; padding:5px 0px 5px 10px;}
.container ul li a:hover{background-color:red; color:#ffffff; }
2、工具函数(动态添加、删除样式)
var CSSclass = {};
CSSclass.is = function(e,c){
if(typeof e == "string") e = document.getElementById(e);
var classes = e.className;
if(!classes) return false;
if(classes == c) return true;
return e.className.search("\\b" +c +"\\b*") != -1;
};
CSSclass.add = function(e,c){
if(typeof e == "string") e = document.getElementById(e);
if(CSSclass.is(e,c))return;
//if(e.className) c=""+c;
e.className += c;
};
CSSclass.remove = function(e,c){
if(typeof e == "string") e = document.getElementById(e);
//e.id = e.id.replace(new RegExp("\\b" +e.id +"\\b\\s*","g"),"");
e.className = e.className.replace(new RegExp("\\b"+c+"\\b\\s*","g"),"");
};
3、在body中加入如下元素
<div id="con">
<ul id="list">
<li><a href="#">Home</a></li>
<li id="myblog"><a href="#">MyBlog</a></li>
<li><a href="#">Sport</a></li>
<li><a href="#">News</a></li>
<li><a href="#">Content</a></li>
</ul>
<button type="button" name ="add" onclick = "CSSclass.add('con','container');">动态添加样式</button>
<button type="button" name ="remove" onclick ="CSSclass.remove('con','container');">动态删除样式</button>
效果:
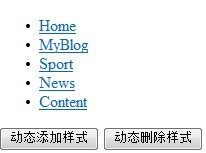
没添加样式的样子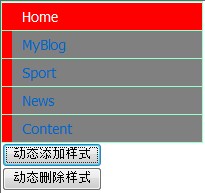
加了样式之后。
(很多没有备注,大家有问题可以给我留言!)
推荐阅读
最新资讯