Bootstrap编写一个同时适用于PC、平板、手机的登陆页面
发布于 2017-03-30 12:48:25 | 115 次阅读 | 评论: 0 | 来源: 网友投递
Bootstrap Web前端CSS框架
Bootstrap是Twitter推出的一个开源的用于前端开发的工具包。它由Twitter的设计师Mark Otto和Jacob Thornton合作开发,是一个CSS/HTML框架。Bootstrap提供了优雅的HTML和CSS规范,它即是由动态CSS语言Less写成。Bootstrap一经推出后颇受欢迎,一直是GitHub上的热门开源项目,包括NASA的MSNBC(微软全国广播公司)的Breaking News都使用了该项目。
这篇文章主要为大家详细介绍了Bootstrap编写一个同时适用于PC、平板、手机的登陆页面,具有一定的参考价值,感兴趣的小伙伴们可以参考一下
Bootstrap如同前台框架,它已经布置好不少的CSS,前端开发的使用需要则直接调用即可。其网站的网址就是http://www.bootcss.com。使用Bootstrap能减少前端开发时候在CSS样子的布置时间
需要使用Bootstrap先在官网(点击打开链接)下载组件即可,用于生产环境的Bootstrap版本(点击打开链接),Bootstrap3对2并不兼容,建议直接根据其开发文档使用Bootstrap3。
将Bootstrap解压之后把得到的3个文件夹css,fonts,js拷贝到站点目录下面。如果是Eclipse的JSP Web Project的话就把它们放到WebRoot文件夹下面。
之后就能够在此站点目录下的任何页面调用Bootstrap为前端快速建模。
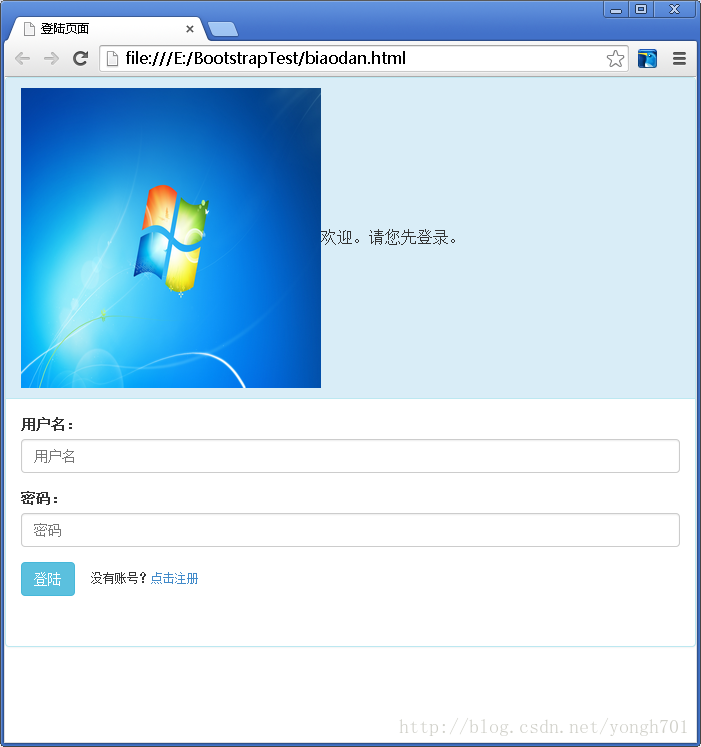
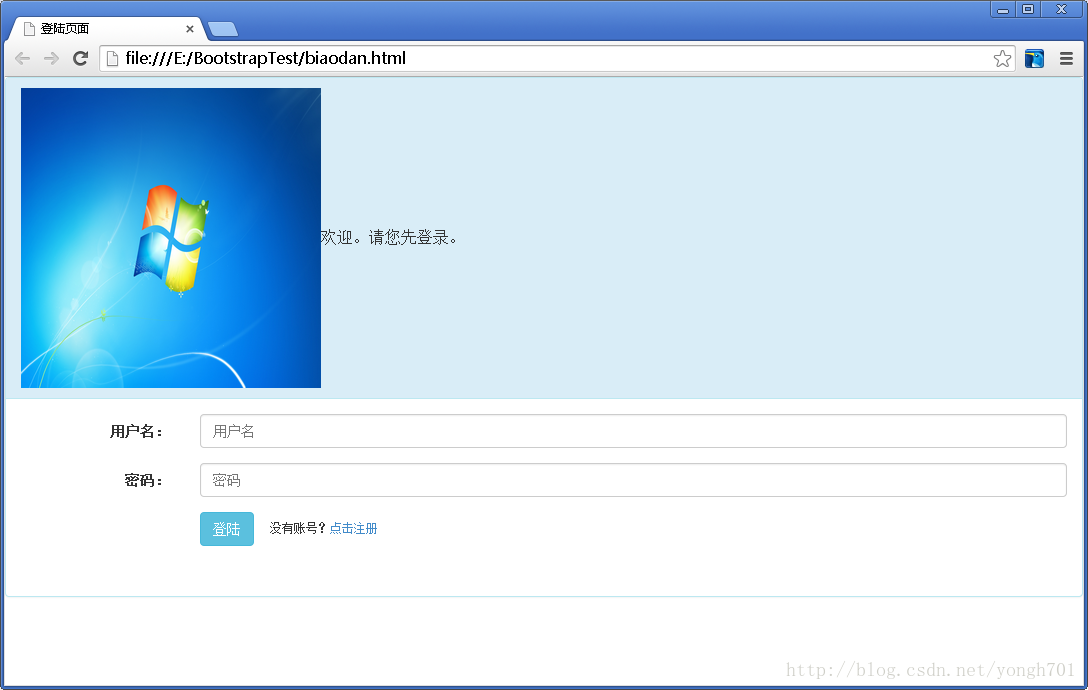
不过值得注意的是,不同浏览器对于Bootstrap解释是不一样的,其中IE对某些样式读不出来,但是基本的功能不受影响,页面丑一点而已。
以下是IE与谷歌浏览器对同一页面的对比:

一、基本目标
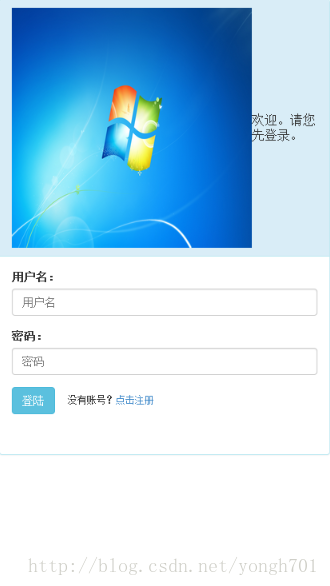
使用Bootstrap来编写一个PC、平板、手机同时使用而且美观的登陆页面。
在PC上如果拉伸的话,各类元素会自动适应屏幕。
在手机上打开这类的页面的话,会直接适应手机屏幕,无需用户自动调节。
二、基本思想
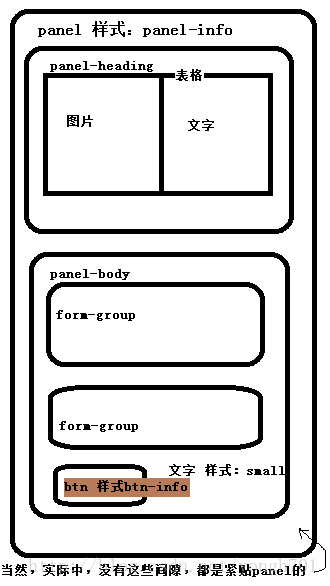
页面的布局,根据Bootstrap固有的样式设计如下:
三、制作过程
如下整个页面具体代码如下,下面将一个一个标签来分析:
<!DOCTYPE HTML PUBLIC "-//W3C//DTD HTML 4.01 Transitional//EN">
<html>
 <head>
 <title>登陆页面</title>
 <meta name="viewport"
 content="width=device-width,initial-scale=1.0,user-scalable=no">
 <link href="css/bootstrap.css" rel="stylesheet" media="screen">
 </head>

 <body>
 <div class="panel panel-info">
 <div class="panel-heading">
 <table frame="void">
 <tr>
 <td>
 <img src="images/img0.jpg" width="300px" height="300px" />
 </td>
 <td>
 欢迎。请您先登录。
 </td>
 </tr>
 </table>
 </div>
 <div class="panel-body">
 <form class="form-horizontal" role="form" action="1.html"
 method="post">
 <div class="form-group">
 <label for="username" class="col-sm-2 control-label">
 用户名:
 </label>
 <div class="col-sm-10">
 <input type="text" name="username" class="form-control"
 placeholder="用户名" id="username" />
 </div>
 </div>
 <div class="form-group">
 <label for="password" class="col-sm-2 control-label">
 密码:
 </label>
 <div class="col-sm-10">
 <input type="password" name="password" class="form-control"
 placeholder="密码" id="password" />
 </div>
 </div>
 <div class="form-group">
 <div class="col-sm-offset-2 col-sm-10">
 <button type="submit" class="btn btn-info">
 登陆
 </button>
 <small> 没有账号?<a
 href="http://2.com">点击注册</a> </small>
 </div>
 </div>
 </form>
 </div>
 </div>
 </body>
</html>
1.<head>标签
先在<head>标签中,放入如下两行代码:
 <head>
 <title>登陆页面</title>
 <!--要求页面自动适应浏览器的屏幕-->
 <meta name="viewport"
 content="width=device-width,initial-scale=1.0,user-scalable=no">
 <!--声明我要使用bootstrap-->
 <link href="css/bootstrap.css" rel="stylesheet" media="screen">
 </head>
2.<body>标签
(1)首先写入<div class="panel panel-info"></div>,然后在其中放入代码,其基本说明如下图:
(2)<div class="panel-heading">标签
 <div class="panel-heading">
 <!--设置表格对这个CSS图层进行布局,在img标签中加入align="left"是不好用的,图象会向图层外溢出-->
 <!--同<table border="0">-->
 <table frame="void">
 <tr>
 <td>
 <img src="images/img0.jpg" width="300px" height="300px" />
 </td>
 <td>
 欢迎。请您先登录。
 </td>
 </tr>
 </table>
 </div>
(3)<div class="panel-body">标签下,先放入一个表单元素form class="form-horizontal" role="form" action="1.html" method="post">,此表单与HTML的普通表单相比,就是多了class属性与role属性,class属性无需多说,如果值为form的话,表单即使有足够位置,外标签与输入框也不会在同一行,如果值为现在的form-horizontal,那么则如图效果所示。role属性看不出有如何效果,此处仅仅是根据bootstrap的中文文档添加的。
接下来,各个form表单下的元素如下:
 <div class="panel-body">
 <form class="form-horizontal" role="form" action="1.html"
 method="post">
 <!--每一个属性的外标签与输入框构成一个form-group元组-->
 <div class="form-group">
 <!--如下的class属性是为了其能够根据屏幕的大小自动拉伸-->
 <label for="username" class="col-sm-2 control-label">
 用户名:
 </label>
 <div class="col-sm-10">
 <!--此处的placholder意为不输入任何东西的说明灰字,当然在IE8中无法解释。id看不出有什么作用,仅仅是根据Bootstrap中文文档的要求而添加的-->
 <input type="text" name="username" class="form-control"
 placeholder="用户名" id="username" />
 </div>
 </div>
 <div class="form-group">
 <label for="password" class="col-sm-2 control-label">
 密码:
 </label>
 <div class="col-sm-10">
 <input type="password" name="password" class="form-control"
 placeholder="密码" id="password" />
 </div>
 </div>
 <div class="form-group">
 <div class="col-sm-offset-2 col-sm-10">
 <!--此处的button与HTML的普通submit按钮是有区别的,但不影响表单的提交-->
 <button type="submit" class="btn btn-info">
 登陆
 </button>
 <!--<small>标签保证了这段文字与submit按钮同一行-->
 <small> 没有账号?<a
 href="http://2.com">点击注册</a> </small>
 </div>
 </div>
 </form>
 </div>
至此,本页面的开发完成。