Android自定义View实现钟摆效果进度条PendulumView
发布于 2017-03-17 23:55:49 | 166 次阅读 | 评论: 0 | 来源: 网友投递
Android移动端操作系统
Android是一种基于Linux的自由及开放源代码的操作系统,主要使用于移动设备,如智能手机和平板电脑,由Google公司和开放手机联盟领导及开发。尚未有统一中文名称,中国大陆地区较多人使用“安卓”或“安致”。
这篇文章主要介绍了Android自定义View实现钟摆效果进度条PendulumView,具有一定的参考价值,感兴趣的小伙伴们可以参考一下
在网上看到了一个IOS组件PendulumView,实现了钟摆的动画效果。由于原生的进度条确实是不好看,所以想可以自定义View实现这样的效果,以后也可以用于加载页面的进度条。
废话不多说,先上效果图
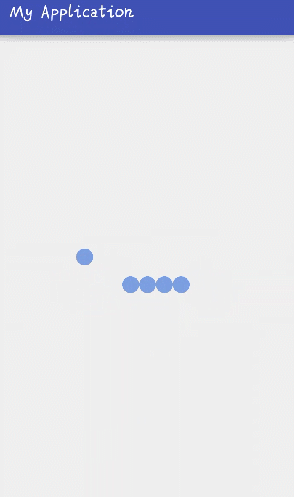
底部黑边是录制时不小心录上的,可以忽略。
既然是自定义View我们就按标准的流程来,第一步,自定义属性
自定义属性
建立属性文件
在Android项目的res->values目录下新建一个attrs.xml文件,文件内容如下:
 <?xml version="1.0" encoding="utf-8"?>
<resources>
 <declare-styleable name="PendulumView">
  <attr name="globeNum" format="integer"/>
  <attr name="globeColor" format="color"/>
  <attr name="globeRadius" format="dimension"/>
  <attr name="swingRadius" format="dimension"/>
 </declare-styleable>
</resources>
其中declare-styleable的name属性用于在代码中引用该属性文件。name属性,一般情况下写的都是我们自定义View的类名,较为直观。
使用styleale,系统可以为我们完成很多常量(int[]数组,下标常量)等的编写,简化我们的开发工作,例如下面代码中用到的R.styleable.PendulumView_golbeNum等就是系统为我们自动生成的。
globeNum属性表示小球数量,globeColor表示小球颜色,globeRadius表示小球半径,swingRadius表示摆动半径
读取属性值
在自定view的构造方法中通过TypedArray读取属性值
通过AttributeSet同样可以获取属性值,但是如果属性值是引用类型,则得到的只是ID,仍需继续通过解析ID获取真正的属性值,而TypedArray直接帮助我们完成了上述工作。
public PendulumView(Context context, AttributeSet attrs, int defStyleAttr) {
    super(context, attrs, defStyleAttr);
    //使用TypedArray读取自定义的属性值
    TypedArray ta = context.getResources().obtainAttributes(attrs, R.styleable.PendulumView);
    int count = ta.getIndexCount();
    for (int i = 0; i < count; i++) {
      int attr = ta.getIndex(i);
      switch (attr) {
        case R.styleable.PendulumView_globeNum:
          mGlobeNum = ta.getInt(attr, 5);
          break;
        case R.styleable.PendulumView_globeRadius:
          mGlobeRadius = ta.getDimensionPixelSize(attr, (int) TypedValue.applyDimension(TypedValue.COMPLEX_UNIT_PX, 16, getResources().getDisplayMetrics()));
          break;
        case R.styleable.PendulumView_globeColor:
          mGlobeColor = ta.getColor(attr, Color.BLUE);
          break;
        case R.styleable.PendulumView_swingRadius:
          mSwingRadius = ta.getDimensionPixelSize(attr, (int) TypedValue.applyDimension(TypedValue.COMPLEX_UNIT_PX, 16, getResources().getDisplayMetrics()));
          break;
      }
    }
    ta.recycle(); //避免下次读取时出现问题
    mPaint = new Paint();
    mPaint.setColor(mGlobeColor);
  }
重写OnMeasure()方法
@Override
  protected void onMeasure(int widthMeasureSpec, int heightMeasureSpec) {
    super.onMeasure(widthMeasureSpec, heightMeasureSpec);
    int widthMode = MeasureSpec.getMode(widthMeasureSpec);
    int widthSize = MeasureSpec.getSize(widthMeasureSpec);
    int heightMode = MeasureSpec.getMode(heightMeasureSpec);
    int heightSize = MeasureSpec.getSize(heightMeasureSpec);
    //高度为小球半径+摆动半径
    int height = mGlobeRadius + mSwingRadius;
    //宽度为2*摆动半径+(小球数量-1)*小球直径
    int width = mSwingRadius + mGlobeRadius * 2 * (mGlobeNum - 1) + mSwingRadius;
    //如果测量模式为EXACTLY,则直接使用推荐值,如不为EXACTLY(一般处理wrap_content情况),使用自己计算的宽高
    setMeasuredDimension((widthMode == MeasureSpec.EXACTLY) ? widthSize : width, (heightMode == MeasureSpec.EXACTLY) ? heightSize : height);
  }
其中
int height = mGlobeRadius + mSwingRadius;
<pre name="code" class="java">int width = mSwingRadius + mGlobeRadius * 2 * (mGlobeNum - 1) + mSwingRadius;
用于处理测量模式为AT_MOST的情况,一般是自定义View的宽高设置为了wrap_content,此时通过小球的数量,半径,摆动的半径等计算View的宽高,如下图:
以小球个数5为例,View的大小为下图红色矩形区域

重写onDraw()方法
@Override
  protected void onDraw(Canvas canvas) {
    super.onDraw(canvas);
    //绘制除左右两个小球外的其他小球
    for (int i = 0; i < mGlobeNum - 2; i++) {
      canvas.drawCircle(mSwingRadius + (i + 1) * 2 * mGlobeRadius, mSwingRadius, mGlobeRadius, mPaint);
    }
    if (mLeftPoint == null || mRightPoint == null) {
      //初始化最左右两小球坐标
      mLeftPoint = new Point(mSwingRadius, mSwingRadius);
      mRightPoint = new Point(mSwingRadius + mGlobeRadius * 2 * (mGlobeNum - 1), mSwingRadius);
      //开启摆动动画
      startPendulumAnimation();
    }
    //绘制左右两小球
    canvas.drawCircle(mLeftPoint.x, mLeftPoint.y, mGlobeRadius, mPaint);
    canvas.drawCircle(mRightPoint.x, mRightPoint.y, mGlobeRadius, mPaint);
  }
onDraw()方法是自定义View的关键所在,在该方法体内绘制View的显示效果。代码首先绘制了除去最左边最右边小球以外的其他小球,然后对左右两小球的坐标值进行判断,如果是第一次绘制,坐标值均为空,则初始化两小球坐标,并且开启动画。最后通过mLeftPoint,mRightPoint的x,y值,绘制左右两个小球。
其中mLeftPoint,mRightPoint均是android.graphics.Point对象,仅是使用它们来存放左右两小球的x,y坐标信息。
使用属性动画
public void startPendulumAnimation() {
    //使用属性动画
    final ValueAnimator anim = ValueAnimator.ofObject(new TypeEvaluator() {
      @Override
      public Object evaluate(float fraction, Object startValue, Object endValue) {
        //参数fraction用于表示动画的完成度,我们根据它来计算当前的动画值
        double angle = Math.toRadians(90 * fraction);
        int x = (int) ((mSwingRadius - mGlobeRadius) * Math.sin(angle));
        int y = (int) ((mSwingRadius - mGlobeRadius) * Math.cos(angle));
        Point point = new Point(x, y);
        return point;
      }
    }, new Point(), new Point());
    anim.addUpdateListener(new ValueAnimator.AnimatorUpdateListener() {
      @Override
      public void onAnimationUpdate(ValueAnimator animation) {

        Point point = (Point) animation.getAnimatedValue();
        //获得当前的fraction值
        float fraction = anim.getAnimatedFraction();
        //判断是否是fraction先减小后增大,即是否处于即将向上摆动状态
        //在每次即将向上摆动时切换小球
        if (lastSlope && fraction > mLastFraction) {
          isNext = !isNext;
        }
        //通过不断改动左右小球的x,y坐标值实现动画效果
        //利用isNext来判断应该是左边小球动,还是右边小球动
        if (isNext) {
          //当左边小球摆动时,右边小球置于初始位置
          mRightPoint.x = mSwingRadius + mGlobeRadius * 2 * (mGlobeNum - 1);
          mRightPoint.y = mSwingRadius;
          mLeftPoint.x = mSwingRadius - point.x;
          mLeftPoint.y = mGlobeRadius + point.y;
        } else {
          //当右边小球摆动时,左边小球置于初始位置
          mLeftPoint.x = mSwingRadius;
          mRightPoint.y = mSwingRadius;
          mRightPoint.x = mSwingRadius + (mGlobeNum - 1) * mGlobeRadius * 2 + point.x;
          mRightPoint.y = mGlobeRadius + point.y;

        }

        invalidate();
        lastSlope = fraction < mLastFraction;
        mLastFraction = fraction;
      }
    });
    //设置永久循环播放
    anim.setRepeatCount(ValueAnimator.INFINITE);
    //设置循环模式为倒序播放
    anim.setRepeatMode(ValueAnimator.REVERSE);
    anim.setDuration(200);
    //设置补间器,控制动画的变化速率
    anim.setInterpolator(new DecelerateInterpolator());
    anim.start();
  }
其中使用ValueAnimator.ofObject方法是为了可以对Point对象进行操作,更为形象具体。还有就是通过ofObject方法使用了自定义的TypeEvaluator对象,由此得到了fraction值,该值是一个从0-1变化的小数。所以该方法的后两个参数startValue(new Point()),endValue(new Point())并没有实际意义,也可以直接不写,此处写上主要是为了便于理解。同样道理也可以直接使用ValueAnimator.ofFloat(0f, 1f)方法获取到一个从0-1变化的小数。
     final ValueAnimator anim = ValueAnimator.ofObject(new TypeEvaluator() {
      @Override
      public Object evaluate(float fraction, Object startValue, Object endValue) {
        //参数fraction用于表示动画的完成度,我们根据它来计算当前的动画值
        double angle = Math.toRadians(90 * fraction);
        int x = (int) ((mSwingRadius - mGlobeRadius) * Math.sin(angle));
        int y = (int) ((mSwingRadius - mGlobeRadius) * Math.cos(angle));
        Point point = new Point(x, y);
        return point;
      }
    }, new Point(), new Point());
通过fraction,我们计算得到小球摆动时的角度变化值,0-90度
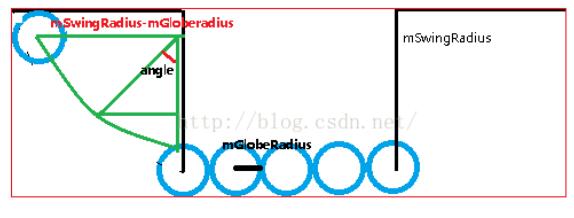
mSwingRadius-mGlobeRadius表示的值是图中绿色直线的长度,摆动的路线,小球圆心的路线是一个以(mSwingRadius-mGlobeRadius)为半径的弧线,变化的X值为(mSwingRadius-mGlobeRadius)*sin(angle),变化的y值为(mSwingRadius-mGlobeRadius)*cos(angle)
对应的小球实际的圆心坐标为(mSwingRadius-x,mGlobeRadius+y)
右边小球运动路线与左边类似,仅仅是方向不同。右边小球实际的圆心坐标(mSwingRadius + (mGlobeNum - 1) * mGlobeRadius * 2 + x,mGlobeRadius+y)
可见左右两边小球的纵坐标是相同的,仅横坐标不同。
        float fraction = anim.getAnimatedFraction();
        //判断是否是fraction先减小后增大,即是否处于即将向上摆动状态
        //在每次即将向上摆动时切换小球
        if (lastSlope && fraction > mLastFraction) {
          isNext = !isNext;
        }
        //记录上一次fraction是否不断减小
        lastSlope = fraction < mLastFraction;
        //记录上一次的fraction
        mLastFraction = fraction;
这两段代码用于计算何时切换运动的小球,本动画设置了循环播放,且循环模式为倒序播放,所以动画的一个周期即为小球抛起加上小球落下的过程。在该过程中fraction的值先有0变为1,再由1变为0。那么何时是动画新一轮周期的开始呢?就是在小球即将抛起的时候,在这个时候切换运动的小球,即可实现左边小球落下后右边小球抛起,右边小球落下后左边小球抛起的动画效果。
那么如何捕捉到这个时间点呢?
小球抛起时fraction值不断增大,小球落下时fraction值不断减小。小球即将抛起的时刻,就是fraction从不断减小转变为不断增大的时刻。代码中记录上一次fraction是否在不断减小,然后比较这一次fraction是否在不断增大,若两个条件均成立则切换运动的小球。
    anim.setDuration(200);
    //设置补间器,控制动画的变化速率
    anim.setInterpolator(new DecelerateInterpolator());
    anim.start();
设置动画的持续时间为200毫秒,读者可以通过更改该值而达到修改小球摆动速度的目的。
设置动画的补间器,由于小球抛起是一个逐渐减速的过程,落下是一个逐渐加速的过程,所以使用DecelerateInterpolator实现减速效果,在倒序播放时为加速效果。
启动动画,钟摆效果的自定义View进度条就实现了!赶快运行,看看效果吧!
以上就是本文的全部内容,希望对大家的学习有所帮助,也希望大家多多支持PHPERZ。