android TabLayout使用方法详解
发布于 2017-03-14 05:24:14 | 150 次阅读 | 评论: 0 | 来源: 网友投递
Android移动端操作系统
Android是一种基于Linux的自由及开放源代码的操作系统,主要使用于移动设备,如智能手机和平板电脑,由Google公司和开放手机联盟领导及开发。尚未有统一中文名称,中国大陆地区较多人使用“安卓”或“安致”。
这篇文章主要为大家详细介绍了android TabLayout使用方法,具有一定的参考价值,感兴趣的小伙伴们可以参考一下
Google在2015的IO大会上,给我们带来了更加详细的Material Design设计规范,同时,也给我们带来了全新的Android Design Support Library,在这个support库里面,Google给我们提供了更加规范的MD设计风格的控件。最重要的是,Android Design Support Library的兼容性更广,直接可以向下兼容到Android 2.2。
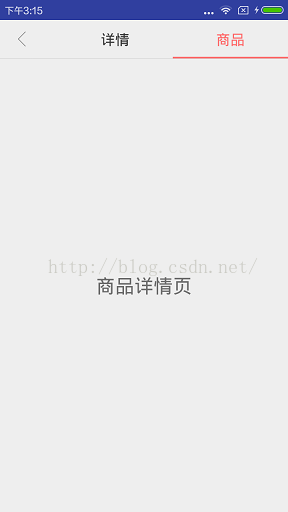
这两天需要做一个仿京东详情的页面,上面的Tab切换,以前都是自己写Viewpager+fragment,或者Indicator的深度定制,一直想尝试一下TabLayout,于是就有了下面的坑。
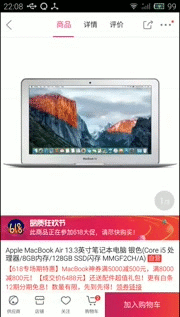
然后下面是我简单的实现效果(个人觉得很坑,还不如自己自定义的导航器)
添加引用库
dependencies {
  compile fileTree(dir: 'libs', include: ['*.jar'])
  compile 'com.android.support:appcompat-v7:24.2.0'
  compile 'com.android.support:design:24.2.0'
  compile 'com.android.support:recyclerview-v7:24.2.0'
  compile 'com.android.support:cardview-v7:24.2.0'
}
Toolbar与TabLayout
我们来看一下实现的布局:
<?xml version="1.0" encoding="utf-8"?>
<LinearLayout xmlns:android="http://schemas.android.com/apk/res/android"
  xmlns:app="http://schemas.android.com/apk/res-auto"
  android:layout_width="match_parent"
  android:layout_height="match_parent"
  android:orientation="vertical">

  <android.support.v7.widget.Toolbar
    android:id="@+id/toolbar"
    android:layout_width="match_parent"
    android:layout_height="48dp"
    android:gravity="center_vertical"
    app:navigationIcon="@drawable/back_icon"
   >

    <LinearLayout
      android:layout_width="match_parent"
      android:layout_height="wrap_content"
      android:gravity="center"
      android:orientation="horizontal">

      <android.support.design.widget.TabLayout
        android:id="@+id/tabLayout"
        android:layout_width="match_parent"
        android:layout_height="match_parent"
        style="@style/style_c7_s20"
        />

    </LinearLayout>

    <TextView
      android:layout_width="wrap_content"
      android:layout_height="wrap_content"
      android:layout_gravity="right"
      android:background="@drawable/more_icon" />

  </android.support.v7.widget.Toolbar>

  <View style="@style/horizontal_line" />

  <android.support.v4.view.ViewPager
    android:id="@+id/viewPager"
    android:layout_width="match_parent"
    android:layout_height="match_parent" />
</LinearLayout>
这布局文件最关键的一点就是android.support.design.widget.TabLayout 标签中的app:tabMode=”scrollable”,他设置tab的模式为“可滑动的”。
其他的用法和Indicator的用法差不多,都需要设置适配器,然后通过数据实现页面的适配。直接上代码
Adapter
public class ProductDetailPagerAdapter extends FragmentPagerAdapter {

  private List<String> mTitles;

  public ProductDetailPagerAdapter(FragmentManager fm, List<String> mTitles) {
    super(fm);
    this.mTitles = mTitles;
  }

  @Override
  public Fragment getItem(int position) {
    if (position == 0) {
      return new ProductFragment();
    } else if (position == 1) {
      return new ProductDetailFragment();
    }
    return new ProductFragment();
  }

  @Override
  public int getCount() {
    return mTitles.size();
  }

  @Override
  public CharSequence getPageTitle(int position) {
    return mTitles.get(position);
  }
}
主页面的相关逻辑,这里的Fragment就是简单的Fragment。
public class ProductDetailsActivity extends BaseActivity {

  @BindView(R.id.viewPager)
  ViewPager viewPager;
  @BindView(R.id.tabLayout)
  TabLayout tabLayout;
  @BindView(R.id.toolbar)
  Toolbar toolbar;

  private TextView tabProduct;
  private TextView tabDetail;

  private List<String> mTitles = null;
  private ProductDetailPagerAdapter productPagerAdapter = null;

  @Override
  protected void onCreate(Bundle savedInstanceState) {
    super.onCreate(savedInstanceState);
    setContentView(R.layout.activity_product_details);
    ButterKnife.bind(this);
    init();
  }

  private void init() {
    initToolbar();
    initViewPager();
  }

  private void initToolbar() {
    setTitle("");
    toolbar.setNavigationOnClickListener(new View.OnClickListener() {
      @Override
      public void onClick(View view) {
        finish();
      }
    });
    initTab();
    initTabChange();
  }

  private void initTabChange() {
    tabLayout.addOnTabSelectedListener(new TabLayout.OnTabSelectedListener() {
      @Override
      public void onTabSelected(TabLayout.Tab tab) {
        viewPager.setCurrentItem(tab.getPosition());
        switch (tab.getPosition()){
          case 0:
            tabProduct.setTextColor(getResources().getColor(R.color.c8));
            tabProduct.setTextSize(18);
            break;

          case 1:
            tabDetail.setTextColor(getResources().getColor(R.color.c8));
            tabDetail.setTextSize(18);
            break;
        }
      }

      @Override
      public void onTabUnselected(TabLayout.Tab tab) {
        tabProduct.setTextColor(getResources().getColor(R.color.c7));
        tabDetail.setTextColor(getResources().getColor(R.color.c7));
      }

      @Override
      public void onTabReselected(TabLayout.Tab tab) {

      }
    });
  }

  private void initTab() {
    tabLayout.setSelectedTabIndicatorColor(getResources().getColor(R.color.c8));
    tabLayout.setSelectedTabIndicatorHeight(UIUtils.dp2px(this, 2));
    tabLayout.setTabTextColors(R.color.c7, R.color.c8);

    tabLayout.addTab(tabLayout.newTab().setCustomView(R.layout.item_detail_tab_product_layout));
    tabProduct= (TextView) findViewById(R.id.tab_product);
    tabProduct.setTextColor(getResources().getColor(R.color.c8));

    tabLayout.addTab(tabLayout.newTab().setCustomView(R.layout.item_detail_tab_detail_layout));
    tabDetail= (TextView) findViewById(R.id.tab_detail);
    tabProduct.setTextColor(getResources().getColor(R.color.c7));

  }

  private void initViewPager() {
    mTitles = new ArrayList<>();
    mTitles.add("商品");
    mTitles.add("详情");
    productPagerAdapter = new ProductDetailPagerAdapter(getSupportFragmentManager(), mTitles);
    viewPager.setAdapter(productPagerAdapter);
    viewPager.addOnPageChangeListener(new ViewPager.SimpleOnPageChangeListener() {
      @Override
      public void onPageSelected(int position) {
        tabLayout.getTabAt(position).select();
      }
    });
  }


  public static void open(Context context) {
    Intent intent = new Intent(context, ProductDetailsActivity.class);
    context.startActivity(intent);
  }
}
我相信很多人看了上面的代码会觉得很麻烦,其实我也觉得,这种虽然可定制高,但是相对于以前的写法,代码丝毫没有减少,我还是建议使用自定义控件,之前有一篇Android万能的指示器,大家可以借鉴借鉴。
以上就是本文的全部内容,希望对大家的学习有所帮助,也希望大家多多支持PHPERZ。