实现Asp.net mvc上传头像加剪裁功能
发布于 2016-06-23 22:03:21 | 400 次阅读 | 评论: 0 | 来源: 网友投递
ASP.NET
ASP.NET 是.NET FrameWork的一部分,是一项微软公司的技术,是一种使嵌入网页中的脚本可由因特网服务器执行的服务器端脚本技术,它可以在通过HTTP请求文档时再在Web服务器上动态创建它们。 指 Active Server Pages(动态服务器页面) ,运行于 IIS(Internet Information Server 服务,是Windows开发的Web服务器)之中的程序 。
这篇文章主要介绍了实现Asp.net mvc上传头像加剪裁功能,需要的朋友可以参考下
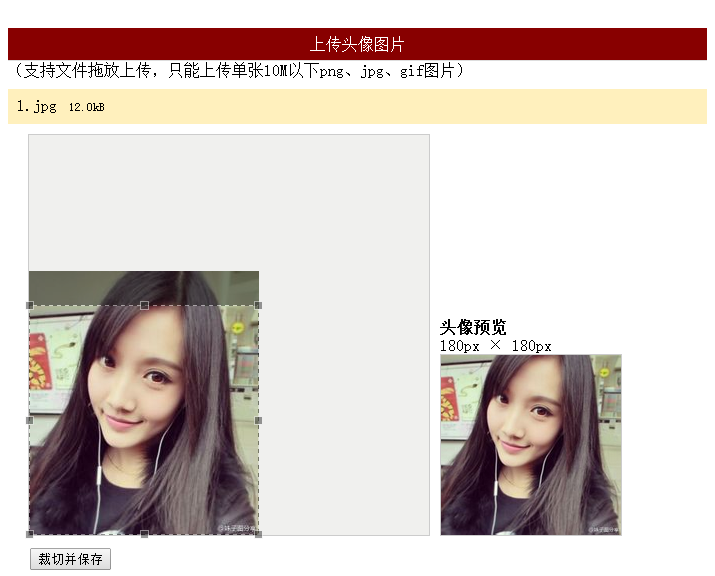
在我们使用QQ上传头像,注册用户账号时是不是都会遇到上传图像,并根据自己的要求对图像进行裁剪,这是怎么实现的呐?
本文主要介绍了Asp.net mvc实现上传头像加剪裁功能,分享给大家供大家参考。具体如下:
运行效果截图如下:
具体代码如下:
前台代码
<link href="~/Content/fineuploader.css" rel="stylesheet" />
<link href="~/Content/jquery.Jcrop.min.css" rel="stylesheet" />
<link href="~/Content/crop.min.css" rel="stylesheet" />
<script src="~/Scripts/jquery-1.8.2.min.js"></script>
<script src="~/Scripts/jquery.fineuploader-3.1.min.js"></script>
<script src="~/Scripts/jquery.Jcrop.min.js"></script>
<script src="~/Scripts/crop.js"></script>

<div id="jquery-wrapped-fine-uploader"></div>
 <div id="message"></div>
 <div id="crop_wrap">
  <div id="crop_holder">
   <div id="crop_area" class="border">
    <img id="crop_image" alt="" src="" class="preview-image" style="display: none" />
   </div>
   <div id="preview_area">
    <div id="preview_title">当前头像</div>
    <div id="preview_large_text" class="preview-text">180px × 180px</div>
    <div id="preview_large_wrap" class="border">
     <img id="preview_large" alt="" src="@ViewBag.Path" class="preview-image" style=""/></div>
   </div>
  </div>
  <div id="crop_operation" style="display: none;">
   <form id="form_crop" action="/home/index" method="post">
    <input type="hidden" name="x" id="x">
    <input type="hidden" name="y" id="y">
    <input type="hidden" name="w" id="w">
    <input type="hidden" name="h" id="h">
    <input type="hidden" name="imgsrc" id="imgsrc">
    <input id="crop_operation_submit" type="submit" value="裁切并保存" /><span id="crop_operation_msg" style="display: none" class="green"></span>
   </form>
  </div>
  <div id="croped_message" class="green"></div>
 </div>
后台代码
public ActionResult Index()
  {
   return View();
  }

  /// <summary>
  /// 保存缩略图
  /// </summary>
  /// <param name="form"></param>
  /// <returns></returns>
  [HttpPost]
  public ActionResult Index(FormCollection form)
  {
   int x = Convert.ToInt32(form["x"]);
   int y = Convert.ToInt32(form["y"]);
   int w = Convert.ToInt32(form["w"]);
   int h = Convert.ToInt32(form["h"]);
   string imgsrc = form["imgsrc"].Substring(0, form["imgsrc"].LastIndexOf("?"));
   string path = ImgHandler.CutAvatar(imgsrc, x, y, w, h);

   //保存Path

   ViewBag.Path = path;
   return View();
  }

  /// <summary>
  /// 上传头像
  /// </summary>
  /// <param name="qqfile"></param>
  /// <returns></returns>
  [HttpPost]
  public ActionResult ProcessUpload(string qqfile)
  {
   try
   {
    string uploadFolder = "/Upload/original/" + DateTime.Now.ToString("yyyyMM") + "/";
    string imgName = DateTime.Now.ToString("ddHHmmssff");
    string imgType = qqfile.Substring(qqfile.LastIndexOf("."));
    string uploadPath = "";
    uploadPath = Server.MapPath(uploadFolder);
    if (!Directory.Exists(uploadPath))
    {
     Directory.CreateDirectory(uploadPath);
    }
    using (var inputStream = Request.InputStream)
    {
     using (var flieStream = new FileStream(uploadPath + imgName + imgType, FileMode.Create))
     {
      inputStream.CopyTo(flieStream);
     }
    }

    return Json(new { success = true, message = uploadFolder + imgName + imgType });
   }
   catch (Exception e)
   {
    return Json(new { fail = true, message = e.Message });
   }
  }
以上就是实现Asp.net mvc上传头像加剪裁功能的部分代码,小编分享给大家参考,希望对大家的学习有所帮助。
推荐阅读
最新资讯