Android自定义View之酷炫数字圆环
发布于 2016-06-19 06:34:02 | 160 次阅读 | 评论: 0 | 来源: 网友投递
Android移动端操作系统
Android是一种基于Linux的自由及开放源代码的操作系统,主要使用于移动设备,如智能手机和平板电脑,由Google公司和开放手机联盟领导及开发。尚未有统一中文名称,中国大陆地区较多人使用“安卓”或“安致”。
这篇文章主要介绍了Android自定义View之酷炫数字圆环,实现效果很酷,值得大家学习,感兴趣的小伙伴们可以参考一下
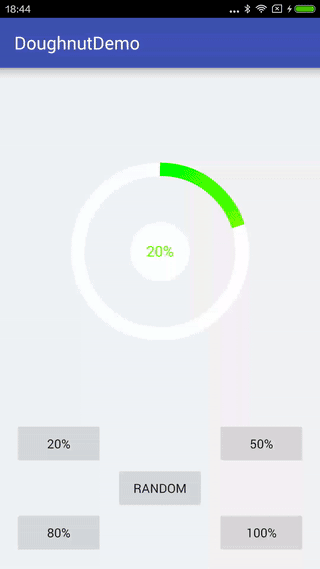
先看下最终的效果
一、开始实现
新建一个DoughnutView继承View
  public class DoughnutView extends View {

  }
先重写onMeasure方法。
 /**
   * 当布局为wrap_content时设置默认长宽
   *
   * @param widthMeasureSpec
   * @param heightMeasureSpec
   */
  @Override
  protected void onMeasure(int widthMeasureSpec, int heightMeasureSpec) {
    setMeasuredDimension(measure(widthMeasureSpec), measure(heightMeasureSpec));
  }

  private int measure(int origin) {
    int result = DEFAULT_MIN_WIDTH;
    int specMode = MeasureSpec.getMode(origin);
    int specSize = MeasureSpec.getSize(origin);
    if (specMode == MeasureSpec.EXACTLY) {
      result = specSize;
    } else {
      if (specMode == MeasureSpec.AT_MOST) {
        result = Math.min(result, specSize);
      }
    }
    return result;
  }
下面就是最重要的重写onDraw方法,大致流程如下
1、画白色圆环(背景),记得改下Activity背景色不然白色圆环看不出来。
 //画背景白色圆环
 initPaint();
 float doughnutWidth = Math.min(width, height) / 2 * 0.15f;
 paint.setStrokeWidth(doughnutWidth);
 paint.setStyle(Paint.Style.STROKE);
 paint.setColor(Color.WHITE);
 paint.setAntiAlias(true);
 RectF rectF = new RectF((width > height ? Math.abs(width - height) / 2 : 0) + doughnutWidth / 2, (height > width ? Math.abs(height - width) / 2 : 0) + doughnutWidth / 2, width - (width > height ? Math.abs(width - height) / 2 : 0) - doughnutWidth / 2, height - (height > width ? Math.abs(height - width) / 2 : 0) - doughnutWidth / 2);
 canvas.drawArc(rectF, 0, 360, false, paint);
2、画彩色圆环
使用SweepGradient来实现圆环渐变的效果,这里有个判断当设置的颜色数组只有一个颜色的时候,直接'setColor',有多个颜色才使用SweepGradient实现渐变色。这样就能既支持渐变色又支持单色。
这里还有一点要注意,SweepGradient默认是从3点钟位置开始渐变的,为了能让它从12点钟位置开始渐变所以将画布旋转了-90°。
 //画彩色圆环
 initPaint();
 canvas.rotate(-90, width / 2, height / 2);
 paint.setStrokeWidth(doughnutWidth);
 paint.setStyle(Paint.Style.STROKE);
 if (doughnutColors.length > 1) {
   paint.setShader(new SweepGradient(width / 2, height / 2, doughnutColors, null));
 } else {
   paint.setColor(doughnutColors[0]);
 }
 canvas.drawArc(rectF, 0, currentValue, false, paint);
3、画中间数值的白色背景(只是为了让数值显示更明显一些)
 //画中间数值的背景
 int fontSize = 50;
 initPaint();
 paint.setStyle(Paint.Style.FILL);
 paint.setColor(Color.WHITE);
 canvas.drawCircle(width / 2, height / 2, fontSize * 2, paint);}
4、画中间数值
 //画中间数值
 canvas.rotate(90, width / 2, height / 2);
 initPaint();
 paint.setColor(ColorUtils.getCurrentColor(currentValue / 360f, doughnutColors));
 paint.setTextSize(fontSize);
 paint.setTextAlign(Paint.Align.CENTER);
 float baseLine = height / 2 - (paint.getFontMetrics().descent + paint.getFontMetrics().ascent) / 2;
 canvas.drawText((int) (currentValue / 360f * 100) + "%", width / 2, baseLine, paint);
这里有两点比较坑:
1、数值的颜色
要实现的效果是让数值的颜色是跟彩色圆环终点的颜色是一样的。寻寻觅觅很久也没有找到获取SweepGradient渲染到某一个角度时颜色的方法=_=
最终花了差不多半天时间写了个颜色渐变算法,代码如下:
 /**
 * 颜色渐变算法
 * 获取某个百分比下的渐变颜色值
 *
 * @param percent
 * @param colors
 * @return
 */
 public static int getCurrentColor(float percent, int[] colors) {
   float[][] f = new float[colors.length][3];
   for (int i = 0; i < colors.length; i++) {
     f[i][0] = (colors[i] & 0xff0000) >> 16;
     f[i][1] = (colors[i] & 0x00ff00) >> 8;
     f[i][2] = (colors[i] & 0x0000ff);
   }
   float[] result = new float[3];
   for (int i = 0; i < 3; i++) {
     for (int j = 0; j < f.length; j++) {
       if (f.length == 1 || percent == j / (f.length - 1f)) {
         result = f[j];
       } else {
         if (percent > j / (f.length - 1f) && percent < (j + 1f) / (f.length - 1)) {
           result[i] = f[j][i] - (f[j][i] - f[j + 1][i]) * (percent - j / (f.length - 1f)) * (f.length - 1f);
         }
       }
     }
   }
   return Color.rgb((int) result[0], (int) result[1], (int) result[2]);
 }
2、数值居中对齐问题
drawText是根据baseLine来定位的。具体可以看下下面两篇文章的分析:文章一、文章二。数字跟文字字母的居中方式可能还略有不同。
二、动画效果的实现
先上代码:
public void setValue(float value) {
ValueAnimator valueAnimator = ValueAnimator.ofFloat(currentValue, value);
valueAnimator.setDuration(300);
valueAnimator.setInterpolator(new Interpolator() {
  @Override
  public float getInterpolation(float v) {
    return 1-(1-v)*(1-v)*(1-v);
  }
});
valueAnimator.addUpdateListener(new ValueAnimator.AnimatorUpdateListener() {
  @Override
  public void onAnimationUpdate(ValueAnimator valueAnimator) {
    currentValue = (float) valueAnimator.getAnimatedValue();
    invalidate();
  }
});
valueAnimator.start();
}
使用ValueAnimator来实现动画效果。还可以设置不同的插值器来实现不同的动画效果:
 valueAnimator.setInterpolator(new AccelerateInterpolator());//加速
  valueAnimator.setInterpolator(new DecelerateInterpolator());//减速
  valueAnimator.setInterpolator(new AccelerateDecelerateInterpolator());//加速减速
  valueAnimator.setInterpolator(new LinearInterpolator());//云速
常用插值器介绍可以看这篇文章。
当然也可以自己实现一个简单的插值器:
valueAnimator.setInterpolator(new Interpolator() {
  @Override
  public float getInterpolation(float v) {
    return 1-(1-v)*(1-v)*(1-v);
  }
});
以上就是本文的全部内容,希望对大家的学习有所帮助。