iOS开发之多表视图滑动切换示例(仿”头条”客户端)
发布于 2015-12-29 05:16:11 | 147 次阅读 | 评论: 0 | 来源: 分享
iOS苹果移动操作系统
苹果iOS是由苹果公司开发的移动操作系统。苹果公司最早于2007年1月9日的Macworld大会上公布这个系统,最初是设计给iPhone使用的,后来陆续套用到iPod touch、iPad以及Apple TV等产品上。
好长时间没为大家带来iOS开发干货的东西了,今天给大家分享一个头条新闻客户端各个类别进行切换的一个示例。在Demo中对所需的组件进行的简单封装,在封装的组件中使用的是纯代码的形式,如果想要在项目中进行使用,稍微进行修改即可。
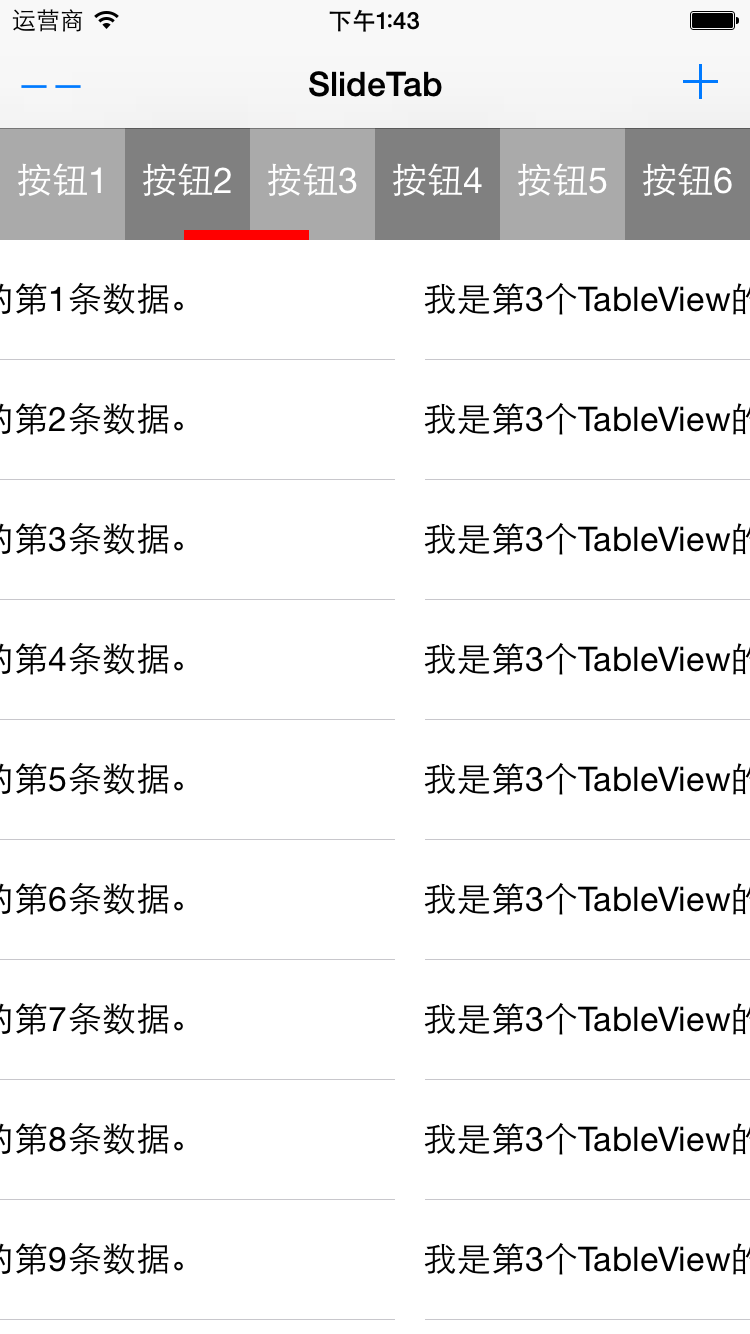
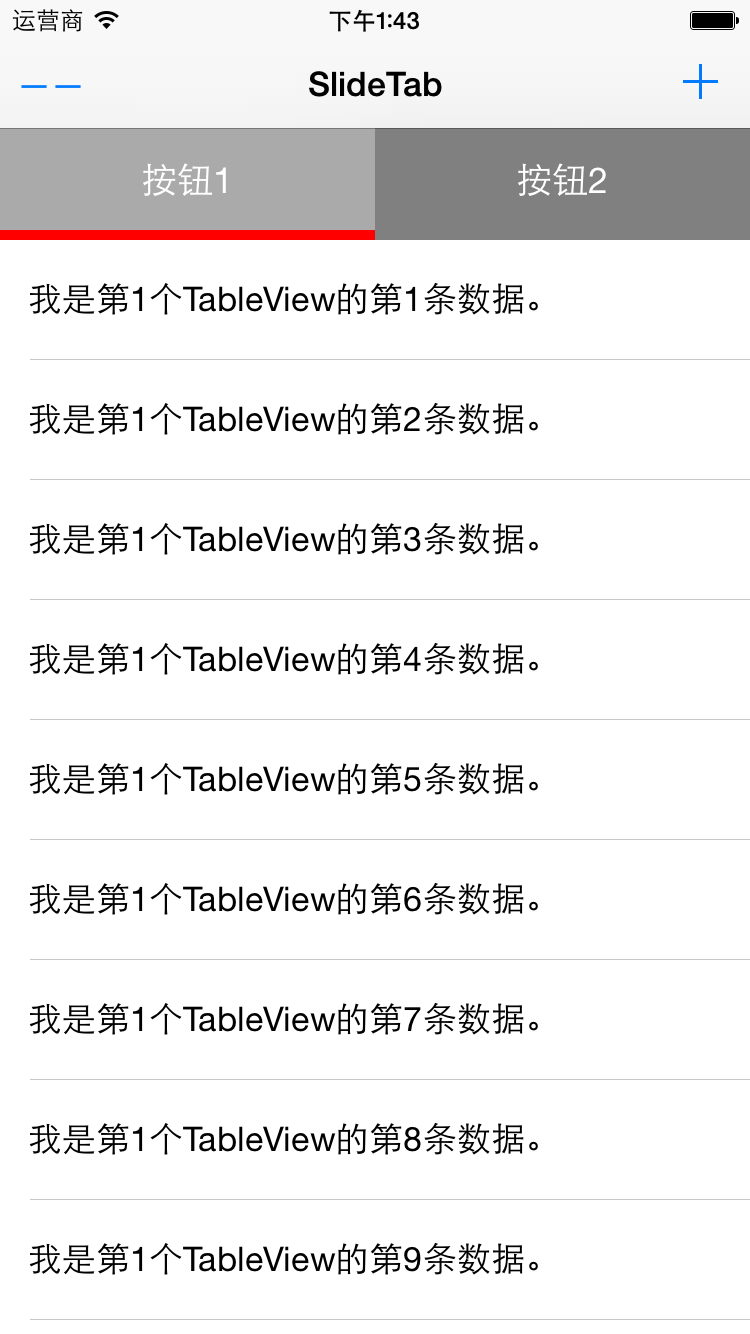
废话少说,先介绍一下功能点,下图是整个Demo的功能点,最上面左边的TabBarButtonItem是用来减少条目的,比如下图有三个按钮,点击减号会减少一个条目。右边的为增加一个条目。点击相应的按钮是切换到对应的表视图上,下方红色的是滑动的指示器,同时支持手势滑动。运行具体效果如下图所示。

一:实现方案
最上方是一个View, View上面实例化了一些按钮,平分屏幕的宽度,下方是一个ScrollView, ScrollView上面放了一些表视图,点击不同的Button, 滑动到对应的表示图上。除了点击按钮,还可以进行滑动切换,切换时,红色的指示器也会随之滑动。
主要的技术点就是通过ScrollView的回调,通过事件的响应来改变ScrollView的ContentOffset的值。在回调中根据ContentOffset的值来计算红色指示器的偏移量。
二:核心代码
1.组件中的主要属性
把上面整个视图进行了封装,命名为SlideTabBarView,下面的代码是主要属性:
  @interface SlideTabBarView() 2 ///@brife 整个视图的大小
  @property (assign) CGRect mViewFrame;

  ///@brife 下方的ScrollView
  @property (strong, nonatomic) UIScrollView *scrollView;

  ///@brife 上方的按钮数组
  @property (strong, nonatomic) NSMutableArray *topViews;

 ///@brife 下方的表格数组
 @property (strong, nonatomic) NSMutableArray *scrollTableViews;

 ///@brife TableViews的数据源
 @property (strong, nonatomic) NSMutableArray *dataSource;

 ///@brife 当前选中页数
 @property (assign) NSInteger currentPage;

 ///@brife 下面滑动的View
 @property (strong, nonatomic) UIView *slideView;
 @end
2.初始化方法如下,在调用初始化方法时需要传入SlideTabBarView的frame和选项卡的个数,初始化函数会调用一系列的初始化方法对组件进行初始化,代码如下:
  -(instancetype)initWithFrame:(CGRect)frame WithCount: (NSInteger) count{
      self = [super initWithFrame:frame];

      if (self) {
          _mViewFrame = frame;
          _tabCount = count;
          _topViews = [[NSMutableArray alloc] init];
          _scrollTableViews = [[NSMutableArray alloc] init];

         [self initDataSource];

         [self initScrollView];

         [self initTopTabs];

         [self initDownTables];

         [self initDataSource];

         [self initSlideView];

     }

     return self;
 }
3.initDataSource方法主要负责模拟生成下方TableView要显示的数据。代码如下:
#pragma mark -- 初始化表格的数据源
-(void) initDataSource{
    _dataSource = [[NSMutableArray alloc] initWithCapacity:_tabCount];

    for (int i = 1; i ) {

        NSMutableArray *tempArray  = [[NSMutableArray alloc] initWithCapacity:20];

        for (int j = 1; j 20; j ++) {

            NSString *tempStr = [NSString stringWithFormat:@"我是第%d个TableView的第%d条数据。", i, j];
            [tempArray addObject:tempStr];
        }

        [_dataSource addObject:tempArray];
    }
}
4.红色滑动指示器的初始化代码如下所示:
#pragma mark -- 初始化滑动的指示View
-(void) initSlideView{
     CGFloat width = _mViewFrame.size.width / _tabCount;
    _slideView = [[UIView alloc] initWithFrame:CGRectMake(0, TOPHEIGHT - 5, width, 5)];
    [_slideView setBackgroundColor:[UIColor redColor]];
    [self addSubview:_slideView];
}
5.ScrollView的初始化代码如下, 指定ScrollView的大小位置以及背景颜色,并且设置分页可用并添加代理。
#pragma mark -- 实例化ScrollView
-(void) initScrollView{
    _scrollView = [[UIScrollView alloc] initWithFrame:CGRectMake(0, _mViewFrame.origin.y, _mViewFrame.size.width, _mViewFrame.size.height - TOPHEIGHT)];
    _scrollView.contentSize = CGSizeMake(_mViewFrame.size.width * _tabCount, _mViewFrame.size.height - 60);
    _scrollView.backgroundColor = [UIColor grayColor];

    _scrollView.pagingEnabled = YES;

    _scrollView.delegate = self;
    [self addSubview:_scrollView];
}
6.添加上方的按钮,根据传入的个数来实例化多个按钮。
  #pragma mark -- 实例化顶部的tab
  -(void) initTopTabs{
      CGFloat width = _mViewFrame.size.width / _tabCount;

      for (int i = 0; i ) {

          UIView *view = [[UIView alloc] initWithFrame:CGRectMake(i * width, 0, width, TOPHEIGHT)];

          view.backgroundColor = [UIColor lightGrayColor];

         if (i % 2) {
             view.backgroundColor = [UIColor grayColor];
         }

         UIButton *button = [[UIButton alloc] initWithFrame:CGRectMake(0, 0, width, TOPHEIGHT)];
         button.tag = i;
         [button setTitle:[NSString stringWithFormat:@"按钮%d", i+1] forState:UIControlStateNormal];
         [button addTarget:self action:@selector(tabButton:) forControlEvents:UIControlEventTouchUpInside];
         [view addSubview:button];

         [_topViews addObject:view];
         [self addSubview:view];
     }
 }
7.点击按钮触发的方法如下:
 #pragma mark --点击顶部的按钮所触发的方法
 -(void) tabButton: (id) sender{
     UIButton *button = sender;
     [_scrollView setContentOffset:CGPointMake(button.tag * _mViewFrame.size.width, 0) animated:YES];
 }
8.初始化下方的多个表视图:实例化表视图,并指定委托回调。
  #pragma mark --初始化下方的TableViews
  -(void) initDownTables{

      for (int i = 0; i ) {

          UITableView *tableView = [[UITableView alloc] initWithFrame:CGRectMake(i * _mViewFrame.size.width, 0, _mViewFrame.size.width, _mViewFrame.size.height - TOPHEIGHT)];
          tableView.delegate = self;
          tableView.dataSource = self;

         [_scrollTableViews addObject:tableView];
         [_scrollView addSubview:tableView];
     }

 }
9.ScrollView的回调方法如下,下面最后一个代理方法是根据ScrollView的偏移量来计算红色指示器的偏移量,第二个是滑动到哪个tableView,然后进行哪个TableView的数据加载。
  #pragma mark -- scrollView的代理方法
  -(void)scrollViewDidEndScrollingAnimation:(UIScrollView *)scrollView{
      [self scrollViewDidEndDecelerating:scrollView];
  }

  - (void)scrollViewDidEndDecelerating:(UIScrollView *)scrollView

  {
      _currentPage = _scrollView.contentOffset.x/_mViewFrame.size.width;

     UITableView *currentTable = _scrollTableViews[_currentPage];
     [currentTable reloadData];

 }

 -(void)scrollViewDidScroll:(UIScrollView *)scrollView{
     if ([_scrollView isEqual:scrollView]) {
         CGRect frame = _slideView.frame;
         frame.origin.x = scrollView.contentOffset.x/_tabCount;
         _slideView.frame = frame;
     }
 }
10.TableView的代理方法如下,数据源就是我们刚才做的假数据,Cell是由Xib实现的,使用的时候注册一下就可用了。
  #pragma mark -- talbeView的代理方法
  -(NSInteger)numberOfSectionsInTableView:(UITableView *)tableView{
      return 1;
  }

  -(NSInteger) tableView:(UITableView *)tableView numberOfRowsInSection:(NSInteger)section{
      NSMutableArray *tempArray = _dataSource[_currentPage];
      return tempArray.count;
  }

 -(CGFloat) tableView:(UITableView *)tableView heightForRowAtIndexPath:(NSIndexPath *)indexPath{
     return 60;
 }

 -(UITableViewCell *)tableView:tableView cellForRowAtIndexPath:(NSIndexPath *)indexPath{

     BOOL nibsRegistered=NO;
     if (!nibsRegistered) {
         UINib *nib=[UINib nibWithNibName:@"SlideBarCell" bundle:nil];
         [tableView registerNib:nib forCellReuseIdentifier:@"SlideBarCell"];
         nibsRegistered=YES;
     }

     SlideBarCell *cell = [tableView dequeueReusableCellWithIdentifier:@"SlideBarCell"];
     if ([tableView isEqual:_scrollTableViews[_currentPage]]) {
          cell.tipTitle.text = _dataSource[_currentPage][indexPath.row];
     }

     return cell;
 }
Demo在GitHub上的分享地址:https://github.com/lizelu/SliderTabBar