iOS开发之多图片无缝滚动组件封装与使用
发布于 2015-12-28 08:15:36 | 165 次阅读 | 评论: 0 | 来源: 分享
iOS苹果移动操作系统
苹果iOS是由苹果公司开发的移动操作系统。苹果公司最早于2007年1月9日的Macworld大会上公布这个系统,最初是设计给iPhone使用的,后来陆续套用到iPod touch、iPad以及Apple TV等产品上。
经常有园友会问”博主,有没有图片无限滚动的Demo呀?”, 正儿八经的图片滚动的Demo我这儿还真没有,今天呢就封装一个可以在项目中直接使用的图片轮播。没看过其他iOS图片无限轮播的代码,也不了解他们的原理,我今天封装这个图片无限轮播是借鉴Web前端中的做法,因为之前写Web前端的时候,实现幻灯片就是这么做的,今天就在iPhone上搞搞。下面的东西是自己写的了,关于轮播的东西这个开源项目也是相当不错的https://github.com/nicklockwood/iCarousel,感兴趣的可以看一下。那是相当的强大,虽然没必要重复造轮子但是原理还是有必要理解的。今天的博客就介绍图片轮播的一种解决方案,下篇博客中在介绍另一种图片轮播的解决方案。
一、Demo运行效果、原理及调用方式
1.运行效果
下面的GIF呢就是Demo的运行效果,一定间隔后,图片会自动切换,当然也支持手指滑动。切换到相应图片时,点击图片,会通过Block回调的方式给出该图片的Index, 在Demo中使用提示框给出Index, 当然在项目中拿到Index你可以做很多事情的,Index就是图片的Tag值,也就是标记着你点击的是那张图片。下图中是三张图片进行轮播。

2.原理
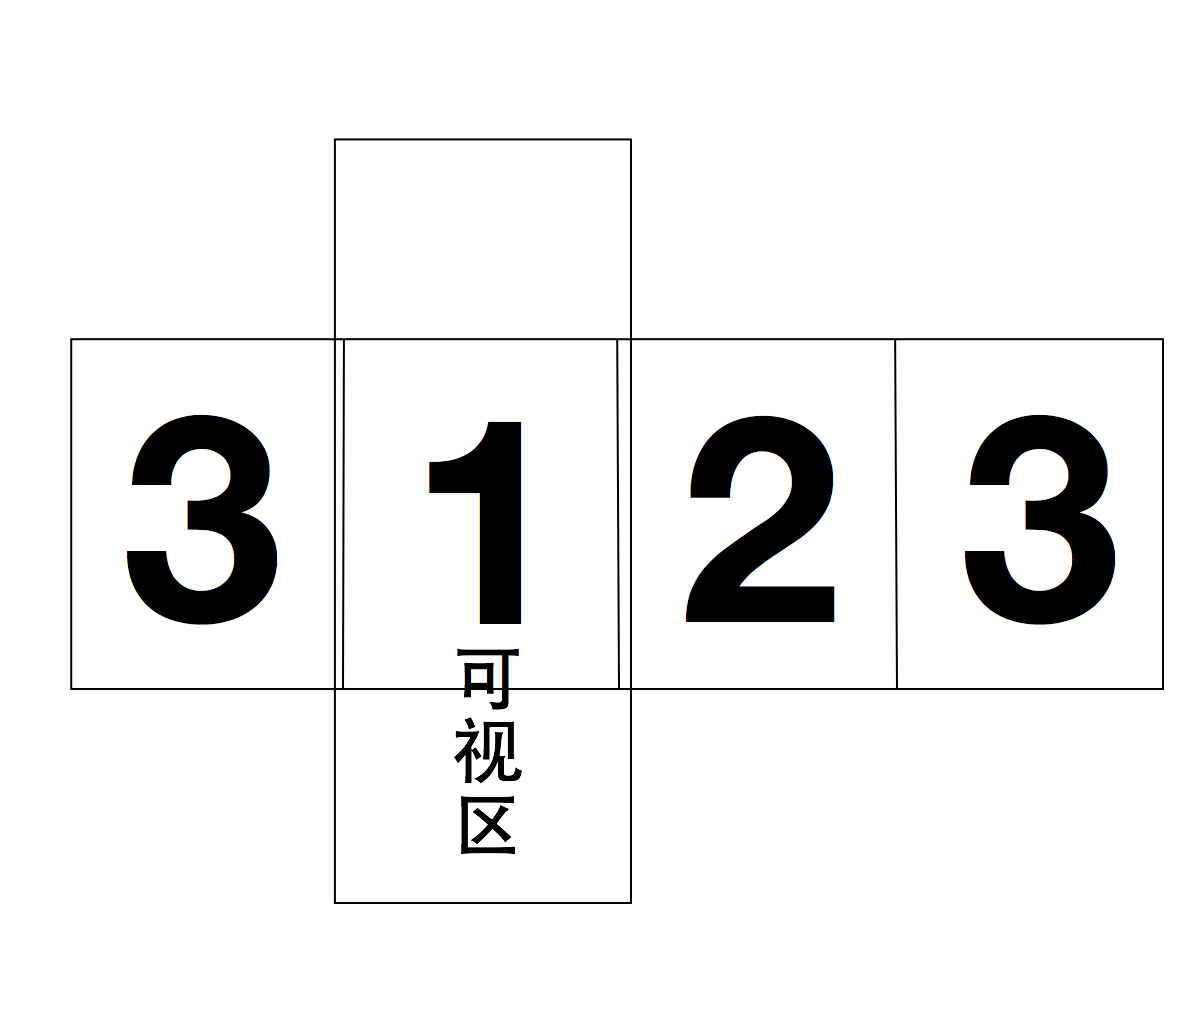
下面是实现图片无限轮播的原理图(借鉴Web前端幻灯片的写法,欢迎大家提出好的解决方案),原理用一句话概括:如果显示3张图片的话,就往ScrollView上贴4张图顺序是3-1-2-3。首次显示1的位置,然后滑动,等滑动到最后一个3时,无动画切换到第一个3的位置,然后在滚动。原理图如下,就可以按着下面的原理图来布局和实例化控件了。
3.组件调用方式
下面这段代码是组件的初始化和属性的设置,分为如下几部:
(1):确定组件的位置
(2):生成图片名字数组
(3):通过便利构造器初始化控件,并传入imageName数组
(4):设置属性(可选), scrollInterval-图片切换间隔,animationInterVale-图片运动时间
(5):addTapEventForImageWithBlock:图片点击后的回调
  -(void) addZLImageViewDisPlayView{

      //获取要显示的位置
      CGRect screenFrame = [[UIScreen mainScreen] bounds];

      CGRect frame = CGRectMake(10, 60, screenFrame.size.width - 20, 200);

      NSArray *imageArray = @[@"01.jpg", @"02.jpg", @"03.jpg"];

     //初始化控件
     ZLImageViewDisplayView *imageViewDisplay = [ZLImageViewDisplayView zlImageViewDisplayViewWithFrame:frame WithImages:imageArray];

     //设定轮播时间
     imageViewDisplay.scrollInterval = 2;

     //图片滚动的时间
     imageViewDisplay.animationInterVale = 0.6;

     //把该视图添加到相应的父视图上
     [self.view addSubview:imageViewDisplay];

     [imageViewDisplay addTapEventForImageWithBlock:^(NSInteger imageIndex) {
         NSString *str = [NSString stringWithFormat:@"我是第%ld张图片", imageIndex];
         UIAlertView *alter = [[UIAlertView alloc] initWithTitle:@"提示" message:str delegate:nil cancelButtonTitle:@"OK" otherButtonTitles:nil, nil];
         [alter show];
     }];

 }
二、核心代码介绍
1.组件的便利初始化方法如下,传入的参数是组件的frame, 和要显示的图片名字数组。在便利初始化方法中初始化一些属性和调用相关初始化方法。初始化内容如下:
  #pragma -- mark 遍历初始化方法
  - (instancetype)initWithFrame: (CGRect)frame
                 WithImages: (NSArray *) images
  {
      self = [super initWithFrame:frame];
      if (self) {
          //获取滚动视图的宽度
          _widthOfView = frame.size.width;

         //获取滚动视图的高度
         _heightView = frame.size.height;

         _scrollInterval = 3;

         _animationInterVale = 0.7;

         //当前显示页面
         _currentPage = 1;

         _imageViewcontentModel = UIViewContentModeScaleAspectFill;

         self.clipsToBounds = YES;

         //初始化滚动视图
         [self initMainScrollView];

         //添加ImageView
         [self addImageviewsForMainScrollWithImages:images];

         //添加timer
         [self addTimerLoop];

         [self addPageControl];

     }
     return self;
 }
2.便利构造器
为我们的组件添加上便利构造器,便利构造器当然是类方法了,传的参数和便利初始化方法一样,该方法主要就是类的初始化,然后调用便利初始化方法, 并返回类的对象。代码如下:
#pragma -- 便利构造器
+ (instancetype) zlImageViewDisplayViewWithFrame: (CGRect) frame
                                      WithImages: (NSArray *) images{
    ZLImageViewDisplayView *instance = [[ZLImageViewDisplayView alloc] initWithFrame:frame WithImages:images];
    return instance;
}
3.初始化ScrollView
往我们自定义组件视图上添加ScrollView, ScrollView的的大小和我们自定义组件的大小一样,并且设置相关属性,设置代理方法,代码如下:
  #pragma -- mark 初始化ScrollView
  - (void) initMainScrollView{

      _mainScrollView = [[UIScrollView alloc] initWithFrame:CGRectMake(0, 0, _widthOfView, _heightView)];

      _mainScrollView.contentSize = CGSizeMake(_widthOfView, _heightView);

      _mainScrollView.pagingEnabled = YES;

     _mainScrollView.showsHorizontalScrollIndicator = NO;

     _mainScrollView.showsVerticalScrollIndicator = NO;

     _mainScrollView.delegate = self;

     [self addSubview:_mainScrollView];
 }
4.添加PageControl
初始化PageControl, 配置相关属性,并添加到我们的自定义组件上,代码如下:
  #pragma 添加PageControl
  - (void) addPageControl{
      _imageViewPageControl = [[UIPageControl alloc] initWithFrame:CGRectMake(0, _heightView - 20, _widthOfView, 20)];

      _imageViewPageControl.numberOfPages = _imageViewArray.count;

      _imageViewPageControl.currentPage = _currentPage - 1;

      _imageViewPageControl.tintColor = [UIColor blackColor];

     [self addSubview:_imageViewPageControl];
 }
5.添加ImageView和Image
往ScrollView上添加ImageView和Image, 下面这个方法也是核心代码,我们根据是第几张图片来计算图片的Frame进行布局,每张图片的大小就是我们组件的大小,根据上面原理的介绍,ScrollView上的第一张图片和最后一张图片一样,你想显示的第一张图片放到ScrollView上的第二张,并改变Scollview的Contentoffset显示ScrollView上的第二张图片,代码如下:
  #pragma -- mark 给ScrollView添加ImageView
  -(void) addImageviewsForMainScrollWithImages: (NSArray *) images{
      //设置ContentSize
      _mainScrollView.contentSize = CGSizeMake(_widthOfView * (images.count+1), _heightView);

      _imageViewArray = images;

      for ( int i = 0; i 1; i ++) {

         CGRect currentFrame = CGRectMake(_widthOfView * i, 0, _widthOfView, _heightView);

         UIImageView *tempImageView = [[UIImageView alloc] initWithFrame:currentFrame];

         tempImageView.contentMode = _imageViewcontentModel;

         tempImageView.clipsToBounds = YES;

         NSString *imageName;

         if (i == 0) {
             imageName = [_imageViewArray lastObject];
         } else {
             imageName = _imageViewArray[i - 1];
         }

         UIImage *imageTemp = [UIImage imageNamed:imageName];
         [tempImageView setImage:imageTemp];

         [_mainScrollView addSubview:tempImageView];
     }

     _mainScrollView.contentOffset = CGPointMake(_widthOfView, 0);

 }
6.添加定时器
想让图片自己动起来,是少不了定时器的,为我们的组件添加定时器,下面的方法就是初始化定时器方法:
 - (void) addTimerLoop{

     if (_timer == nil) {
         _timer = [NSTimer scheduledTimerWithTimeInterval:_scrollInterval target:self selector:@selector(changeOffset) userInfo:nil repeats:YES];
     }
 }
7.定时器执行的方法
下面的方法就是定时器执行的方法,当时间到时,自动改变ScrollView的ContentOffset.x的值,有动画的切换到下一张图片。如果目前是最后一张图片则无动画的切换到ScrollView的第一张图片,因为第一张图片和最后一张图片是一样的,所以用户看不到这个无动画的切换,切换后,图片有开始从第一个开始滚动,所以就可以无限循环的滚动了,下面也是核心代码:
  -(void) changeOffset{

      _currentPage ++;

      if (_currentPage == _imageViewArray.count + 1) {
          _currentPage = 1;
      }

      [UIView animateWithDuration:_animationInterVale animations:^{
         _mainScrollView.contentOffset = CGPointMake(_widthOfView * _currentPage, 0);
     } completion:^(BOOL finished) {
         if (_currentPage == _imageViewArray.count) {
             _mainScrollView.contentOffset = CGPointMake(0, 0);
         }
     }];

      _imageViewPageControl.currentPage = _currentPage - 1;

 }
8.手动切换
上面介绍的是使用NSTimer来实现自动切换,那么如何让组件支持手动切换呢? 要支持手动切换就得在我们ScrollView的回调中进行处理了。在用户手动滑动后的方法中去做我们要做的事情,也就是判断是不是最后一张图片,然后在暂停一下定时器即可,对应的回调方法如下:
  - (void)scrollViewDidEndDecelerating:(UIScrollView *)scrollView{
      NSInteger currentPage = scrollView.contentOffset.x / _widthOfView;

      if(currentPage == 0){
          _mainScrollView.contentOffset = CGPointMake(_widthOfView * _imageViewArray.count, 0);
          _imageViewPageControl.currentPage = _imageViewArray.count;
          _currentPage = _imageViewArray.count;
      }

     if (_currentPage + 1 == currentPage || currentPage == 1) {
         _currentPage = currentPage;

         if (_currentPage == _imageViewArray.count + 1) {
             _currentPage = 1;
         }

         if (_currentPage == _imageViewArray.count) {
             _mainScrollView.contentOffset = CGPointMake(0, 0);
         }

         _imageViewPageControl.currentPage = _currentPage - 1;
         [self resumeTimer];
         return;
     }

 }
9.暂停定时器
手动滑动后要暂停定时器一段时间,因为不暂停的话,你手动切换完,有时会立刻切换到下一张图片,下面是暂停定时器的方法,然后在过一段时间后自动激活定时器。方法如下
  #pragma 暂停定时器
  -(void)resumeTimer{

      if (![_timer isValid]) {
          return ;
      }

      [_timer setFireDate:[NSDate dateWithTimeIntervalSinceNow:_scrollInterval-_animationInterVale]];

 }
经过上面的这些代码组件就可以被调用了,你的图片就可以使用了,最后在给出该组件留出的对外接口:
  //
  //  ZLImageViewDisplayView.h
  //  ZLImageViewDisplay
  //
  //  Created by Mr.LuDashi on 15/8/14.
  //  Copyright (c) 2015年 ludashi. All rights reserved.
  //

  #import 10
 //点击图片的Block回调,参数当前图片的索引,也就是当前页数
 typedef void(^TapImageViewButtonBlock)(NSInteger imageIndex);

 @interface ZLImageViewDisplayView : UIView

 //切换图片的时间间隔,可选,默认为3s
 @property (nonatomic, assign) CGFloat scrollInterval;

 //切换图片时,运动时间间隔,可选,默认为0.7s
 @property (nonatomic, assign) CGFloat animationInterVale;

 /**********************************
  *功能:便利构造器
  *参数:滚动视图的Frame, 要显示图片的数组
  *返回值:该类的对象
  **********************************/
 + (instancetype) zlImageViewDisplayViewWithFrame: (CGRect) frame
                                       WithImages: (NSArray *) images;

 /**********************************
  *功能:便利初始化函数
  *参数:滚动视图的Frame, 要显示图片的数组
  *返回值:该类的对象
  **********************************/
 - (instancetype)initWithFrame: (CGRect)frame
                    WithImages: (NSArray *) images;

 /**********************************
  *功能:为每个图片添加点击时间
  *参数:点击按钮要执行的Block
  *返回值:无
  **********************************/
 - (void) addTapEventForImageWithBlock: (TapImageViewButtonBlock) block;

 @end
三.组件和Demo分享
下面给出了Demo和组件在GitHub上的分享地址:
https://github.com/lizelu/ZLImageViewDisplay
上面的Demo是图片轮播的解决方案之一,下篇博客会使用两个ImageView复用的形式来实现图片的无限轮播的解决方案。Demo写的比较着急,难免会有纰漏的地方,望大家批评指正。