Laravel 5.1 Ajax上传图片示例
发布于 2015-12-23 04:28:17 | 644 次阅读 | 评论: 0 | 来源: PHPERZ
这里有新鲜出炉的Laravel 快速入门,程序狗速度看过来!
Laravel PHP Web开发框架
Laravel是一套简洁、优雅的PHP Web开发框架(PHP Web Framework)。它可以让你从面条一样杂乱的代码中解脱出来;它可以帮你构建一个完美的网络APP,而且每行代码都可以简洁、富于表达力。
最近在做的项目基于Laravel 5.1开发,需要用到Ajax上传,查了些资料,自己整理了下可用的方法。
控制器:
UploadController.php
<?php

namespace App\Http\Controllers\Admin;

use App\Http\Requests;
use App\Http\Controllers\Controller;
use YuanChao\Editor\EndaEditor;
use Redirect, Input, Response;

class UploadController extends Controller
{

    //Ajax上传图片
    public function imgUpload()
    {
        $file = Input::file('file');
        $id = Input::get('id');
        $allowed_extensions = ["png", "jpg", "gif"];
        if ($file->getClientOriginalExtension() && !in_array($file->getClientOriginalExtension(), $allowed_extensions)) {
            return ['error' => 'You may only upload png, jpg or gif.'];
        }

        $destinationPath = 'uploads/images/';
        $extension = $file->getClientOriginalExtension();
        $fileName = str_random(10).'.'.$extension;
        $file->move($destinationPath, $fileName);
        return Response::json(
            [
                'success' => true,
                'pic' => asset($destinationPath.$fileName),
                'id' => $id
            ]
        );
    }
}
模板:
upload_img.blade.php
<!-- 上传图片div /S-->
<div class="upload-mask">
</div>
<div class="panel panel-info upload-file">
    <div class="panel-heading">
        上传图片
        <span class="close pull-right">关闭</span>
    </div>
    <div class="panel-body">
        <div id="validation-errors"></div>
        {!! Form::open( array('url' =>['/admin/upload_img'], 'method' => 'post', 'id'=>'imgForm', 'files'=>true) ) !!}
        <div class="form-group">
            <label>图片上传</label>
            <span class="require">(*)</span>
            <input id="thumb" name="file" type="file"  required="required">
            <input id="imgID"  type="hidden" name="id" value="">

        </div>
        {!!Form::close()!!}
    </div>
    <div class="panel-footer">
    </div>
</div>

<!-- 上传图片div /E-->
CSS :
.thumb-wrap{
    overflow: hidden;
}
.thumb-wrap img{
    margin-top: 10px;
}
.pic-upload{
    width: 100%;
    height: 34px;
    margin-bottom: 10px;
}
#thumb-show{
    max-width: 100%;
    max-height: 300px;
}
.upload-mask{
    position: fixed;
    top:0;
    left: 0;
    width: 100%;
    height: 100%;
    background: rgba(0,0,0,.4);
    z-index: 1000;
}
.upload-file .close{
    cursor: pointer;
    font-size: 14px;
}

.upload-file{
    position: absolute;
    top: 50%;
    left: 50%;
    margin-top: -105px;
    margin-left: -150px;
    max-width: 300px;
    z-index: 1001;
    display: none;
}

.upload-mask{
    display: none;
}
JS:
需要jQuery库 和jQuery.form.js
$(function(){
    //上传图片相关

    $('.upload-mask').on('click',function(){
        $(this).hide();
        $('.upload-file').hide();
    })

    $('.upload-file .close').on('click',function(){
        $('.upload-mask').hide();
        $('.upload-file').hide();
    })

    var imgSrc = $('.pic-upload').next().attr('src');
    console.log(imgSrc);
    if(imgSrc == ''){
        $('.pic-upload').next().css('display','none');
    }
    $('.pic-upload').on('click',function(){
        $('.upload-mask').show();
        $('.upload-file').show();
        console.log($(this).next().attr('id'));
        var imgID = $(this).next().attr('id');
        $('#imgID').attr('value',imgID);
    })


    //ajax 上传
    $(document).ready(function() {
        var options = {
            beforeSubmit:  showRequest,
            success:       showResponse,
            dataType: 'json'
        };
        $('#imgForm input[name=file]').on('change', function(){
            //$('#upload-avatar').html('正在上传...');
            $('#imgForm').ajaxForm(options).submit();
        });
    });

    function showRequest() {
        $("#validation-errors").hide().empty();
        $("#output").css('display','none');
        return true;
    }

    function showResponse(response)  {
        if(response.success == false)
        {
            var responseErrors = response.errors;
            $.each(responseErrors, function(index, value)
            {
                if (value.length != 0)
                {
                    $("#validation-errors").append('<div class="alert alert-error"><strong>'+ value +'</strong><div>');
                }
            });
            $("#validation-errors").show();
        } else {

            $('.upload-mask').hide();
            $('.upload-file').hide();
            $('.pic-upload').next().css('display','block');

            console.log(response.pic);

            $("#"+response.id).attr('src',response.pic);
            $("#"+response.id).next().attr('value',response.pic);
        }
    }

})
路由:
//图片上传
Route::post('upload_img','UploadController@imgUpload');
现在需要在模板中include 上传图片模板
(我的放在admin目录下的common目录下,根据自己放的位置更改)
@include('admin.common.upload_img')
现在我在create.blade.php中使用
<div class="form-group row">
    <label class="col-md-2 control-label">缩略图</label>
   <div class="col-md-4 thumb-wrap">
   <div class="pic-upload btn btn-block btn-info btn-flat" title="点击上传">点击上传</div>
     <img id="logo" src="">
        <input type="hidden" name="logo" value="">
   </div>
</div>
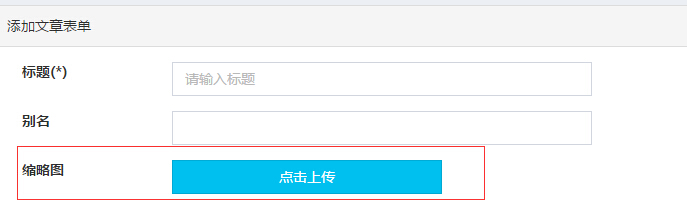
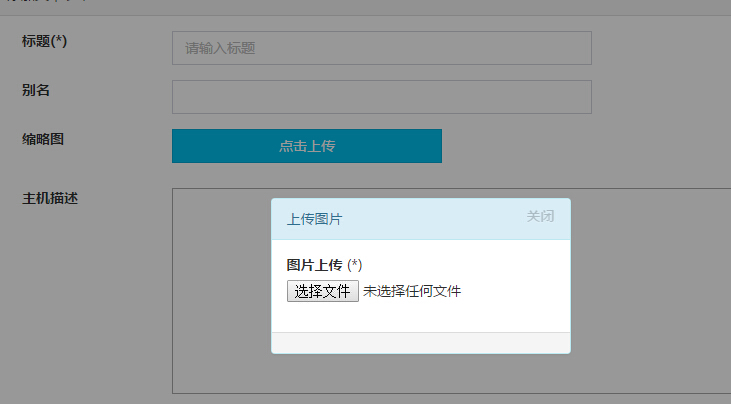
效果如下图:
1.未上传状态
2.点击上传
3.上传完成

推荐阅读
最新资讯