Centos 6下oracle10g数据库安装教程
发布于 2014-12-08 08:04:37 | 649 次阅读 | 评论: 0 | 来源: PHPERZ
Oracle关系数据库管理系统
Oracle Database,又名Oracle RDBMS,或简称Oracle。是甲骨文公司的一款关系数据库管理系统。到目前仍在数据库市场上占有主要份额。
本文为大家讲解的是Centos 6下安装oracle10g数据库教程,感兴趣的同学参考下。
Oracle Database,又名Oracle RDBMS,或简称Oracle。是甲骨文公司的一款关系数据库管理系统。到目前仍在数据库市场上占有主要份额。
一、安装流程
1、 最小安装Centos6.6虚拟机(虚拟机系统推荐Virtualbox https://www.virtualbox.org ),Centos6镜像地址 http://mirrors.163.com/centos/6.6/isos/x86_64/CentOS-6.6-x86_64-minimal.iso
- CPU: 2
- MEM: 2G
- DISK: >=20G (创建固定大小的虚拟硬盘文件能提高安装速度)
- 分区时选最上面的 Use All Space
- 手工指定主机名、分配IP地址
2、安装桌面环境和依赖包,关闭防火墙和SELINUX
[root@centos6 ~]# yum groupinstall "Desktop" "X Window System" && yum install wget binutils compat-libstdc++-33 compat-libstdc++-33.i686 elfutils-libelf elfutils-libelf-devel gcc gcc-c++ glibc glibc.i686 glibc-common glibc-devel glibc-devel.i686 glibc-headers ksh libaio libaio.i686 libaio-devel libaio-devel.i686 libgcc libgcc.i686 libstdc++ libstdc++.i686 libstdc++-devel make sysstat libXp libXp.i686 libXt libXt.i686 libXtst libXtst.i686
[root@centos6 ~]#
[root@centos6 ~]# chkconfig iptables off
[root@centos6 ~]#
[root@centos6 ~]# vi /etc/sysconfig/selinux
SELINUX=permissive
3、上传环境设置脚本(见文章末尾),编辑变量部分,数值必须与本机相符。核查无误后,运行环境设置脚本(因为脚本没有做容错,所以只能运行一次),环境设置脚本会提示如下错误,忽略。重启系统。
error: "net.bridge.bridge-nf-call-ip6tables" is an unknown key
error: "net.bridge.bridge-nf-call-iptables" is an unknown key
error: "net.bridge.bridge-nf-call-arptables" is an unknown key
4、重启后,把学习用的Oracle10g安装包复制到/tmp,解压缩
[root@centos6 ~]# cd /tmp
[root@centos6 tmp]# gunzip Oracle10g-10201-Linux-X64.cpio.gz
[root@centos6 tmp]# cpio -idmv < Oracle10g-10201-Linux-X64.cpio
5、以orausr用户登录控制台,运行 startx 启动桌面,终端里运行 /tmp/database/runInstaller 安装Oracle10g。以下选择仅供参考:
- 选择Advanced Installation
- 仔细核查安装目录是否跟脚本一致
- 选择Enterprise Edition,选择Product Languages,增加 Simplified Chinese
- Name推荐跟主机名一致,再次核查安装目录
- 等待自检依赖项,完毕后点Next
- 选择Create a database
- 选择General Purpose
- Global Database Name、SID可以不动,选择Database Character Set 为 Unicode standard UTF-8 AL32UTF8,选择Create database with sample schemas
- 点Next
- 选择File System,核查数据文件位置
- 选择Do not enable Automatic backups
- 选择Use the same password for all the accounts,输入密码,需要字母开头,大小写数字结合
- 点Install
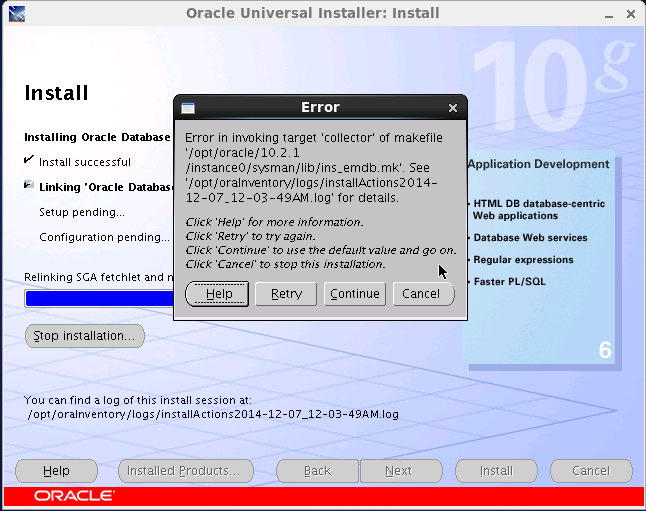
- 忽略报错,点 Continue
- 点OK
- 以root身份运行完两个脚本后,点OK
中间会出现一个编译错误,Error in invoking target 'collector' of makefile '/opt/oracle/10.2.1/instance0/sysman/lib/ins_emdb.mk'. 可以点“Continue”忽略。
6、安装结束时,runInstaller会提示在root终端窗口运行两个脚本 orainstRoot.sh,root.sh,照做就行,接着完成Installer里面的操作,重启服务器。
如果安装失败,重新安装之前需要删除安装目录和一些文件
/opt/oracle/*
/opt/oraInventory/*
/etc/oratab
/usr/local/bin/* (新装系统这里只有3个Oracle程序,不会有其他文件)
二、使用Oracle
1、启动
[orausr@centos6 ~]$ emctl start dbconsole
[orausr@centos6 ~]$ lsnrctl start
[orausr@centos6 ~]$ dbstart $ORACLE_HOME
emctl start dbconsole启动时间很长,要耐心。
第一次手工运行dbstart会报错,需要修改dbstart脚本。嗯,oracle有个工程师叫vikrkuma,他写脚本有点儿马虎。。。
[orausr@centos6 ~]$ vi $ORACLE_HOME/bin/dbstart
ORACLE_HOME_LISTNER=/ade/vikrkuma_new/oracle  替换为 ORACLE_HOME_LISTNER=$ORACLE_HOME
2、访问
sqlplus访问:
[orausr@centos6 ~]$ sqlplus /nolog
SQL> conn /as sysdba
SQL> startup
SQL> show linesize;
linesize 80
SQL> set linesize 160;
SQL> select * from scott.emp;

     EMPNO ENAME      JOB           MGR HIREDATE        SAL       COMM     DEPTNO
---------- ---------- --------- ---------- --------- ---------- ---------- ----------
      7369 SMITH      CLERK          7902 17-DEC-80        800            20
      7499 ALLEN      SALESMAN          7698 20-FEB-81       1600        300       30
      7521 WARD       SALESMAN          7698 22-FEB-81       1250        500       30
      7566 JONES      MANAGER          7839 02-APR-81       2975            20
      7654 MARTIN     SALESMAN          7698 28-SEP-81       1250       1400       30
      7698 BLAKE      MANAGER          7839 01-MAY-81       2850            30
      7782 CLARK      MANAGER          7839 09-JUN-81       2450            10
      7788 SCOTT      ANALYST          7566 19-APR-87       3000            20
      7839 KING       PRESIDENT        17-NOV-81       5000            10
      7844 TURNER     SALESMAN          7698 08-SEP-81       1500      0       30
      7876 ADAMS      CLERK          7788 23-MAY-87       1100            20

     EMPNO ENAME      JOB           MGR HIREDATE        SAL       COMM     DEPTNO
---------- ---------- --------- ---------- --------- ---------- ---------- ----------
      7900 JAMES      CLERK          7698 03-DEC-81        950            30
      7902 FORD       ANALYST          7566 03-DEC-81       3000            20
      7934 MILLER     CLERK          7782 23-JAN-82       1300            10

14 rows selected.

SQL>
SQL> create user jerry identified by password123;
SQL> grant create session to jerry;
SQL> conn jerry/password123
SQL> show user;
OEM Web管理(需要先在sqlplus运行startup后才能正常):
http://192.168.122.2:1158/em
三、环境设置脚本
ins-c6-10g.sh
#!/bin/bash
#script for Oracle10g installation on Centos6.6
#Change the following variables for your installation.
local_ip="192.168.122.2"
host_name="centos6"
host_name_fqdn="centos6.localdomain"
oracle_user="orausr"
oracle_user_password="mysql"
oracle_base="/opt/oracle"
oracle_home="/opt/oracle/10.2.1/instance0"
oracle_data="/opt/oracle/data"
oracle_data_recoveryarea="/opt/oracle/data_recover"
oracle_inventory="/opt/oraInventory"
oracle_sid="centos6"
#Change the above variables for your installation.

echo "${local_ip} ${host_name} ${host_name_fqdn}" >>/etc/hosts

groupadd -g 500 oinstall
groupadd -g 501 dba
groupadd -g 502 oper
useradd ${oracle_user}
echo ${oracle_user_password}|passwd --stdin ${oracle_user}
usermod -g oinstall -G dba ${oracle_user}

mkdir -p ${oracle_base}
mkdir -p ${oracle_data}
mkdir -p ${oracle_data_recoveryarea}
mkdir -p ${oracle_home}
mkdir -p ${oracle_inventory}
chown -R ${oracle_user}:oinstall ${oracle_base}
chmod -R 755 ${oracle_base}
chmod -R g+s ${oracle_base}
chown -R ${oracle_user}:oinstall ${oracle_inventory}
chmod -R 755 ${oracle_inventory}
chmod -R g+s ${oracle_inventory}

sysctl_value="
kernel.sem = 250 32000 100 128
fs.file-max = 65536
kernel.shmall = 2097152
kernel.shmmax = 1054525444
kernel.shmmni = 4096
net.ipv4.ip_local_port_range = 1024 65000
net.core.rmem_default = 262144
net.core.rmem_max = 262144
net.core.wmem_default = 262144
net.core.wmem_max = 262144
vm.hugetlb_shm_group = 501
"
/bin/cp /etc/sysctl.conf /etc/sysctl.conf.bak
echo -e "${sysctl_value}" >> /etc/sysctl.conf
sysctl -p

limits_value="
${oracle_user}  soft    nofile  1024
${oracle_user}  hard    nofile  65536
${oracle_user}  soft    nproc   2047
${oracle_user}  hard    nproc   16384
"
/bin/cp /etc/security/limits.conf /etc/security/limits.conf.bak
echo -e "${limits_value}" >> /etc/security/limits.conf

bash_profile_value="
umask 022
ORACLE_BASE=${oracle_base}
ORACLE_SID=${oracle_sid}
ORACLE_HOME=${oracle_home}
ORACLE_UNQNAME=${oracle_sid}
export ORACLE_BASE ORACLE_SID ORACLE_HOME ORACLE_UNQNAME
PATH=$PATH:${oracle_home}/bin
export PATH
"
/bin/cp /home/${oracle_user}/.bash_profile /home/${oracle_user}/.bash_profile.bak
echo -e "${bash_profile_value}" >> /home/${oracle_user}/.bash_profile


/bin/cp /etc/redhat-release /root/redhat-release.bak
echo "redhat4" > /etc/redhat-release

echo
echo "All prepared! Restart the system and then run Oracle Installer in linux GUI."
注:以上环境中的变量,路经等,要根据自己系统的不同而改变,参考时大家要注意。